Ref : Revell #03093
Live Resin #LRE-35241 FLW 200 with M2 .50MG on high turret
Djiti Productions #35027 Wheels for GTK Boxer
Eureka XXL # ER-3548 Towing cable for GTK Boxer

The gepanzerte Transportkraftfahrzeug (GTK) Boxer is rooted in a German project at the beginning of the 1990s. France then the United Kingdom joined the project in 1993 and 1996. But as soon as 1999, France withdrew to develop the VBCI. Germany and the United Kingdom created the consortium ARTEC and in 2001 the Netherlands rejoined the project. In 2004, the United Kingdom finally withdrew from it.
The first prototype was issued in December 2002 and a Dutch command vehicle prototype was issued in October 2003. In 2006, an order was placed for 272 Boxer for the German army and 200 for the Dutch army. In 2007, the requirement for a remote weapon station further delayed the delivery of production vehicles.
In 2010, the two first production vehicles were issued to the German infantry school.
The characteristic of the Boxer is its modular design. The driving module is common to all the versions and accomodates the mission module. The mission modules currently are as follows : section transport vehicle, command vehicle and ambulance. A driver training vehicle also exists.
The A1 version of the Boxer GTFz (Gruppentransportfahrzeug) mainly differs from the original A0 by the addition of mine-protection plates, the integration of an electronic counter-measures system, the raise of the FLW 200 by 30 cm and the move of the smoke grenades dischargers from the roof to the front of the FLW 200.
The Boxer A1 saw action in Afghanistan
as soon as 2011. It has a crew of three and can carry 7 infantry soldiers. It is
armed with the FLW 200 RWS which can mount either a 0.50 M2 HB MG or a Heckler
and Koch 40 mm automatic grenade launcher.
The Boxer will progressively replace the TPz Fuchs and some M113 variants.
The content
The Revell kit represents the la GTFz Boxer A1 version. In the box you get 7 dark green plastic sprues, 1 clear parts sprues, 8 vinyl tires, 1 soft vinyl sprue, 1 decal sheet allowing four German decorations and the instruction booklet with the usual metal wire length.
The level of detail is quite basic and generally simplified. Some parts are molded solid when then should be hollow. The molding is acceptable but there are some heat sinks on the left side bin for example. My sample came with some large parts warped. The molding lines are rather thin but a bit larger on some parts of the running gear and suspension. Some ejection pinmarks are visible, particularly on the driver hatch. The clear parts are good for the vision blocks but the various mirrors are poorly designed.
The build
It begins with the driving module and is divided into 48 steps in all. The module is made of five main parts: two sides, the floor, the front plate and the vertical wall. The assembly is easy. Steps 3 and 4 are dedicated to the driver compartment.
The bulk of the job comes with step 5 and the suspension. You need to clean the molding lines which are sometimes large as on the spring absorbers. From step 10, be careful of the part numbers as Revell made a number of mistakes in the instructions. At steps 10 and 11, reverse parts B8 and B9. At steps 12 and 15, reverse parts C17 and C18. At steps 13 and 16, reverse parts B6 and B7.
At step 18, paint the headlights before gluing the protection glass. Revell molded the headlights falt whereas they should be semi-spherical. They could be replaced by some SKP lenses.
At step 20, the exhaust rubber flaps are
issued as a thick vinyl part. They could be redone in thinner plastic card.
Likewise the rear mud flaps are the same too thick vinyl. Revell proposes to fold
them (as on the actual vehicle) but this only would give a non realistic
thickness.
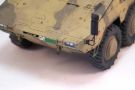
If you don't intend to use the towing hooks, you need to drill out the towing
eyes at steps 24 and 25.
Step 36 is the last concerning the driving module and is dedicated to the wheels assembly and the various mirrors supports. Personally, I decided to use Djiti wheels which are finer but to keep them until the weathering is done. Concerning the mirrors, I only used the rear view mirrors as seen on many Afghanistan pictures. They are glued only after the painting is complete.
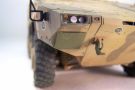
The mission module assembly starts with
the RWS. It is extremely simplified detail wise and is not accurate. I replaced
it by the Live Resin reference (see the review
here). Revell gives
the two possible weapons, 40 mm AGL and 0.50 HMG.
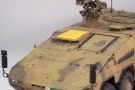
At step 43, build the module with the floor, the both sides and the front and
rear walls. The roof is to be glued at the following step. Before this, you need
to redo and add some details. I started with the vision blocks whose glasses are
raised. They are cut away with a fine saw and the glasses are removed and
replaced by plastic cards rectangles. The brackets for the towing cables are
removed and replaced by the PE parts of the Eureka set. The base of the FLW 200
is removed as well. A conduit for a jammer antenna is added. Before, you have to
sand away the antislip patches under the conduit. The hatches hinges are
detailed with a handle and two small plastic card rectangles. The vehicle
commander hatch is the only one molded separately and thus it can be shown open.
The rear view camera is detailed with two slices of 2 mm tube depicting the
lenses.
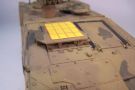
At step 45, the towing bar box is detailed with the latches on its top and the hinge plates on the rear side. At step 46, you need to carve the lid lines of the left bin. It also applies to the right bin at step 47. Then you have to add the antislip patches on the top of the bins that Revell omitted. The antennas will be added only when the painting is complete. The radio antenna base is replaced by a Djiti resin base.
Djiti wheels require some cleaning on the tread. Some of the mounting holes are filled with resin flash. A mill is used to clean the holes. Djiti designed the wheels with different locations for the Michelin markings. To reinforce the unique look of each wheel, the hub covers are glued in different positions.
The painting
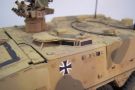
Revell proposes two German camouflage
schemes (a NATO three tone one and a Afghanistan three tone one) and decals for
4 vehicles. Unfortunately options 49 and 50 are only good for a Boxer A0. The 38
MLC disc is not correct for a Boxer A1 and should sport 42.
The good point is that Revell gives blank plates and generic numbers which
allows to make your own plates.
The chosen scheme is the desert three tone one for a vehicle deployed in Afghanistan in 2011. The unit is not given by Revell but at this time only the 292 J�gerbatallion were equipped with the Boxer. The paints used come fro mthe Vallejo Umtarnfarben German ISAF color set. First you have to convert the Revell denomination into the RAL references. Thanks to the Tankograd volume dedicated to the Boxer, I managed the find the right combination. The base shade (Afrikabraun L for Revell) is RAL 8031 Sandbraun. The Revell shades Beige (M) and Khakibraun+Hellgrau (N) are in fact RAL 1040 Graubeige and RAL 7050 Tarngrau.
The base shade is airbrushed then the
two other shades are brush painted because of a dilution issue. A AK wash is
applied in the recesses then some dust is created by spraying some Mig pigments
(Gulf war sand) diluted with alcohol. The running gear and the lower hull get
some mud made of various pigments sprinkled over some mat varnish.
The air recognition panel decal is applied over a bit of tin foil to give more
thickness.
Conclusion
As often Revell is the only manufacturer to produce modern German vehicles. Unfortunately, they are sometimes simplified and this Boxer is not exempt from this rule. With some efforts and a couple of aftermarket references, it still is possible to get a model which reflects the actual vehicle.
I would like to thank Hans-Hermann B�lhing for his help during this project.
Reference :
Tankograd Milit�rfahrzeug Spezial n�5039

|

|

|

|

|

|

|

|

|
|

|

|

|

|

|
|
|

|

|

|

|

|
|

|

|

|

|
|

|

|