reference: #35326

Tamiya has just released the latest version of the well known US main battle tank fitted with the Tank Urban Survivability Kit (TUSK). Coming in the usual white box, the kit comprises a lower hull, 9 sand plastic sprues, 1 clear parts sprue, a bit of fabric mesh, a small sheet of clear plastic, a score of polycaps, a decals sheet, an instruction booklet and a historical background booklet. All the sprues are individually wrapped in a sealed plastic bag.
This review will focus on the build and the difficulties you may encounter during the assembly. I will simply follow the order of the steps as planned by Tamiya.
So from step 1 to step 4, the assembly concerns the lower hull and the
running gear. No surprise there as this is the good old Tamiya hull. Not so good
would say some who prefer the better detailed Dragon kit. Tamiya has kept the
things simple so you don't have adjustable road wheels arms nor torsion bars as
the arms are molded solid on the hull tub.
However Tamiya made some changes. The return rollers supports are new, the three
bars which block the side skirts elements are present and have the right shape.
On the rear panel, the tank infantry phone is present as well as the exhaust
deflector. Of course the belly armor plate is present. It is nicely cast with
fine weld seams and a series of bolt heads on each sides. The fit to the lower
hull is perfect.
The wheels are kept in position with the usual polycaps hence the lack of detail
of the rear of the wheels. The sprockets are still missing the four mud relief
holes. Tamiya also gives two plugs to fill the motorization holes at the back of
the hull.
Steps 5 to 8 deal with the upper hull. This part is brand new and fix some
flaws of the previous Tamiya M1A2 kit. So you get a new driver hatch with a
better shape but still not fully correct. Tamiya gives some clear plastic to
depict the driver episcopes but this is not suitable to the side episcopes. On
the actual vehicle, you can see the sides of the episcopes. Tamiya would better
have added some clear parts for all the episcopes. So be prepared to have some
extra work there. The left fuel cap is now oriented the right way. The plug for
the electrical cables left of the driver is present too.
The NBC system is modified and the under armor auxiliary power unit cover is
added as a separate part. The mesh of the angled grille just behind the
NBC system is now correct.
Concerning the assembly, you just have to be aware that the headlights are a bit loose. If you use the towing bar hooked to the front upper towing eyes, it will be difficult to put the headlight lenses. The better is to glue the headlight after the painting step. You can put the bar after the painting too or attach it elsewhere.
Steps 9 and 10 deal with the tracks and the hull halves assembly. The tracks are the new type which can be glued with liquid cement. The detail is quite good but you have molding lines on the connectors and the guide teeth are the solid type. If you follow the instructions and want to glue the hull at this step, you'd better paint the running gear and the tracks now. The hull join thanks to a large tab at the rear and two polycaps at the front. So you virtually do not need any glue.
Steps 11 to 13 concern the ARAT (Abrams Reactive Armor Tile) blocks assembly. In the kit you have all the parts needed to build either a TUSK I or a TUSK II Abrams. Step 11 is for the TUSK II. After you have glued the ARAT I block, the easiest assembly sequence for the ARAT II is upper run first then the lower run and finally the ends protections (part H6). To align the skirts with the hull you have some tabs and the three bars attached to the lower hull.
Steps 15 to 34 deal with the turret. I will split this long sequence in four shorter ones.
Steps 15 to 21 tackle the turret general assembly. First you have to drill a
number of holes in the both turret halves for the fitting of parts. Then you
assemble the gun breech. Tamiya asks you to paint it white with the breech per
se black. I don't think it is necessary. Either you put the figures or you let
the hatches closed and this is useless or you have the hatches open and you will
look into a huge void with only the breech as an interior part. But it's up to
you.
The extra conduits on the turret top are nicely detailed as well as the armored
ones for the Vapor Compressor Unit under the bustle. The barrel comes in two
parts plus a separate muzzle and the muzzle reference system. The gun mantlet is
mobile as well as the small flap at its back.
Unfortunately the side stowage boxes still have their handles molded solid as
well as the loader's hatch one.
The bustle rack and the extension are new. They present a number of ejection pin
marks to fill. Some of them are ill located and will remain visible if not dealt
with. The mesh is the usual Tamiya fabric mesh. Some photoetched parts would
have been welcome. To ease the cutting of the parts, I photocopied the
instructions and used the copy as templates. The fabric must be glued with CA
glue. When this is done, you can trim the mesh with a sharp blade.
Here you are, you have assembled the turret.
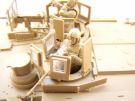
Now you have to tackle the tank commander and loader gun station protections. This is covered in the steps 22 to 28. Unfortunately nearly all the inner faces of the protection panels shows ejection pin marks you need to fill. This is quite a tedious operation but is necessary. For the purpose of the review I have just glued the clear parts with white glue to check the fit which proves perfect. During these steps I decided not to glue the searchlight for the tank commander. I think it is easier to paint it before attaching it. The searchlight as well as the loader's MG scope have a molding line just in the middle of the glass. This will require some smooth sanding with toothpaste to remove the lines and keep the parts clear.
Steps 29 to 31 have you assembling the M2 MG above the gun mantlet, the smoke dischargers and the commander independent thermal viewer. The MG cradle has two ejection pin marks to fill. The CITV housing has a prominent molding line to remove.
Steps 32 to 34 deal with the turret ARAT brackets. This does not need any comment as the build is straightforward.
Step 35 is the matching of the turret onto the chassis. This could be managed by the average modeler!
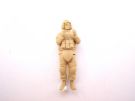
Step 36 concerns the two crew member figures. The bodies come in two parts: the main body and the front torso. This way Tamiya managed to give a realistic look to the lower armor plate of the body armor. But the joint of the shoulders requires some putty to fill the large gap. All the figure parts present prominent molding lines. I usually do not build figures with my models and these figures won't have me changing my mind. To me they are not on a par with the kit in terms of sharpness of the details.
If you intend to fill the large turret baskets Tamiya gives you some fuel and water tanks as well as some ammo boxes. You also get a couple of combat identification panels. For sure you will need many more items to fill the baskets and give your model an operational look.
As this was intended to be a built review only, I will not speak about painting. Concerning the decals Tamiya includes in this box, they allow to depict only one TUSK II Abrams and two TUSK I. A nice addition on the decals sheet is the stencils for the towing points and the CITV. More would have been appreciated though.
Thanks to Armorama for the review sample.

|

|

|

|

|

|

|

|

|

|

|

|

|

|

|

|

|

|

|

|

|

|

|

|

|

|

|

|

|

|

|

|

|

|
|

|
|

|

|

|