Ref
: Skif #226
SP #172 T-80UDK M1985 turret
SP #173 T-80UDK M1985 Upper hull detail set
SP #081 T-80UD Tracks
SP# 092 T-80UD Outer roadwheels
Ref
: Skif #226
SP #172 T-80UDK M1985 turret
SP #173 T-80UDK M1985 Upper hull detail set
SP #081 T-80UD Tracks
SP# 092 T-80UD Outer roadwheels
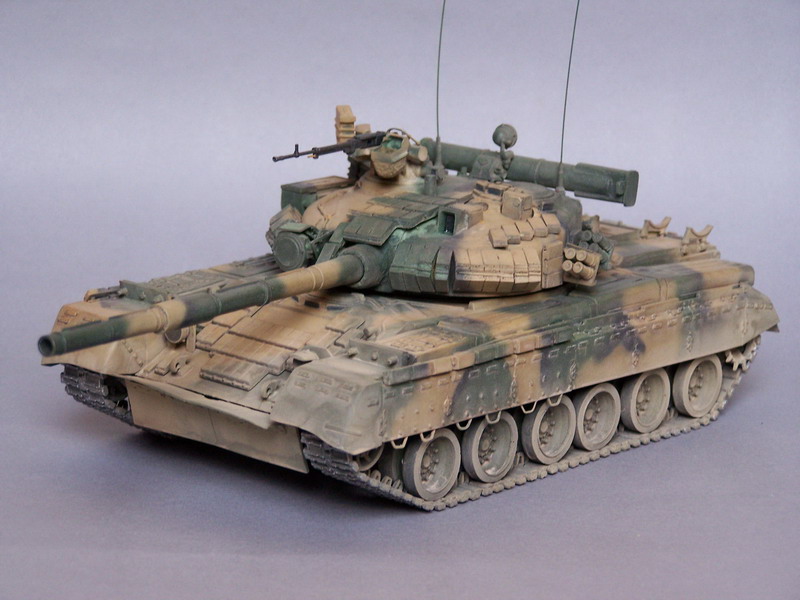
The T-80U is an improved
variant of the T-80BV which by the way proved its weaknesses during the Chechniya conflict.
The UD is the version fitted with the diesel engine 6TD manufactured in Ukraine.
At the USSR collapse, Ukraine kept on producing the UD version then started
producing its own components while Russia refused to continue providing parts
like the molded turret.
The UDK command version is fitted with supplemental radio sets, an APU mounted
on the right rear and a pedestal for an aerial mast on the roof. The mast is
carried at the back of the bustle.
The Kontakt armor having proved not satisfactory, it has been quickly replaced by the Kontakt5 which is integrated to the hull and the turret. For this reason, the ERA tiles equipped version issued by Skif is quite rare as well as the documents available on the Internet.
Skif model depicts an
early variant. The kit comes in 6 sprues in a light green plastic, 2 2-piece
vinyl tracks, a decal sheet and an instruction booklet. The sprues are wrapped
in sealed bags.
As usual with Skif, the detail level is average. The largest flaw is the engine
deck which does not match the UD one. The tracks hardly resemble the real ones,
the skirts lack of details as well as the turret.
For these reasons, I decided to use some elements coming from the Ukrainian
manufacturer SP Designs. They are a turret, an engine deck, the side sponsons
and fuel cells. Besides, the outer roadwheels and tracks in lengths with the
hollow horn guide replace those in the kit.
SP parts are not flawless. The engine deck is slightly oversized which will need
extra work for the fitting. Numerous air bubbles are spread all over many parts.
The build
The hull
The chassis is built
without modification. It comes with a floor, two sides and a rear plate. The
outer wheels are replaced with SP ones because they lack a rim. The fitting of
the new wheels need to shorten the arms axes. There is no arms alignment
trouble. The sprockets are replaced by the resin ones which match the originals.
The only remaining part used is the disk 3A. Some resin flash has to be removed
from the sprockets.
The entrenching blade is installed after the gap between the hinges which is too
large has been modified.
The rear plate is glued without the various accessories. These will be glued
later on, especially the parts 26A to ease the tracks setting.
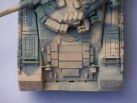
On the hull ,the engine
deck is cut away. The biggest problem comes here since the resin part is too
long by 2mm and too large by 1mm. We must thin it but can't reach the correct
thickness due to the molded details. The articulations 31F and 32F are thinned
too. On the back, the exhaust is set. One line is engraved across the left side
box as this one opens.
On the engine deck, the positioning holes for the fuel drums brackets are
drilled again. The side brackets are cut and repositioned. The protective plates
96D are replaced by thinner plastic card parts heat-shaped .
The resin fuel cells come in several parts of which the contact surface must be
carefully sanded. On the right side, the tow last parts are replaced by the APU
which comes with the turret set (!). At the rear, the APU and the fuel cell
slightly overhang on the mudguards (Skif miss this detail).
On the glacis, the kit ERA tiles are used as the resin ones are too large to be
fitted. The formation lights are drilled out, they will be filled later on with
some white glue and painted black before being finally coated with a layer of
white glue to figure the glass. The headlights have a sink mark which is partly
sanded. The surface is then covered with some white glue to get it smooth.
At this stage, the both hull-halves are assembled. The brackets 43B are glued on the rear deck opposite the exhaust hinges. The front mudguards are not fitted, they will be only after the tracks are painted. To facilitate the painting, the chassis is painted prior the skirts fitting. The assembly is painted XF26 Deep Green. The wheel rubber bands are painted XF69 NATO Black.
The tracks building is long because each series of links needs to be cleaned and the horn guides must be cut from their sprue and glued on the links. The tracks are painted XF69 then a wash of XF16 Aluminum was applied before a drybrush with some Humbrol 11. Once dry, the are shaped around the sprockets and the idlers. The tracks have some tiny bubbles which can be hidden with some mud.
The skirts are set beginning by the front just after the front mudguards are glued. We really need to take care of the fragile footsteps. Several bolt heads are redone with plastic rod. To enable the fitting, the front part brackets need to be sanded. The rubber plates on the front of the glacis are set in place. The resin ones are way more realistic than Skif ones.
The turret
Few parts from the kit
are used. The work starts by hollowing the very heavy turret. The various
accessories are glued after a careful sanding to delete the resin flash.
Unfortunately, SP has not designed any positioning marks for the armor blocks.
However, a top sketch enables to guess their location. The tiles 16 must be
glued before the bin 20. On this bin, SP indicates to glue the plastic parts 69/70E
but I haven't seen this box on any picture. So I let it apart.
The searchlight is glued. The protection plate is thoroughly thinned. The
liaison parts between the light and the gun are added from the pictures I found
on the Internet and in the Concord book on the T-80.
The boxes SP 24 and Skif 86C are not used, they do not show on the pictures I
have. It looks like they have been only present since the fitting of the
Kontakt5.
The
smoke-dischargers brackets are glued with the rear middle wall removed.
The schnorchel is fitted. To get the assembly between the turret and the tube
more resistant, 2 metal axes are added.
The
TC cupola is heavily detailed. To start with, the MG bracket is added unlike
what state the kit instructions. It appears that all the U have mounted a MG
including the UK. A picture on SP instructions leaflet clearly shows the MG on
the UDK turret.
To detail the cupola, I referred to the one of the T-90 which is identical. The
parts have been thinned. Various cables and wires are added. The supporting pole
for the box on the right of the MG is made from plastic rod and strips. The
glass on the sight is sanded away and a frame from plastic card is added. The MG
is partially replaced by one coming from a Dragon T-72.
Two antenna mounts come from the spare parts box. The antennas are made from
piano string.
The gun is modified. The rings around the thermal sleeve are thinned. The strips on the top are removed and redone from thin plastic card. 4 bolts are added on the front face of the bore evacuator.
Skif issues the elements of the long aerial on the roof. If you intend to use them, don't forget the shrouds.
The painting
The scheme is the green, sand and black
3-tone camouflage. The shades I used are XF26 Deep Green, XF57 Buff and XF2 Flat
Black. A yellow filter is applied on the green. The glasses are painted flat
black then get a layer of gloss varnish. The sight gets an extra coat of clear
blue.
Then starts the weathering. Small stripes of highly diluted XF57 are sprayed on
the green vertical surfaces. On the sand parts, some brown strips are sprayed
too. Then, a mix of water and XF52 Flat Earth is sprayed all over the tank.
After the paint is dry, the dusty look is done with some XF57 paying particular
attention to the bottom and the rear of the vehicle. Some oil and fuel stains
are added. The MG is rubbed with graphite powder.
References :
Concord MiniColor Series #7503
Russia's T-80U Main Battle Tank
http://t80leningrad.narod.ru/tank_t80_2.htm
http://btvt.narod.ru/5/80ud/t80ud-modification.htm

|

|

|

|

|

|

|

|

|

|

|

|

|

|

|

|

|

|

|

|
|

|

|

|

|

|

|

|

|

|

|

|

|

|

|

|

|

|

|

|

|

|

|

|

|

|

|
|

|

|