Ref : Trumpeter #05560 Russian T-90 MBT Cast Turret
Armo #35778 Smoke grenade launchers 902 A/B Tucha (charged)
Eureka XXL # ER-3550 Russian T-90 MBT (tow cables)

The T-90 is an improved version of the T-72 which design started in 1986. Originally known as T-72 BU, it was officially named T-90 at its entry in service in 1992 to mark the difference with the T-72 which poorly performed during the first Gulf War.
Production first stopped in the late 90s. In 2005 production resumed with a new order of new tanks with the welded turret similar to the one fitted to the Indian tanks. In 2011 orders came to an end. The majority of the Russian T-90s are deployed in the Siberian military district.
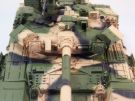
The hull is the T-72 one with a new engine. The protection is improved thanks to the Kontakt 5 reactive armor. The early cast turret is similar to the T-72 one but benefits from a better protection due to the reactive armor and the Shtora missile jamming system. The latter is mainly composed of laser warning sensors at the front and the sides of the turret and two jammers on each side of the 2A46M gun.
The main armament is
a 125 mm smoothbore
2A46M gun with an autoloader. The basic load is 43 rounds of which 22 are ready
in the autoloader. It is associated to a modified version of the T-80 fire
control system.
The secondary armament is composed of a 7.62 mm coaxial PKMT machine gun and a
12.7 mm antiaircraft NSVT machine gun (later replaced by a Kord MG) which is
operated from inside. 12 Tucha smoke grenade launchers complete the protection
of the T-90.
Because of the autoloader the crew is only of 3: a driver, a commander and a gunner.
The T-90 did not see action in its early version. However the T-90A was committed in Dagestan, in Syria and more recently in Donbass. About 10 countries operate the T-90 of which the major ones are Russia, India and Algeria.
The kit
Molded in a light grey plastic, it comprises 16 sprues, 1 lower hull, 1 turret upper shell, 1 clear plastic sprue, 8 green plastic sprues for the tracks, 1 vinyl sprue, 1 set of polycaps, 3 lengths of copper, brass and plastic tubing, 3 sheets of photoetched parts, 1 sheet of decals, 1 instructions booklet and 1 color sheet for the decoration instructions.
The number of parts is more than 1300 with 372 for the
tracks and 321 PE parts. The cast is excellent with a superb level of detail.
The molding lines are thin and easy to clean as well as the rare ejection
pinmarks. The fit is very good even if some parts need to be thinned in some
rare occasions.
Despite the high count of parts, Trumpeter does not give the gun breech. It is a
pity as the optics for the gunner and the commander are provided. So it is hard
to let the hatches open. The gun comes in three parts: two lengths and the
muzzle. The mantlet cover is a vinyl part which is tight enough so you don't need to
glue the tube.
The instructions booklet
comprises 20
pages and splits the build into 21 steps. The drawings are usually clear however
I noticed one omission of parts and a lack of precision to glue some PE parts.
The instructions for the decoration are given on a separate color sheet. Paint
references are given for 5 brands but only those of the Mr Hobby range are
comprehensive. Two decorations for unknown units are proposed. The sheet of
decals also includes numerals to create your own turret numbers. A very
attractive decoration with an eagle head and the Russian flag is present. This
is the one I chose. Unfortunately I noticed after having applied the markings
that they were incomplete or wrong.
This is not the only mistake Trumpeter made in the kit. In fact, the cast turret T-90 is an early model so it should have the T-72 exhaust as well as RMSh tracks. Moreover the gun muzzle seems to be too long for an early tank.
The build
It starts with the hull and the running gear. Except the parts count it is not difficult at all. The round PE parts for securing the antiradiation liner are glued with liquid plastic glue. As they have no tension they perfectly stay in place without CA glue. All the roadwheels, idler wheels and sprocket wheels include a polycap which allows to fit them without glue. It facilitates the fitting of the tracks too. Trumpeter gives jigs to assemble the track links. For each track, I assembled three lengths which I allowed to set around the running gear. Then I removed them to paint them.
At step 4 the upper hull assembly begins. I thinned the
sides of the driver vision block so it can fit into its location. At step 6 you
need to take your time to assemble the headlights and their
protections. The latter are molded as a single piece which is great. The clear
parts are not glued at this step but after the painting. However you have to
check if they fit well.
At step 8 you have to glue the latches for the unditching trunk. I decided not
to install the trunk at this step and I think this was a mistake. It is
difficult to insert the trunk when the fuel barrels brackets are in place.
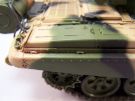
From step 11 the fender assembly with
the stowage bins and the fuel tanks begins. You have to carefully trim the parts
A6. Bending the PE latches for the bins and the tanks requires a number of dry
fit tests. The rear fuel tanks piping junction C28 must be thinned otherwise the
tube won't fit.
At step 14 you have to glue PE parts PE-A15, PE-B19 and PE-A8. The instructions
are a bit vague and you need to look at the drawings in the next steps to find
where they must be glued. At this step Trumpeter have you fit the fuel piping
into the rear fuel tanks. However they omitted to precise you need first to insert the
copper wire (provided in the box) into the tubes so they are stiff enough.
At step 15 you have to install the towing cables. I decided to use the Euraka
XXL reference instead of the breaded brass wire provided by Trumpeter. Oddly
Trumpeter omitted the brackets of the cables and only give the locks for the
cables eyes. Consequently the cables run in front of the convoy lights.
At step 16 the turret assembly starts. The most difficult step is the building of the Shtora TShU jammers. Aligning all the parts is tricky. The rest of the build requires some attention as some parts are very thin. However there is no difficulty. At step 20 Trumpeter omitted to mention parts PE-A6 which are the center bin latches.
I must mention that the turret is not secured to the hull by the usual tabs like on most of the kits. So extra care will be needed when handling the kit in the future.
The decoration
At first glance I wanted to depict the tank with the eagle heads painted on the additional armor plates on the side skirts. Having no reference picture I applied the decals according to the instructions. However the turret number is wrong as I could see on a picture I got later. It happens that Meng's T-90 has the same decoration with some markings being different. I don't know which manufacturer is right.
Concerning the paints I used the following references: XF-78 Wooden Deck Tan, XF-67 NATO Green and XF-1 Flat Black. The weathering is intentionally very light as I wanted to show a vehicle during an exhibition. So I applied a pinwash in the recesses and drybrushed the dark colors as well as the tracks.
Click on a thumbnail to see the full sized picture

|

|

|

|

|

|

|

|

|

|

|

|
|

|

|

|

|

|

|

|

|

|

|

|

|

|

|

|

|

|
|

|

|

|

|

|

|

|

|

|

|

|

|

|
|
07/2019