Ref: Trumpeter #00377

The T-62 was developed as a response to the introduction in the western arsenals of the powerful L7 105mm gun. The T-62 was officially approved in 1961 and the production started in July 1962. In 1967, a new engine deck is introduced but it is only in 1972 that appears the 12.7mm DShKM anti-aircraft MG. At that time are also introduced the new RMSh tracks as well as the new sprockets with 14 teeth.
The architecture of the T-62 is similar to the T-55 one.
The crew is of 4: the driver on the left, the tank commander on the left of the
turret, the gunner below the TC and the loader on the right of the turret.
The engine is in the back. The running gear consists of 5 pairs of large road
wheels without return rollers, the idler wheel at the front and the sprocket at
the rear.
The main armament is the U5TS (or 2A20) 115mm gun and the secondary armament
consists of a coaxial 7.62mm PKT MG and a 12.7mm DShKM AAMG.
The kit
This reference depicts the third model of the Soviet tank. It comprises 16 grey plastic sprues among them 11 are dedicated to the 1972 model (E, K, F, H et 7xN), 4 black plastic sprues, 1 clear plastic sprue, the lower hull, a metal barrel, a photoetched parts sheet, a decals sheet and a length of brass wire.
The total number of parts is 491 grey plastic parts
among which
217 track links, 12 clear plastic parts, 20 black plastic parts and 11
photoetched parts. Not all the parts are necessary as some are intended for the model 1962.
Moreover, Trumpeter offer several options for the build, mainly concerning the
turret.
The instructions come as a 16-page booklet complemented by a color sheet with 2
decoration schemes.
The cast is nice and the carving fine to very fine. Very few ejection marks are visible and the molding lines are pretty thin.
The build
At the beginning, the model should be assembled from the box and in the end only a minimum amount of additions or modifications were made. The necessary fuel lines have been added and the headlights have been mounted according to the real way, bolted along the legs of the protection cage.
The chassis
It is assembled according to the plan. However in order to facilitate the painting, only the inner wheels are glued. The tracks are assembled with liquid cement and temporarily set to get the right shape with the desired sagging.
The upper hull
On the glacis, Trumpeter omitted to mention the part
A4 on the left side. The right side towing hook lock A33 is not glued to enable
an easy fitting of the cable later on. The both headlights are not glued to the
glacis. They must be attached to the frame of their protection cage.
On the rear deck, the protection flaps E1, H2 and H3 are not used.
On the left fender, it is not necessary to drill the two
holes of the step 10 since on the model 1972, the spare track links are fixed to
the rear deck under the fuel drums brackets. The PE part PE2 for the exhaust is
not used. The plastic one is more true. The holes are drilled and the part is
thinned before being installed.
On the right fender, the fuel lines must be made. Some copper wire and aluminum
foil for the connections will do the trick.
The turret
Trumpeter give several options for the
turret among them a metal
barrel, two gun mantlets (with and without canvas protection) and two types of
IR searchlight. The metal barrel has been used even if the bore evacuator is
better detailed on the plastic one.
At the step 21, you must not drill the two foremost holes for the 4th MG
ammunition box. According to all the reference pictures, only 3 boxes are
visible.
The rest of the build follows the instructions. You must be take care of the
handrails which are very fragile. The IR light support on the right of the gun
is quite tricky to assemble. You must ensure that the light is parallel to the
main gun.
The MG is finely molded but the cradle is not easy to assemble. The fit leaves to be desired. As a result the MG is not installed.
The decoration
Trumpeter give the choice between two Soviet tanks and
two Arab tanks without any precision about the nationality. It is a Soviet tank
belonging to a standard unit which is represented.
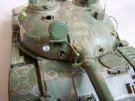
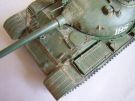
A first layer of dark green is sprayed then two hairspray layers are applied.
Then the base color, XF-67 NATO green, is sprayed. The chipping effect done, the
weathering starts with a filter of raw umber and some darker wash in the
recesses. The dust is done with different shades of pigments to avoid a monotone
look.
In conclusion, this model can be built pretty quickly out of the box. Of course, it is possible to raise the level of details as for any model. It is a pity that the MG cradle is disappointing as this is the MG that makes this version attractive.

|

|

|

|

|

|

|

|

|

|

|

|

|

|

|

|

|

|
|

|

|

|

|

|

|

|
|

|

|
|