Ref: Zvezda #3670 T-14 Armata Russian Main Battle Tank

The T-14 Armata is a Russian 4th generation tank. Is is part of a family of armored vehicles notably including a heavy armored fighting vehicle and a self propelled howitzer. Its design started around 2010 and the first vehicles were presented in 2015. Because of delay during the trials the T-14 is not in service yet. Depending on sources it could be the case in 2023 or 2024.
The T-14 is the very first tank with an inhabited turret. Its crew of 3 is accommodated in an armored compartment between the frontal armor and the turret.
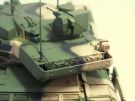
Its main armament is the 2A82-1M 125 mm smoothbore gun. The autoloader utilizes a 32 rounds carrousel. The secondary armament includes a coaxial PKTM 7.62 mm MG and a remote controlled PKTM 7.62 mm MG located on the turret roof beside the panoramic sight.
The tank commander and the gunner have each a sight with a day channel and a thermal night channel.
The T-14 protection benefits from a lot of efforts. Its armor includes passive armor plates, Relikt explosive armor plates and RPG grilles on the sides of the engine. The protection is supplemented by the Afganit active protection system and an array of passive protection systems including laser warning sensors and radars. Smoke grenades and decoys launchers are fitted into the turret roof.
In 2020, it was announced the production target was 500 tanks. However the cost of the tank could lead to decrease this number. Already the Russian army preferred to order modernized T-72, T-90 and T-80 tanks some of which using technologies coming from the T-14.
The kit
Released in 2016 by Zvezda it includes 8 light grey plastic sprues, 2 hull halves, 1 clear parts sprue, 2 bits of nylon mesh, 1 sheet of decals and 1 instructions booklet.
The engraving is very fine and the cast of high quality except for the headlights protections. The part cleaning is minimal. The RPG grilles are a bit thick and should be thinned. As often the tracks come in lengths onto which you have to glue lengths of guide teeth. The system allows a quick build. However once the tracks are assembled it is advised to cut the plastic bits between the guide teeth on the links which remain visible.
For the decoration Zvezda proposes 2 painting schemes (plain green and 3-tone) and 3 sets of decals without any information about the units. Unfortunately as usual Zvezda only gives one profile for the 3-tone camo.
The build
It begins with the turret in steps 1 to 14.
At step 1 you need to properly align parts H4 and H5 with the turret roof.
Steps 2 to 6 come with no issue as the fit is perfect.
At step 7 the junction between sub-assembly 7b (labeled 1b on the notice) and sub-assembly 2 presents a gap at the front that needs to be filled with putty. The shpae of the assembly makes sanding tricky. It is advised to paint sub-assemblies 7b and 7d before gluing the turret roof.
At step 11 you need to bevel the front of part K61 to fit cover 11b. The MG can remain mobile as well as the sight if you take care while gluing the base at step 12.
At step 14 the antennas are not glued yet to avoid breaking them.
The hull assembly begins at step 15 with the upper part. You have to cut the engine grilles from the nylon mesh. To do so Zvezda provides templates.
At step 19 Zvezda has inverted sub-assemblies 19a and 19b.
At step 20 take care of the proper alignment of the swing arms. At some positions Zvezda molded an extra thickness which prevent to align the 7 arms in the vertical plan. So you have to remove the extra thicknesses.
At step 21 the roadwheels are not glued. Only the inner parts are fixed to the arms with some blu-tac. This allows an easier fit of the tracks.
At steps 22 the lengths of guide teeth are glued to the links lengths. Then the lengths are not glued together. However the connectors are drilled and small bits of Evergreen rod are inserted in the holes which makes the track lengths mobiles. The idler is not glued yet. The lower hull and the tracks are painted before they are installed. The idlers are glued at the right tension of the tracks.
Then side skirts can be glued at step 23.
At step 25 the headlights protections are not used because the horizontal rods are ill molded. They are replaced with Evergreen rod bits.
At steps 28 and 29 you need to glue the brackets of the RPG grilles. On the notice Zvezda only shows one side however the order of the parts is correct for both sides. When the brackets are glued you need to make a dry test fit with the grilles to have a correct alignment. The grilles must be thinned. They have a triangular profile which must be fixed too. To facilitate the painting the grilles will be glued after being painted.
The decoration
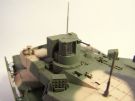
To avoid the usual parade plain green I chose a 3-tone camo different from the one proposed by Zvezda and seen on numerous pictures taken during exhibitions or trials. The colors are the ones of the most seen camo on Russian vehicles, that is green, tan and black. For them I used XF-67 NATO Green, XF-78 Wooden Deck Tan and XF-1 Flat Black. The patches are freehand airbrushed using pictures as references. Unfortunately for the tank top I had to invent.
Once the 3 colors are sprayed a brown filter is applied with a large brush. When it is dry a pinwash is applied to enhance the details. The exhausts are stained with dark grey pigments as well as the RPG grilles in front of them. Then the RPG grilles are glued. Streaking is simulated with water pencils of various shades. To conclude several layers of dust made of XF-52 Flat Earth are sprayed insisting of the lower parts and the tracks are drybrushed with a metallic shade.
References : Recomonkey
Click on a thumbnail to see the full sized picture

|

|

|

|

|

|

|

|

|

|

|

|

|

|

|

|

|

|

|

|

|

|

|

|

|

|
|

|

|

|

|
|

|

|

|

|
||||