Ref: Trumpeter #00381 Russian PT-76B Amphibious Tank
Armo #35551 Track links for PT-76 or Shilka

The PT-76 was accepted in active service in 1952 and the same
year the full scale production began. During all its service life the PT-76 has
regularly been upgraded. The first important upgrade was the adoption in 1955 of
the D-56TM gun with its double baffle muzzle brake and the fume extractor. The
PT-76 mod1955 has been called PT-76B by NATO whereas for the Soviets the PT-76B
only came in 1962 when the PT-76 got the newer D-56TS gun with a 2-axis
stabilization system and some other modifications among which a raised hull by
13 cm.
This confusion between the both types of PT-76 remains present in the various
model kits available including the Trumpeter offerings.
The PT-76B is an amphibious reconnaissance vehicle. IT can swim up to 10 km/h and drive up to 45 km/h. Its range is about 400 km without the external tanks.
Its main armament is the 76.2 mm D-56TS gun with a range of 1500 m. The standard ammo load is 24 High Explosive rounds, 8 Armor Piercing rounds and 8 High Explosive Anti Tank rounds. The coaxial 7.62 mm SGMT MG (replaced from 1967 by the PKT) has 1000 rounds and can fire up to 1000 m in daylight. The PT-76B has no night firing sight.
The PT-76B unlike its previous versions is protected against the NBC weapons.
The crew is of 3: a driver, a tank commander/gunner and a loader.
Approximately 5000 PT-76 of all types have
been built and many of them were exported to 25 countries. So during its
operational life the PT-76 has seen action during numerous conflicts in Europe,
in Africa, in Asia and in Middle-East.
The PT-76 has been phased out by the Russian army but is still in service in 18
countries around the world.
The kit
Trumpeter released two models labeled as Russian PT-76B but this reference is the one which corresponds the best to the Russian PT-76B with its raised hull. However Trumpeter did not modify the front of the hull which should have been extended.
The kit comes in 5 light grey sprues, 2 hull halves, 2 vinyl tracks, 2 photoetched parts sheets, 1 sheet of decals and 1 length of nylon thread. The 10-page instruction booklet is complemented by a color sheet for the 2 proposed decorations.
As usual the engraving is good and the details are nice enough. The molding lines are thin except for the roadwheels tires treads. The PE parts are few. The headlights protections are flat and as such unusable. Moreover when bent, they do not match the positioning holes on the hull. The only option given by Trumpeter is the use or not of the schnorkel. The turret hatch can be opened but with the exception of the gun breech there is nothing to show inside.
The build
In a classical way it begins with the lower hull and the running gear. As I chose to use resin tracks instead of the kit ones, I glued the roadwheels, the sprockets and the idlers unlike what I'm used to do. The tracks come as lengths and links which allows a correct winding around the sprockets and the idlers. However their assembly is quite time consuming and requires many dry fit tests to get the right length.
At steps 7 and 8 I glued the large engine access panels as well as the side water intakes of the nautical propulsion system (step 10 of the instructions). I added the glasses of the driver's vision blocks from inside the hull. Then I glued the both hull halves before gluing the various details to the hull.
At step 9 you have to install the PE headlights protections. Trumpeter gives jigs to shape them but they are of little use. On the one hand they are flat and on the other hand the positioning legs do not match the holes in the hull. So I decided to make new ones in plastic rods using the kit ones as templates.
At step 12 you need to build the left towing cable. Trumpeter gives a length of nylon thread but I preferred to use some naval modeling thread. Trumpeter asks you to cut a length of 12 cm which too long. 11.5 cm are enough. The part B1 is hollowed, in reality it is a tube.
From step 16 the turret assembly begins.
on the hatch B43 you need to add the vision blocks glasses. A bit of plastic
card can do the trick. The handrails around the turret are a bit thick and could
be replaced by some brass wire. The coaxial MG muzzle is hollowed.
The gun breech is designed to be moveable. However when the gun mantlet B3 is
installed the whole assembly is fixed. The seam between the tow parts of the gun
is quite difficult to remove because of the irregular shape of the gun and its
evacuator.
The decoration
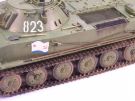
I opted for the plain green decortion with the Soviet naval infantry flags but unlike what is shown on the instructions I didn't paint the white cross typical of the Operation Danube (invasion of Tchecoslovakia).
The base color is Tamiya XF-67 NATO Green. Some highlights are made with the base color mixed with some XF-15 Flesh. A coat of gloss varnish is applied before applying the decals. Once the varnish applied the base color got quite darker. So I applied some ochre filters to enlighten the whole vehicle.
The weathering started with a dark brown wash to enhance the recesses. Some streaking has been made with various oil shades. To finish a dust effect has been done by brushing the tracks and the fenders with some very diluted XF-52 Flat Earth. On the horizontal surfaces some stains were added to simulate the smear at the traditional areas (engine deck, around the crew hatches ...).
Conclusion
Despite the fact it does not accurately represent a PT-76B this model is pleasant and easy to build. The Armo resin tracks allow to build slightly better detailed tracks than the kit ones. But I don't think I will use this reference again despite its attractive price.
Click on a thumbnail to see the full sized picture

|

|

|

|

|
|

|

|

|

|

|

|

|

|

|

|

|

|

|

|

|

|

|

|

|

|

|

|
||