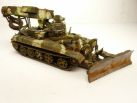
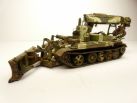
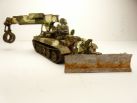
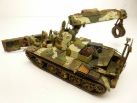
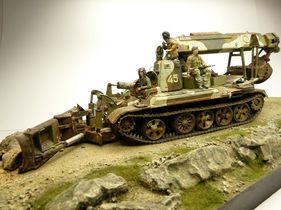
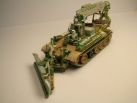
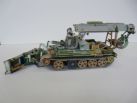
Scratch conversion on Esci T-55
Model, figures and texts by Zacharius Sex, painting and base by David Coynes
Some tanks never get the recognition they deserve and while
the T-55 has become synonymous with Soviet post-war tank design, a whole range
of T-55 variants remain pretty much unknown. For example the Sudanese Abu-Fatima
SPG and North Korean M-1978 Kochsan are relatively unknown because of their
exotic locale and the camera shy nature of their current owners. However, the
main Cinderellas of the T-55 family are engineering and recovery variants, a
group of vehicles that, until recently, patiently waited in the shadows for
their moment in the sun.
While 'Wings and Wheels' latest photo manual on the T-55 recovery variants
leaves the modeller with little excuse if he wants to build a BTS-2, BTS-3, WZT
or MT-55. However information on the Russian IMR combat engineering vehicle is a
little trickier to get ones hands on. Happily, since the end of the cold war a
number of Russian authors have produced books and magazines which have begun to
fill in the spaces in the giant jig saw puzzle that is Russian armoured vehicle
production and development. One of these authors is M. Baryatinsky whose book
“Tanks in Chechnya” provides the reader with a myriad of atmospheric images of
Russian equipment, not only in Chechnya but all over the former USSR. Included
in this photo-fest are two shots of the illusive object 616A or IMR combat
engineering vehicle carving out a mountain path in South Ossetia. These two
images provided plenty of visual detail and were the inspiration for this
scratch built project.
After conferring with Aaron Smith over several pints of Guinness at our local
modelling club and picking his brain for his knowledge of Russian vehicles, but
also for his outstanding scratch building abilities, I decided to give the IMR a
stab. The first step was to produce some form of template or scale plan to work
from. This was greatly helped by a series of images of an IMR vehicle serving
with IFOR in Bosnia, on the French military website armyrecognition.com.
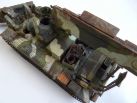
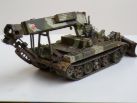
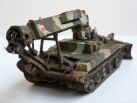
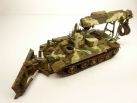
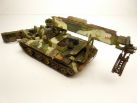
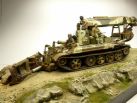
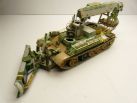
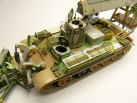
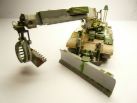
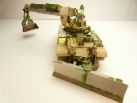
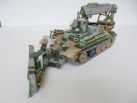
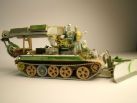
The initial planning for this project involved five main sequences, the first being the central turret and boom arm. The second involved the adjustable dozer blade. The third step centred on the grabber or log clamp suspended from the rear of the boom arm. While the fourth stage was based around producing the side fuel cells, side lockers, drivers section and engine bay. The fifth and final sequence was based around producing a number of crew figures and various accoutrements. This neglects the array of hydraulic lines and various other fittings, extras which I neglected to plan for in the scheme of work I set myself. As a result, the whole project took far more time and became at times all engrossing, so much so that on a number of occasions the IMR was put away and I proceeded to build three T- 34’s just for a mental break. In retrospect, the IMR became a bit of a monster with its abundance of hydraulic tubing, windows and myriad of tiny fittings.
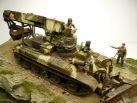
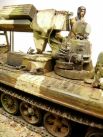
Stage 1: Central turret and boom arm.
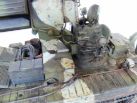
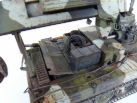
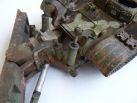
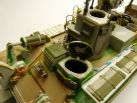
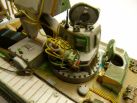
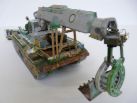
This first step involved fashioning the boom operator’s armoured turret. The turret itself is a relatively simple shape, sitting to the left-hand side of a circular base. The right-hand side is dominated by a boom ram and various hydraulic tubing. On this model, all of this delicate work is exposed. On later IMR models, such as the T-72 based IMR-2, this mass of hydraulic tubing is covered by an armoured drum. I built the sides of the boom operator’s turret by heating 1/35th scale Trumpeter T-55 fuel drums and gluing them to flat sections which represented the front and rear sides of this armoured cupola. The next step was capping this with a sheet of plastic card. Then, using a Dremel I set about drilling out the openings for the windows and hatch. Fine finishing in this area involved the use of small jewellers’ files, surgical blades, and small rolled tubes of sand paper. A similar approach was used in the driver’s armoured cupola. Interestingly, the turret and drivers' section avail of the same hatch lid. These two were made by adapting two spare Skif MTLB hatch lids. Returning to the turret, the large elbow joint to the rear was now carved from various pieces of waste plastic and attached to a large triangular shaped boom arm. The boom arm is a relatively straight forward structure with a number of boxes and housings running down the length of its right-hand side. The boom structure ends over the rear of the vehicle with a large fivesided reinforced wrist joint from which the grabber or log clamp is suspended. The wrist joint housing was a straight forward little project which provided a satisfying full stop to the sequence.
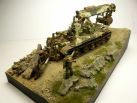
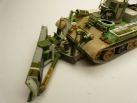
Stage 2: Adjustable dozer blade
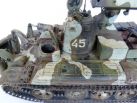
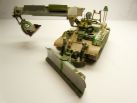
This stage revolved around a complicated dozer blade and mechanism which is attached to the front of the vehicle. In real life this blade is versatile and can be adjusted to suit many applications including snow clearance, road building and land clearance. I was hooked by an image in ' Tanks in Chechyna' where the blade is tilted to the right and pushing rubble off a mountain path. The construction of this blade, which is in effect two blades joined together, was the lynch-pin for this essential stage of the project. I finally settled on strip lengths of aluminium beer can super-glued to strips of plastic yoghurt pot. Needless to say I was forced to consume copious amounts of the former in the search for just the right can. The constructed blades were then attached to a wedge shaped pivoting joint which in turn is attached to the front hull by chunky dozer arms. The blade is operated by six hydraulic rams and these were fabricated using sections of Dragon T-72 tank barrel for the outer sheath and tubular sprew bar for the inner arms.
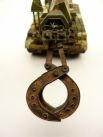
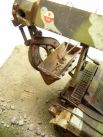
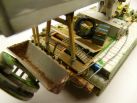
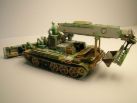
Stage 3: The log clamp attachment
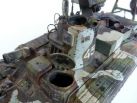
The third component was a set of grabbers or log clamps which are suspended from the rear of the IMR boom arm. These are capable of lifting tree trunks and other obstacles while the grabbers range can be lengthened as a result of the telescopic nature of the boom arm. The grabber proved fairly straightforward being that it is similar to the fitting found on logging trucks. When not in use this device has an earth bucket attached to its' inner face, presumably for scraping and grading surfaces. To the left of the grabber is attached a strange two legged fitting with a spade like top which appears adjustable and capable of vertical movement as a result of a hydraulic ram. What it does I don't really know but it looks good so on it goes.
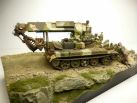
Stage 4: Side fuel cells, side lockers, drivers section and engine bay.
This stage involved building up the large right hand side fuel cell and left side stowage boxes. These run along the top of the T-55 fenders. The large right hand side fuel cell is detailed with anti slip metal strips and fuel caps. These were fabricated using ultra-thin strips of plastic yoghurt carton lids. The stowage boxes on the left hand side have large rectangular hatch lids built by utilising a number of Dragon T-72 hatch sections. A third of the width of each hatch-lid was removed and two were then bonded together to form the larger lids which were required. To the rear of the vehicle I decided to open up the engine deck area having watched some you tube footage of an Iraqi BTS-3 entering an Iranian town during the Iran-Iraq war with its engine screen bouncing up and down as it travelled over rough ground. This added detail would fit in with the busy composition of this particular model. After all a hardworking IMR with an overheating engine might well have its grill left ajar by a thoughtful crew member.
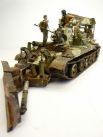
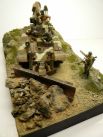
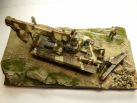
Stage 5: Producing a number of crew figures and various accoutrements.
This final stage of the construction process involved sculpting a set of figures which consisted of two crew members and two Russian troops. These were added to give a sense of scale to the project. But also add that all important human interest by completing the scene and giving the whole composition a sense of realism. The actual figures themselves were a combination of WW2 Miniart and modern Dragon Russian figures. These were amalgamated to create pieces which have the look of modern Russian troops deployed in Chechnya. By combining the lower sections of the Mini-art figures with the upper torsos of the Dragon figures I believe I achieved a figure which was realistic and reflected the look of modern Russian troops. To top off the figures I used Hornet heads on the infantrymen, however in the interests of originality, for the crew I combined faces from Hornet heads attached to plastic Russian tank crew helmets. I constructed the crew heads in this fashion to create a more diverse series of figures given that Hornet produce a limited variety of tank crew heads all of which I have used already on a variety of projects. The final act was adding two stowage boxes over the engine access hatches at the rear of the vehicle. The first of which was a simple closed box with handle constructed from scrap plastic. The second is an open container also constructed from scrap plastic and into which I put a ripped and rusty oil can, a pair of old boots, a sledge hammer, a coiled fuel line and topped off with an oil cloth. I then off-loaded this particular creation to David Coynes spray shop and didn't look at another model for a whole week. So over to Dave ...
|
|
|
|
|
|

|
|
|

|
|
|
|

|
|

|
|
|
|
|