ref : Meng#VS-003 Russian Armored High-Mobility Vehicle GAZ-233014 STS Tiger
The GAZ-233014 STS Tiger is one of the many versions of the Tiger which is in service with the Russian forces. The development started in 1999. The first prototypes were isued in 2001. 5 more were built in 2003. It entered service with the Russian forces in 2006.
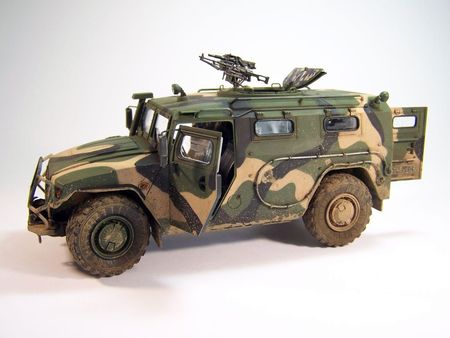
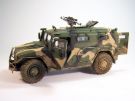
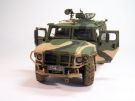
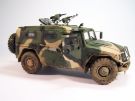
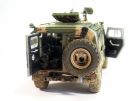
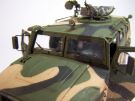
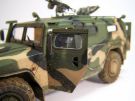
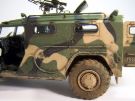
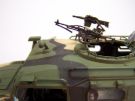
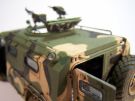
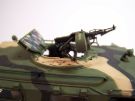
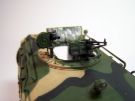
The STS version is armored and features a spall-liner to protect the personnel on board. In addition to the 2 crew members the Tiger STS can accommodate 6 soldiers. It is fitted with a ring mount armed with a 7.62 mm PKP Pecheneg MG and a 12.7 mm Kord MG or a 30 mm AGS-17 automatic grenades launcher.
The Tiger STS has seen action during the operations in Ukraine and Syria.
A version with a more powerful engine, the Tiger-M, has been adopted by the Russian forces too. More than 2000 Tiger have been built and are in service in at least 13 countries including China.
The kit
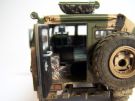
Released by Meng in 2012, it was the first model ever available for this Russian vehicle. The cast is high quality as well as the level of details. As expected with such a vehicle Meng gives a comprehensive interior however with no radio or jammer whereas the kit comes with a number of aerials. The doors and the hatches can be modeled open and the wheels are mobile. No engine is included.
The kit includes 6 green plastic sprues, 1 clear parts sprue, 1 frame, 2 hull halves, 1 photoetched grille, 1 large sheet of decals, 4 polycaps and 5 vinyl tires. The instructions are clear and the assembly comes smoothly. The fit is good. The ammo boxes inside are the only parts to present seam lines hard to remove. Two decorations are proposed by Meng: 1 with a 3 tone camouflage and 1 plain green for a vehicle during the Victory parade in 2011.
The build
As usual it begins with the chassis from step 1 to 9. You need to properly clean the molding seams on the various parts. The fit is good. The front axle is steerable.
From step 10 begins the interior assembly with the dashboard. You have to paint the whole assembly before applying the decals for the dials. Decal softener is required.
At step 12 you have to assemble the ammo rack for the automatic grenades launcher. The way the assembly is designed makes the seams difficult to hide.
At step 14 you have to first paint the floor of the cabin before applying the decals representing the liner. Even if their design is good you need some softener.
At step 17 you already glue the lower hull to the frame.
From step 18 you deal with the upper hull. The first thing to do is painting the inside again before applying the camo decals.
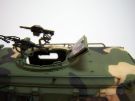
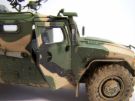
At step 19 the ring mount is put in place. It remains mobile.
Till step 23 there is no issue.
At step 24 the upper hull is glued to the frame.
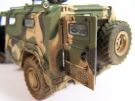
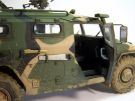
At step 25 the wheels are prepared but not installed taking advantage of the polycaps. The various details are added around the hull. The doors are not glued but set in place with blu tac to show them open at the end of the painting stage.
At step 30 the weapons are assembled but not glued to facilitate the painting. The vehicle coming without any radios the antennas are not used.
The decoration
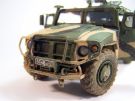
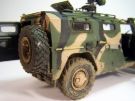
I chose the 3 tone camo of the Northern Caucasus military district. Meng gives the paint references in the Vallejo range. As I use Tamiya paint I opted for the following references: XF-1 Flat Black, XF-58 Olive Green and XF-78 Wooden Deck Tan. The 3 shades are applied with an airbrush then the hard edges are done with a brush. You need to be careful as the side views of the instructions do not match with the top one.
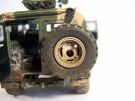
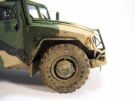
The vinyl tires are rubbed with some steel wool to get rid of the glossy look. The molding line is melted with the tip of a soldering iron.
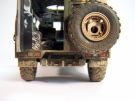
A dark brown wash is applied all over the vehicle then a pin wash enhances the details. The mud splatters are made with a mix of plaster, white glue and pigments. The mix is applied to the bottom of the vehicle with an old brush.
Conclusion
This is a pleasant model to build. Even if the part count is low the assembly takes time as you need to paint the quite comprehensive interior first. The references about this version are scarce so it is difficult to check if the colors advised by Meng are right. As often the camouflage views of the instructions do not always match.
Click on a thumbnail to see the full sized picture
|
|
|
|
|
|
|

|
|
|
|
|
|
|
|
|
|
|
|
|
|
|
|||
12/2020