Ref : Eastern Express #35188
Azimut ZU23-2

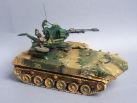
The BTR-ZD is a combination of a ZU23-2 and a BTR-D. It
is basically used in a direct support role by the airborne troops due the
tremendous fire power of the twin barreled gun. The gun mount can be settled
either at the front or at the back of the vehicle. It lies on pieces of tree
trunk and is secured to the vehicle with cables.
The gunner and the servant are outside the vehicle and with no protection to
fire.
In this variant, the BTR-D has not the bow MGs.
When I saw this variant for the first
time, I decided I had to do it. No full kit was available, I only remembered
that Azimut did a set of the gun some years ago for a Lebanese M113 conversion.
I just had to wait for someone to issue the portee vehicle. And the first to
shoot was Eastern Express among other BMD variants.
Noticeably the Russian brand Alanger have now a full kit
in their catalogue. After a look at the sprues of their BMD-2, my guess is that
this is just a reboxing of the EE kit.
The BTR-D
The kit comes in a light grey plastic with 4 main sprues plus 2 for the individual track links. A decal sheet enabling 5 decorations is included. The instructions are given through 3 stapled sheets of poor quality. In my kit, the pages were inverted. The explanations are in Russian and English. The detail is quite good but the carving is soft.
The building starts with the hull halves
preparation. On the the lower part, EE have omitted the fins at the back of the
hull. They are done with plastic card.
Concerning the upper hull, the vision blocks on both sides of the driver station
are filled.
During the assembly, I noticed a part acting as a reinforcing wall was missing.
Moreover, the fitting is not excellent and needs some sanding and putty. The
last surprise comes with the bow MGs ports. In fact, on the mower part, the hull
is jutting out and needs to be cut.
Once the hull assembled, the setting of
the accessories can start. On the back, the part #8D is too wide and needs to be
sanded. The large hatch is not numbered and the instructions have missed the
vertical plate with the firing port as well as the vision block !
The roof hatches need to be slightly sanded to ease their fitting. The brackets
#15M and 16M are drilled out before being glued on the sides. On the right side,
the part #18D requires to erase the tie-downs. The handrails on the roof are
replaced by some brass rod.
Concerning the side firing ports location, the notice is wrong.
You must refer to pictures of a real vehicle or the painting instructions to see
where gluing them.
EE omitted the headlight guards so you have to do them.
To end with the hull, we can install the external fuel tanks which seams need to
be carefully sanded.
The running gear is assembled except the idler arm which will later enable to adjust the track tension like on the real thing! The tracks are of the individual links type. These are well detailed with the exception of the guide horn which has not the "mushroom shape" so peculiar to the BMD family.
The ZU23-2
This kit is a combikit by Azimut. The original kit is from Scale of Russia to which Azimut have added some resin, white metal and photoetched parts. The notice is a single A4 sheet and comprises 8 steps.
The building starts with the gun cradle
then the fitting of the aiming device. This latter gets two resin parts
forgotten by the Russian manufacturer.
The tubes bracket (part#24) is detailed with 4 PE parts at the front end. But
those parts are too narrow for the tubes to pass through. We must thin the tubes
after having removed the flash suppressors which will be replaced by other from
aluminum tubing (Azimut give the right dimensions). During the step 2, the
handles #23 are not to be located as shown on the figures but abreast the wheels
#50. In fact, they come at the end of cables wound around those wheels.
The fitting of the ammo boxes requires some patience to fold the PE but is not
properly troublesome.
The PE seat backs are too flat and thus not used. Those from the kit are kept
after being thoroughly sanded.
The gun mount is prepared to get the resin
parts. The instructions are not clear and you'll need good reference pictures to
locate the suspension arms brackets in the proper way. Otherwise, you may have
the wheels too high in the lowered position (which in fact is the raised
position) and have them in contact with the mudguards preventing the gun from
rotating.
On the part #3, we need to remove the longitudinal rib on the top of the part
and add 2 handles.
The final assembly
According to the real way, the mount lies on three logs of wood which are cut in a twig. The legs are secured with cables attached to various hooks.
The decoration
The vehicle is painted in the classical
3-tone camouflage : olive green XF58, grayish sand (a mix of dark yellow XF60
and Prince August Air medium sea grey 49) and flat black XF1. The gun mount is
painted plain olive green.
The weathering is done with ochre and raw sienna pastel chalks. The mud is a
mixture of those chalks with some flat earth XF52 diluted with water.