Ref: Trumpeter #09556 BMD-3 Airborne Infantry Fighting Vehicle

The BMD-3 is an armored infantry fighting vehicle designed for the Russian airborne troops to replace the BMD-1 and BMD-2. Its development started in the 80s and the BMD-3 entered service in 1990. It has the same architecture as its predecessors with a front compartment accommodating 3 people, a central compartment for the turret and the transported soldiers and a rear compartment for the engine and allowing the access to the interior thanks to a large hatch. However it is much larger.
The BMD-3 uses the BMP-2 turret which is fitted with a 30 mm automatic cannon, a 7.62 mm coaxial MG and roof mounted firing post for the antitank guided missile 9M113 Konkurs (AT-5 Spandrel). In addition to the turret weapons, the BMD-3 is also equipped at the front of the hull with a AGS-17 automatic grenade launcher and a 5.45 mm RPK MG. Its armament enables it to engage targets, including armored ones, up to 4000 m. The 2A42 automatic cannon is fed with 500 ready to fire armor piercing and explosive rounds with 360 additional ones stowed.
The crew includes a driver in the center of the front compartment, a vehicle commander and a gunner in the turret. It can carry 4 additional combatants.
The BMD-3 is air-transportable, air-droppable and amphibious. It is protected against the NBC agents. It aluminum alloy hull protects the crew against small arms fire and artillery splinters.
The total number of vehicle built between 1985 and 1997 is 143. About a dozen were sold to Angola and according to some sources China would have got some vehicles.
The kit
Released in 2018, it includes 360 parts which is low regarding the usual models of Trumpeter. In the box you get 4 light grey plastic sprues, 2 hull halves, 1 clear parts sprue, 168 clickable track links, 1 photoetched parts sheet, 1 decals sheet, 1 length of twisted brass, 1 instructions booklet and 2 color plates for the decoration schemes.
The level of detail is excellent unless with some exceptions as mentioned later on. The molding is good and does not present large molding lines or ill-placed ejection pin marks. The instructions booklet is clear and includes 7 steps only. As often to shape the PE parts there is no template or jig which is annoying for the headlights guards.
The build
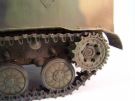
It starts by the assembly of the suspension. Despite the numerous parts it comes with no issue. After setting the wheel arms you just need to check the alignment so the roadwheels are all aligned. Hooks A21 need to be thoroughly cleaned to properly fit. The roadwheels are not glued at this stage.
The tracks are assembled at step 2 but they are not installed to facilitate the weathering. They are easy to build without glue. Trumpeter asks you use 84 links per track but 83 are enough. The mud flaps are not glued to allow the further installation of the tracks.
At step 3 you need to install the episcopes in the hull. For a good fit you have to clean the molding line. The back of the episcopes is painted black before the installation and the front glass is protected by a piece of masking tape. The PE securing hooks of the towing cable PE-A3 and PE-A4 are to be bent without a jig. It is advised to use a 1 mm rod t oget the proper shape. The 2 hull halves are glued before adding all the details
At step 4 you need to sand the hinges of
the hatch B13 so it can fit. To install the grille PE-A5 to the part B10, you
first need to remove the head bolts molded under the edge of part B10. Shaping
PE-A5 requires many trials as Trumpeter does not give a jig as always. In
reality you have to bend the upper and the lower edges at an angle of 90�.
The numbers of the headlights brackets B4 and B14 are inverted. The seams of the
bins at the rear of the hull need to be sanded to avoid gaps. Grilles B1 and B2
alos need to be sanded to fit into their location. Be aware they have to
slightly jut out of the hull.
Unlike what the instructions state I decided to complete the hull before tackling the turret. The main difficulty is the bending in a round shape of the headlight guards. Again there is no jig. You have to give a rounded shape to the upper part while aligning it with the top of the reinforcing part on the hull side. There is no miracle method except testing the curvature until you get a satisfactory result.
At step 5 the whole turret is assembled.
This is the part missing most of the details. The commander sight C33 is flat.
You need to add the frame of the glass with strips of styrene. The episcope flap
and its articulation on the hatches need to be added with some plastic card and
styrene rod. The bracket of the searchlight C15 is thinned.
At the rear of the turret you have to glue 12 PE tie-downs. It is advised to
first soften the plastic with some liquid glue before putting the tie-downs.
When it's dry you can add some CA glue with the tip of a blade. Be aware that
unlike what the instructions show the upper and lower tie-downs are not oriented
the same way. The lower ones need to be reversed.
To conclude with the turret you have to redo the coaxial MG gun because
Trumpeter molded it solid with the protection grille. To do so I cut the gun
muzzle and
drilled out its location. To replace the gun muzzle I used a bit of 0.66 mm rod
of which I drilled the end. Then I used a conical drill to give the flare look
of the muzzle.
The 30 mm cannon is well rendered with a hollowed flash suppressor. This is the
last part to glue before painting.
The decoration
Trumpeter proposes 4 decorations with one for the Chinese army. I didn't find any source to confirm this. The Russian decorations include one plain green vehicle and two with different three-tone camouflages. I chose one of these.
The camouflage is made
of sand, green and black. I used the Tamiya references XF-78 Wooden Deck Tan,
XF-67 NATO Green and XF-1 Flat Black. The various colors are airbrushed freehand.
When the paint is dry I apply a coat of Klir to apply the few markings. A second
layer of Klir seals the decals before the weathering.
The weathering begins with a dark brown wash applied in the recesses. Then I
used the technique of oil dots drawn downward.
In parallel the tracks have been painted with some XF-84 Dark Iron and got a dark brown wash. The hull lower part and the tracks are sprinkled with a mix of fine sand and Earth pigments fixed with mat varnish. The inside of the mud flaps are weathered the same way. Then all these elements are glued to the hull.
To give the final look I sprayed Russian Earth pigments and insisted on the lower parts. On some spots I rubbed the pigments right after to get some variations in the effects. The edges of the tracks are brushed with XF-16 Flat Aluminum.
Conclusion
Trumpeter released a simple and easy to build model with few
parts. It is a pity that the detail level of the turret is poorer than the hull
one whereas the turrets of the BMP-2 models of the brand are very good.
Logically the manufacturer designed this model in order to reuse the molds for
its BMD-4 which mainly differs from this vehicle by the turret.
Click on a thumbnail to see the full sized picture

|

|

|

|

|

|

|

|

|

|

|

|

|

|

|

|

|

|

|

|

|

|

|
|

|

|

|

|

|

|

|
||||
01/2020