Introduction
The T-64 was accepted
for active service in late 1966. This tank, a revolution by this time, would
enable the Soviet armor to make a technological leap. In fact, it created a
break with the former generation MBTs (T-54/55, T-62) which were directly
derived from the T-34 :
- crew number reduced to 3 men thanks to the autoloader
- use of composite armor
- new type suspension
- motorization
But being costly and complex, this tank didn't fit a conscription army.
Therefore, it was quickly replaced by the T-72, more fitted to mass production.
The T-64 is still in service, particularly in Ukraine where the most modern
version entered service a few months ago : the T-64BM Bulat
According to the Soviet tradition, the
two main versions
(T-64A and T-64B) went through
many remzavod along their career. This amount of sub-versions enables an
important choice for the modeler ! Now, I decided to build a T-64B Mod1981. Be
careful when you buy your Skif kit since there are 5 versions of the T-64 issued
by the manufacturer :
T-64A
T-64B
T-64BV
T-64AK
T-64BM2
Several parts combinations exist :
T-64A without anti-radiation lining on the turret, the glacis and the hatches
T-64A without anti-radiation lining on the turret but with the layer on the
glacis and the hatches
T-64B without anti-radiation lining on the turret but with the layer on the
glacis and the hatches
etc...
If possible, have a glance at the content of the box and according the model you
want to build make the right choice !
Eduard proposes 2 photo-etched sets for the T-64 : reference 35203 for the T-64A and reference 35334 for the T-64BV. The sheet for the T-64A is the most suitable for a T-64B mod. 1981.
The chassis assembly
Molding method "ŕ la Heller".
Before the assembly of the rear fuel drums brackets, sand them and replace them
by the Eduard ones. Carefully fit the sides. Don't hesitate to sand the tenons
to get a perfect fit. Some putty will be required at the rear. My intent being
to build a T-64B mod. 1981, I had to remove the anti-radiation lining on the top
of the hull abreast the driver hatch. For this kind of surgery work, I use a
mini driller with a sanding disk.
Take care to have the disk parallel to the hull to avoid hollowing the plastic.
Once the most of it is removed, the remaining just need to be hand sanded.
A little solvent is swiftly brushed to
check if the result is neat. Some putty add-ons were necessary. The few details
on the glacis are sanded away as well. The wiring of the headlights and the
cables for the demining kit are redone with different diameters copper wires.
The Eduard parts replace to great advantage the kit ones : mudguard, tow cable
brackets, etc... The headlights cages are redone from brass wire. Skif and
Eduard parts are used as templates.
The fuel cells piping is made from electrical wire not fully stripped.
The engine deck is detailed with some PE parts, particularly the engine grilles.
On the other hand all the handles are done from copper wire, the PE parts being
by construction too flat...
From the kit skirts, the upper parts taken. The lower parts are done from thick
lead foil. The hinges are rebuilt with the Eduard PE parts on which are glued
tiny bits of stretched cotton-bud rods. In these homemade tubes, you just have
to insert a copper wire pin.
The tow cables are from Karaya.
I advise you to set the running gear without gluing it to facilitate the fitting
of the Miniarm tracks.
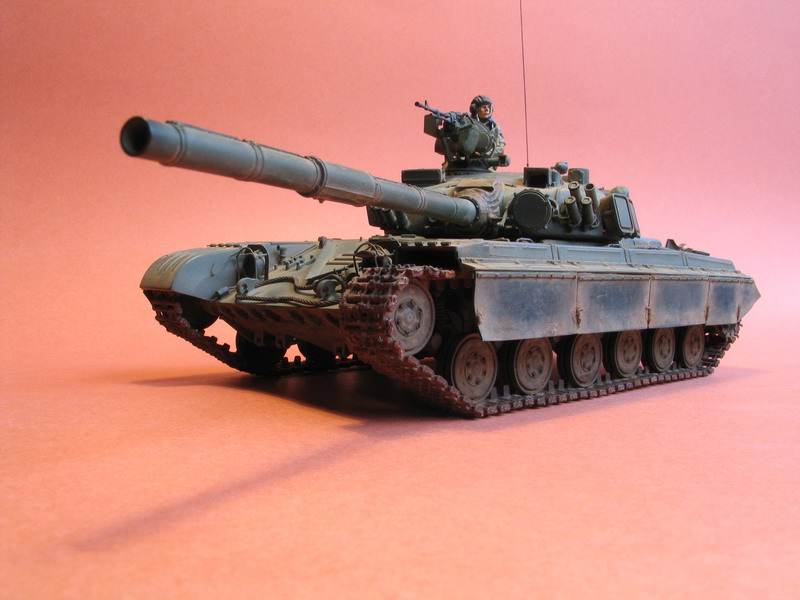
The turret
The Miniarm kit
contents nearly 70 parts solely dedicated to the turret, including a turned
metal barrel. This new turret is really nice. It very much resembles a T-64
turret unlike the Skif kit one.
The kit even includes the beginning of an interior with the TC sights, the fire
control and the breech. The rest of the interior relies on the bravest modeler
responsibility... Maybe for another time !
The resin parts are improved here and there with some PE addition, among others
the bins and ammo boxes latches. Beware, you'll need to have fairy fingers to
set those parts !
Few additions are needed for the turret. The most important is the smoke
dischargers wiring.
The kit metal barrel, despite being well-made, is replaced by a resin one issued
from the Blast set for the T-72. The T-72 and T-64 barrels are similar
(2A46M).
The tracks
The true problem of
the Skit kit : the tracks... Skif also issues an individual links set for the
T-64 but unfortunately this set does not match our hopes. The links require an
incredibly tedious sanding to allow a nearly correct fit.
Fortunately, Miniarm comes to the rescue with a magnificent resin tracks set.
With a very little preparation work, the assembly is quickly done. Take care to
the fastening system which is very fragile.
I decided to assemble the tracks and paint them apart. This is quite tedious as
the tracks are pretty fragile.
I rather advise you to :
- assemble lengths of 10 links, not more.
- set them directly on the running gear.
Once the track is in place, you just have to remove the assembly tracks/roadwheels
and paint it.
The painting
Once the model
complete, it is cleaned by spraying some methyl alcohol. A light white coating
is sprayed all over the vehicle to unify the various shades of the materials
used. This first work also reveals glue stains and sanding marks... Then several
veils of Tamiya JNA green are sprayed in successive layers before being sealed
with a satin varnish coat. A diluted black filter is brushed on the whole tank ;
then a black wash is applied to stress the recesses.
The next step is application of Maskol with a scouring pad. A well diluted veil
of Buff is sprayed in several passages and some Maskol is removed between each
passage. At this stage, the various details are painted with Prince August
shades : the gun mantlet fabric, the headlights, the tow cables, etc ...
Once dry, we can go to the pastel/pigment step. I equally use MIG pigments, dry
or oily pastel chalks. I work by areas and in an approximate way ! With a long
hair brush, I lay down a good amount of pigments. I blow on it to remove the
excess, then with a finger I rub the parts where the dust does not pile up. When
the result is satisfactory, I seal the pigments in the recesses with some
mineral oil. If necessary, the operation is repeated on the same area till the
expected effect is reached. When I am satisfied by the dusty look, I complete
with some grease stains (black oil paint diluted with white spirit and some
drops of gloss varnish). Then, with a lead pencil, some graphite chalk and a
little stump, I try to give a polished metal look to the worn-out areas.
Don't be heavy handed, a peace time tank is often well maintained even by the
Russians !
Conclusion
Although a bit expensive, the Miniarm turret truly gives a lot to the Skif T-64. Pending the injected kits main manufacturers bring us a new mold, it is, in my honest opinion, a must-have to realize a T-64 looking like a T-64. Obviously, the bravest among us still could redo the Skif turret with their putty tubes. If you decide not to buy the turret, don't do it for the tracks as they are really great. A nice marvel of molding !


