Ref: Meng # SS-014 Russian 9K37M1 Air Defense Missile System

The 9K37M1 Buk (NATO: SA-11 Gadfly) is a self propelled medium range air-defense system including a command post vehicle and a target acquisition radar vehicle (at battalion level), tractor erector launcher and radar (TELAR) vehicles and tractor erector launcher reload vehicles (at battery level). The TELAR is called 9A310M1.
The 9K37 system has been designed from 1974 to replace the 2K12 Kub (NATO: SA-6 Gainful). Unlike the Kub, the Buk integrates an acquisition and fire radar which makes it autonomous.
The 9K37M1 is a modernized version which entered service in 1984. The modernization concerned the performances of the radar system, the kill probability and the resistance to electronic couter-measures. The target identification system has also been improved to guarantee the classification of targets even when IFF is not available.
The 9K37M1 system is capable of detecting targets up to 85 km (140 km according to some sources) at the altitude of 25000 m and 35 km at the altitude of 100 m. An aircraft can be engaged between 3 and 42 km at an altitude between 15 to 25000 m, a tactical ballistic missile can be engaged between 3 and 20 km at an altitude between 2000 m and 16000 m. The system is capable of engaging ground targets.
The reload vehicle can transfer its missiles to the TELAER within 13 minutes and can be reloaded within 15 minutes. The vehicle can fire its own missiles however it needs to be controlled by the radar of a TELAR.
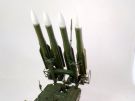
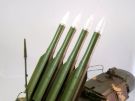
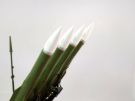
The 9K37M1 fires the 9M38M1 missile. It is 5.5 m long, weighs 690 with a 70 kg warhead comprising 8000 shrapnel fragments. The explosion is triggered by a radar proximity fuse.
The Buk in various versions has been engaged in South-Ossetia en 2008, in Eastern Ukraine since 2014 where a civil airliner was shot down, in Syria since 2018.
The Buk is in service in 17 countries. The main users are Russia, Ukraine, Algeria and Syria.
The kit
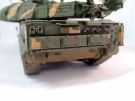
Released in 2018 by Meng the kit depicts the first evolution of the Buk. It includes 10 beige plastic sprues, 2 hull halves, 1 launching platform top, 1 clear parts sprue, 1 vinyl sprue, 1 photoetched parts plate, 1 decals sheet and 1 24-page instructions booklet. The tracks are the individual link type and are workable like the suspension thanks to torsion bars.
The cast is clean, the level of detail is excellent. The parts require a minimal cleaning. The mold lines are very thin. Several ejection pin marks are ill placed especially inside the driver compartment flaps. All the hatches are separate parts even though no interior is provided.
The notice is usually clear and does not present any mistake. You need to choose the decoration at the beginning of the build as the Finnish version has some differences which are well described in the notice. Some painting instructions for details are provided. The track assembly requires 113 links per side. The assembly is done with a jig allowing the build 7 links at a time. Those are secured by a pin which is inserted in one side with no glue needed.
The build
The hull
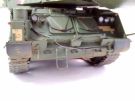
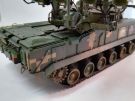
Step 1 deals with the roadwheels, idlers and sprockets. The tread of the roadwheels is sanded to delete the seam lines.
At step 4 the torsion bars are fitted. They are workable.
At step 5 the roadwheels and idlers are not attached yet. However the sprockets are installed because you have to glue the mud-scrapers C10 and C11.
At step 7 it is better to paint in black the interior of the hull under the engine grille B30 (only mentioned at step 9)
At step 10 the headlights are glued but the glass parts are not.
At step 11 Meng give the option between open and closed driver flaps. As there is no interior I glued them closed.
At step 12 the rear view mirror support is not glued yet to avoid any breakage. The inner face of episcopes G4 are painted black before being glued.
At step 15 you need to choose between the 2 launching platform lock (travel or firing positions).
The turret
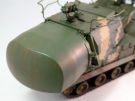
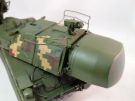
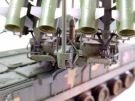
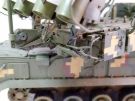
Steps 18 � 21 deal with the assembly of the launching platform shell and its numerous hatches. The fit is perfect.
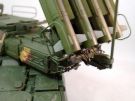
At step 22 you assemble the jack for the launching ramp. It is necessary to enlarge the hole for the piston C28 (step 31).
At step 23 you have to stick to the sequence of assembly of parts D43 and D6.
Steps 24 to 26 do not need any comment.
At step 27 I glued the optical visor horizontally as it would not stay in place.
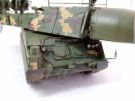
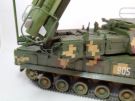
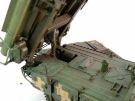
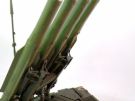
Steps 29 and 30 deal with the both launching ramps and are symmetrical. You have to thoroughly eliminate the assembly seam on the main arms. On sub-assemblies G and L you must ensure parts A59, A50 and A51 are parallel. The vinyl cables H1 can be glued with plastic glue.
At step 31 the ramps are installed. Again Meng give an order for the assembly of the various elements which must be respected. The ends of cables H1 are plugged at the rear of the ramps. Weirdly enough the vinyl was brittle and two cables broke when they were bent. They were glued back with CA glue. For an unknown reason the ramps would not rest of their supports. This obliged me to represent the ramps in the firing mode.
At step 32 in order to elevate the missiles ramps parts (C3 et C15) at the base of the antenna must keep mobile.
Missiles are assembled at step 36. The body is made of two parts so it is necessary to eliminate the seam properly. The fins installation comes with no issue. The missiles are not glued yet to facilitate the painting and the marking.
The decoration
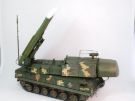
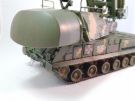
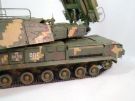
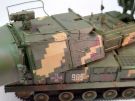
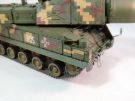
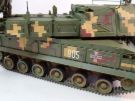
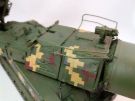
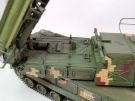
Meng propose 3 decoration options: a Russian 3 tone-camouflage, a Finnish 4-tone one and a Ukrainian pixel one. This is the one I chose. The main problem was to cut the numerous masks to create the areas.
First the tan color (XF-60) has been applied before being masked. Then the brown (XF-9) and the dark grey (XF-69) have been applied. To achieve the camouflage the green (XF-67) has been sprayed all over the vehicle. The various details are painted according to the instructions. The roadwheelds treads are painted XF-85 and the tracks are painted XF-84. The missiles are painted XF-67 enlighten with some XF-3. The head is painted white and the metallic ring is painted X-11. The fins at the rear are painted with XF-20 enlighten with some white.
A coat of gloss varnish is sprayed before applying the rare markings on the vehicle and the stencils on the missiles. Concerning the latter all of them have not been applied. Some straight bands cannot fit to the missile body curved parts.
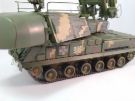
The weathering began by spraying various shades of earth of the running gear and the lower hull. Then the tracks have been assembled. The vehicle got a dark brown wash to enhance the details. Then several veils of light earth have been sprayed to give a more dull finish. Some streaking is made with water color pencils.
Conclusion
Meng realized a superb model easy to assemble even if the missile ramps require some care. The Ukrainian pixel camouflage is out of the ordinary however it is not easy to mask. The turret tends to turn freely into the hull ring. So some care will be required during handling or trips.
Click on a thumbnail to see the full sized picture

|
|

|

|
|
|
|
|
|

|
|
|
|
|
|
|
|
|
|
|

|
|
|

|

|
|
|
|

|
|
|
|
|||