T-55AM2B
Ref :
Tamiya #35257
CMK #3045 T-55AM2 /2B Kladivo
Real Model #RM35090 A5M - T-55 Hammer
Miniarm #B35057 T-55 (late) T-62 workable set and drive sprockets (RMSh)

The T-55 AM2B Kladivo is the
improved
version of the T-55 AM2 which was developed by Czechoslovakia between 1985 and
1990. Approximately 450 tanks have been built. The Kladivo was better
protected thanks to add-on armor under the belly, on the front glacis and the
turret front. The upgraded fire control system used a laser rangefinder above
the gun mantlet, a wind sensor SDIO on the turret rear and a 1K13 sight enabling
the firing by the gun of the 9K116 Bastion antitank missile. The tank carries 38
gun rounds and 5 missiles.
The tank was also fitted with a bank of 8 smoke grenades launchers Tucha, one
7.62mm coaxial MG PKT and one 12.7mm antiaircraft MG DShKM.
The AM2 version was also
in service with the East-German army but was not capable of firing the antitank
missile. Moreover the East-Germans modified their tanks.
This version has been exported to Sri Lanka, Angola, Yemen, Georgia and Latvia.
The model
To build this conversions, I used the Tamiya kit as a base and mixed the conversions by CMK and Real Model. (See the comparison of both kits in the reviews section) The former is more comprehensive and generally most accurate than the Real Model one. But it still needs an important detailing work to get a model true to life.
Before beginning, you need to choose the
final version among three options: a Czech or East-German AM2 and a Czech AM2B.
Having decided to depict a AM2B Kladivo, I modified the Tamiya turret parts B8
and B16 according to the CMK instructions. It is necessary to cut away the right
fenders.
The turret
Before assembling the parts of the
conversion, you need to represent the chamfer at the base of the turret and
drill the air inlet of the right side.
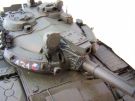
The difficulties come with the fitting of the gun mantlet. None is
accurate so I chose the CMK one which is too narrow but appears to be the most
correct. I rebuild the front part of the laser rangefinder housing. You need to
drill the hole to install the gun. It will be set later. The photoetched latches
for the thermal sleeve must be dry fitted as the order of fitting does not match
the instructions.
The armor blocks are the Real Model ones. They are molded solid with the
brackets welded to the turret. Moreover they present the rough cast effect. The
left one also has the cut-out for the driver's head.
On the right block, you need to add the wiring for the small IR light.
The large IR light is modified. Its rear face has small fins and a power
socket.
Unlike the drawings of the instructions, you must not utilize the hand rails of Tamiya. On the Czech AM2, they are either of a different shape or located elsewhere.
On the turret roof, you need to add the
power cable for the smoke-grenades launcher. In front of the commander hatch,
the light bracket is detailed and the 1K13 sight is glued. The photoetched part
for the glass is too large. So the flap is glued closed.
The loader hatch is too short. A strip of plastic is glued to its front. The
base for the MG pedestal comes from the Real Model conversion as it is more
detailed.
The rear of the turret requires a lot of
work. It is necessary to have a good documentation to avoid mistakes. First,
there is only one lifting hook on the turret. It is centered. The convoy
light C59 must not be glued as per the Tamiya instructions. It is cut and glued
along the SDIO wind sensor bracket. The base of the wind sensor has legs welded
to the turret. They are represented with bits of Evergreen rod. All the wiring
is made with brass wire. A light is added to the left of the sensor.
To complete the rear part, it is necessary to make the MG travel support.
The numerous ammunition boxes with their fabric covers are issued in resin with
photoetched straps. Unfortunately, the straps are too short for the boxes. So I
used the Tamiya boxes.
The lower hull
It requires very few
extra work. In fact you just have to glue the belly armor plate. The running
gear is not installed at this stage. The Miniarm tracks are assembled but will
be installed only at the end of the build. Although they are workable, they are
very fragile and the retaining pins can be easily broken.
The rear panel is detailed with a square hatch bolted between the fuel drums
brackets. The latter are provided in resin by CMK but I preferred the Tamiya
ones for their better fit. However you have to detail them.
The upper hull
The front part is quite
easy. The armor block is the Real Model one. Indeed, it fits better and presents
the large bolts on the sides of the front face. The front of the block must be
shortened by 2mm as it overhangs too much.
The headlights protection cage is modified. The headlights are mounted to the
vertical posts like the real ones. The power cable is added. The convoy lights
are modified too. On the Czech tanks, the base is a kind of tube welded to the
hull.
The driver vision blocks cleaning system is added.
On the front fenders, you have to put on the right two spare track links and on the left hooks for transportation by railway. The latter are made from plastic card as the CMK resin part is way oversized.
The rear deck requires a
large amount of work. CMK, in fact Eduard, provides a great number of
photoetched parts which are useful to represent the various grilles open. For
those who want to depict them close, the Real Model resin part is a good base.
The engine grilles are too wide. Their frames must be thinned to be adapted to
the Tamiya part. Each flap consists of two parts to give some thickness. A thin
strip of plastic is glued around the transmission grilles to create the missing
relief of the photoetched parts.
All the hinges for the flaps must be added. For the transmission flaps, you have
to add at the rear of the engine deck the retaining hooks which hold the flaps
open.
Between the both engine grille, they is a plate with 4 bolts. On the Czech
vehicles, there are 12 bolts. The missing bolts are made from plastic rod.
At the end, an oval bolted plate is added as well as two bits of tube in front
of the right fuel drum brackets.
The fenders require a
bit of detailing work. you have to add the fuel piping and take into account
those which run to the fuel drums. So the fuel circuit is different from the one
usually found on the T-55s. The fuel tanks latches are made from plastic strips.
Behind the front tank, there is a stowage box of the same type as the one on the
left rear fender. It comes from my spare parts box. The oil tank is moved onto
the exhaust cover.
Do not use the CMK parts PUR10 as they represent OMSh spare track links.
The build ends with the
side skirts. The Real Model parts are the good size but are wrong. They are
modified copies of T-72 skirts. The CMK ones are quite accurate but are badly
warped and the left one is too short. So I cut the portions to straighten them
more easily. Some details have been added. The rubber parts have been made from
plastic card. Each photoetched strap is first dry fitted as you can't rely on
the instructions.
Concerning the upper portions, the photoetched parts are used on the right side.
On the left one, you have to make the portion in front of the exhaust and cut
the one behind it.
The decoration
CMK provides decals for a Czech version and a East-German one. Unfortunately I lost my decals so I used decals coming from the Kagero book about the BMP-2.
For the painting, the
base color is Tamiya XF-58 Olive Green. To create some shade variations I
applied some oil dots which are then drawn downward. A wash of black and umber
is applied to give some depth.
Finally the mud is made with a mixture of various pigments and white spirit
which is splattered with an old tooth brush.
References
Military vehicles
BRDM2
Brigadyr.net
Forum
valka
Tanksim org

|

|

|

|

|

|

|

|

|

|

|

|

|

|

|

|

|

|

|

|

|

|

|

|

|

|

|

|

|

|

|

|

|

|

|

|

|

|

|

|

|

|

|

|
|