Réf : Panzershop #PS35C134
MasterClub #BMP-2 MC135042CL

Réf : Panzershop #PS35C134
MasterClub #BMP-2 MC135042CL
The ShM-120 (samohybný minomet) vz.85 PRAM is a self-propelled mortar based on an extended BMP-2 chassis and armed with a 120 mm mortar. The development started in 1978 and in 1982 two prototypes were assembled. The tests were conducting till 1985 and in 1990 a total of 12 vehicles were built.
At the secession between Czech republic and Slovakia, the vehicles were dispatched between the both armies. The Czech army would still possess 8 vehicles.
The PRAM is organized in a classical way with a driver compartment to the left of the engine compartment and the combat compartment at the rear in a casemate. The main armament is centrally installed and can be elevated from 40 to 80° and traversed from - 15° to + 15°. The loading is done by the breech. The mortar has a range of 500 m to 8000m depending on the type of ammunition. The rate of fire can be up to 18 rounds during a minute and 40 rounds during 5 minutes. The ammunition capacity is 80 rounds.
The secondary armament consists of a 12.7 mm anti-aircraft NSVT MG mounted on a cupola at the rear of the casemate and a 9M113 Konkurs (AT-5 Spandrel NATO code name) antitank missile firing post.
Even though a limited number has been built, there are many small differences between the vehicles, in particular on the casemate.
The crew comprises a vehicle commander, a driver and two mortar crew members.
The kit
The kit produced by Panzershop includes approximately 140 resin parts, a small photoetched parts sheet and a decal sheet with only the nationality markings. It comes in a large cardboard box. The parts are issued in re-sealable plastic bags and protected by foam chips. The instructions are made of 4 pages of poor black and white copies of photos of the assembled model. 2 additional pages list the parts with their number and denomination and feature poor BW pictures of them.
The level of detail varies. The molding is quite acceptable in
particular for the parts being copies of the Dragon BMP kit. However accuracy
wise the kit is a miss. Most of the Dragon parts have not been modified or
incompletely (in particular the sprocket wheels and the tracks). The casemate
has geometry issues and the details are wrong. Many air bubbles need to be
filled.
All the PE parts are useless.
You need to fix all the kit's flaws. Concerning the casemate, all the details are sanded away. I only sanded a limited part of the vehicle commander cupola but I should have done it all.
On the front compartment you need to fix the left side which lacks the straight angle. Panzershop didn't fix the Dragon part. To do so the left side is cut out and two pieces of plastic card are added. On the running gear, the "Dragon" tracks are simply replaced by a set of MasterClub which includes late type sprockets. When the basic preparation is complete, the whole hull is assembled. Large gaps exist at the front and the rear. They are filled either with plastic card or putty.The upper hull
On the front part, the holes on the access hatch behind the driver are filled and new ones drilled out at the right location. The bolted part (part of the NBC system) is done with a roundel of plastic card. The round plate for the antenna is redone and moved to the right place. The hinge on the driver hatch is improved.The exhaust cover is detailed with the wire frame and two metal strips inside. Many details are added such as the headlights cables protections, the hooks on the front glacis (the kit ones are wrong), three lifting eyes on the engine deck and an air intake.
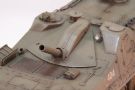
The casemate requires a large amount of work. You need to add the numerous weld seams omitted by Panzershop. They are made of plastic lengths soaked with liquid cement and marked with the back of a cutter blade.The base of the mortar with the two folding flaps is entirely redone. The parts issued by Panzershop are totally wrong. A basic U shaped structure is made with 1.5 mm thick plastic card. On top of the sides three beveled plastic card rectangles are glued. When the assembly is set, the outer angles are rounded off. The inner angles are drilled with a mini drill. The rear part is made of two plastic card pieces glued together to get the right thickness then shaped by sanding. The details are added with brass wire and thin plastic card. The mortar dust cover is made with some Tamiya epoxy putty.
The small light is replaced by one from a Tamiya T-55 kit. The bracket is made from plastic card.The water drop shaped cover which protects the mortar sight is cut in a 0.75 mm plastic card sheet.
The large round air intake is made from a bit of 7.9 mm diameter styrene tube. The mesh comes a Aber sheet. The rest of the structure is made from plastic card of various thickness. The bolts at the base a from Plastruct. The duct left to the intake is made from resin leftovers. Two small air intakes rear of the duct are also made from plastic card.The retaining system for the towing cables are depicted with styrene and brass wire. The MG gunner hatch is totally redone. The base only is preserved. The NSVT and the antitank firing post supports are entirely redone as well. The NSVT is a copy of the Tamiya T-72 kit one. So it is quite good but Panzershop has omitted to give the recoil springs under the cradle. They are made with bits of styrene rods and very thin metal wire to create the springs.
On the slope sides, you need to redo the bolted round hatches. The tools are either modified or made from scratch and their latches are made from styrene strips. The PE parts are wrong. The spare track links come from the MasterClub set.On the left side, the door must be engraved (it was molded raised) and the details need to be added or improved. On the right side, the brackets for the unditching log must be added. All the handles are made from metal wire designed for flower art.
At the rear, the large panel and the door must be engraved and the details of the door added. A support for a stowage bag is created from metal wire too. Panzershop gives a bag but it is too large and does not feature the metallic support. The straps are made from tin foil.The skirts come in three parts. The front and rear sections are separate parts. The central section is molded on the casemate. To ensure a correct alignment, you need to cut off the central section and glue it to the ends to get a complete skirt. The right one must shorten. Then thin styrene strips are added to the central section to fix the size issues. Moreover, on my model a tear in the mold generated a big extra thickness issue on the left central section.
The lower hull
The running gear is assembled without any
issue. Some roadwheels need a thorough cleaning to remove a mold line. The
sprockets are wrong because they have 6 spokes instead of 5. They are replaced
by MasterClub ones which are the late type.
The kit tracks are wrong. They are too wide and the inner face is not flat. They
are replaced by the MasterClub set designed for the BMP-2 which are nicely
engraved. The level of detail on the connectors is stunning. The box includes
200 links with a number of them with bent connectors (to fit the sprockets and
the idlers) and 4 spare links.
They are clickable but have a tendency to break apart at the slightest tension.
I ended by securing them with CA glue.
Under the front glacis all the mounting brackets for the KMT are removed. The mobile flaps in front on the tracks are thinned and the stationary part is simply replaced by a rectangle of plastic card.
The painting
The vehicles were painted either
in plain khaki
or in a three tone camo. The lack of reference about the latter drove me to
choose the khaki decoration. To get a close shade, I made a mix of XF-65 Field
Grey and XF-49 Khaki.
The markings issued by Panzershop are not correct. On the one hand, the cockades
have a blue edge which is wrong and on the other hand only one has the blue part
oriented to the front. The numerals and the unit markings (triangle) come from a
bonus decal sheet issued in a Kagero book about the BMP-2, the cockades come
from the Tamiya T-72 kit and the one on the back is fro ma Dragon sheet.
The mud effects have been done with various tones of pigments fixed with flat varnish. The dust is created with some Flat Earth well diluted and sprayed all over the vehicle.
Click on a thumbnail to see the full sized picture

|

|

|

|

|

|

|

|

|

|

|

|

|
|

|

|

|

|

|

|

|

|

|

|

|

|

|

|

|

|