ref : Meng #TS-001 Merkava Mk.3D early
Eureka XXL#ER-3511 Towing cable for Israeli Merkava III tank

The Merkava 3D is the latest version of the Merkava 3 in service with the Israeli Defense Forces. Compared with the previous versions, it incorporates many improvements of the protection and the firepower. In fact, the turret has been reinforced by armor modules on each side without the whole turret needing to be redesigned. The side skirts benefited from third generation armor.
The firepower has been improved with the introduction of the fire control system BAZ given to the tank a true fire-on-the-move capacity thanks to a stabilized target tracking ability. The BAZ system also gives a Hunter-Killer capacity enabling the tank commander to independently detect and assign targets to his gunner. For this, he has a panoramic sight on the turret roof.
The Merkava 3D has a 1200 HP diesel engine. Installed at the front like in all Merkavas, it contributes to the crew protection. Brand new transmission and suspension allowed to improve the tank mobility.
The tank is armed with a 120 mm smoothbore gun and a 7.62 mm coaxial MG, a .50 MG fitted onto the gun mantlet and two 7.62 mm MG for the tank commander and the loader. For the close protection, it features two clusters of 6 smoke-dischargers on each side of the turret.
In the standard way, the crew is of four: a tank commander, a gunner and a loader in the turret and a driver in the front left hull side.
Since its entry into service, the Merkava 3D took part in all the operations conducted by the IDF of which the war in Lebanon in 2006 and operation Cast Lead in the Gaza strip in 2009.
The kit
Upon its release, Meng created a surprise. A previous model released by Academy didn't meet the modelers' expectations. The result is really great even if it is not perfect as seen later.
In a large box, we have no less than eleven grey soft plastic sprues, one clear sprue, two hull halves, two turret halves, two one-piece idler wheels, a set of polycaps, a bag with 220 track links, a bit of metal sheet and a bit of metal wire. A sheet of decals and a instructions booklet complement the parts.
The instructions booklet is 26 pages. The first four are dedicated to the tank and the model history. The last two show a diagram with the sprues and the decoration color instructions. The build is split into 45 steps and allow some options as presented later.
The
level of detail is great. Some parts are particularly fine. Above all, Meng
managed to realistically mold the well known protective chains at the back of
the turret which always are a problem when one wants to build a Merkava. In
contrast, the antislip coating, which is characteristic of the Israeli vehicles,
is not represented.
The molding is usually good but some molding lines are just of the 70s standard,
in particular on the suspension parts. The fit is also good.
The build
The hull
The lower hull is molded with stiffening ribs. This avoids a twisted hull which always is annoying when it comes to glue the upper hull.
The suspension demands a
huge cleaning job to get rid of the molding lines. Meng give the choice between
all steel roadwheels and rubber band ones. Of course the related swing arms are
issued. However, there is no correspondence with neither of the decorations
included. The idlers wheels are molded in a single piece which is outstanding.
The triangular supports of the return rollers are handed. It is not that obvious
to notice but in case of you are mistaken there is no negative consequence.
The footstep C26 at the front of the hull is too wide regarding its brackets
C27.
The large hull rear door requires some care to be assembled. The baskets
supports are quite fragile. Once built it is better to put them aside to avoid
breakage.
The upper hull does not require major comments. Meng offer
several options: open or closed headlights, two types of driver hatch. Again, no
indication is given concerning the correspondence of one type with a specific
decoration.
The side skirts are really nice with many markings. The brackets are issued as
separate parts which enables to represent a tank with one or more missing skirts
elements.
The tracks are the separate link type and are nicely molded. However the molding
lines require to be cleaned for a perfect bonding.
The turret
The build starts with
the gun which comprises 15 parts. In my kit, the muzzle was wrongly molded and
had a V shaped cut-out which I had to fill with putty. On the front ring of the
bore evacuator F23, you need to drill four holes, one for each tab. To make the
further handling easier, the gun has not been glued to the mantlet as this
stage.
The turret basket and the well-known chains are the next step. The assembly
requires some care due to a tricky fit.
At the step 25, it is important to glue the antenna bases and the wind sensor
mast prior to fixing the parts K12 and K13.
Some parts are fragile like the handrails of the side armor modules. Despite
this, the assembly is not difficult at all.
All the vision blocks can be shown open or closed. However, the tank commander
sight is in the open position only.
The both smoke dischargers clusters can be depicted open or closed. The edge of
the parts need to be thoroughly cleaned to allow a perfect fit.
The build ends with the three MGs. The commander MG only was problematic. The cradle made of parts F6 and F7 was too large and do not fit into the support F26. The linking rod between the parts had to be shortened.
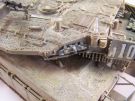
The cables have been replaced by those from Eureka XXL. As on the real ones, the eyes are attached with small chains made of twisted brass wire.
The antislip coating
Being absent, I chose to make it with some fine sand I found in a artcraft store. White glue has been paintbrushed to have a better control of the areas to avoid. Then the sand has been sprinkled. The excess was removed by turning the hull or the turret upside down. The adhesion of the sand was reinforced by tapping the surface with a finger tip. The job was successively done in small areas to prevent the glue from setting.
The decoration
It started as soon as the running gear assembly. It got a coat of sand grey made of a mixture of Lifecolor UA35 Israeli Sandgrey and Tamiya XF49 Khaki in a ratio of 2:1. The tracks have been painted dark grey. A basic weathering was done prior to gluing the upper hull and the side skirts.
The whole tank has been sprayed with the sand grey mixture. The white stripes on the gun have been airbrushed using some Tamiya masking tape. A coat of gloss varnish was sprayed over to help apply the decals and the dark wash to enhance the recesses.
Once dry, the weathering was done with various shades of sand and earth from Tamyia and Lifecolor. Some pigments from Mig were mixed to represented the mud splashes under the hull and on the tank sides. The metal parts of the MGs and the spare track links have been painted XF84 Dark Iron. The rendering is better than with XF10 Gun Metal.
Conclusion
Meng realised a very model which can be built without add-ons. It is simply a pity that the antislip coating is absent and some molding lines are way to thick.

|

|

|

|

|

|

|

|

|

|

|

|

|

|

|

|

|

|

|
|

|

|
|||