ref : Trumpeter#01531 United Arab Emirates BMP-3
Eduard#36178 BMP-3 UAE baskets
The BMP-3 development started in 1981 and the vehicle has been adopted by the Russian army in 1987. Its entry in service was a slow process and the total number of BMP-3 in the Russian army is estimated to approximately one hundred. However, the BMP-3 has been a real success on the export market with around 580 vehicles sold to Cyprus, United Arab Emirates (UAE), Kuwait and South-Korea.
The BMP-3 has an outstanding firepower compared to the standard IFVs. It is armed with a low pressure 2A70 100mm gun firing standard rounds but also laser guided 9M117 missiles. The coaxial 2A72 30mm autocannon complements the main armament. One 7.62mm PKT MG is also fitted coaxially in the turret ans two more PKT are fitted in the hull on both sides of the driver.
The crew comprises a vehicle commander and a gunner in the turret, a driver, two PKT gunners and a squad of 5 infantry soldiers.
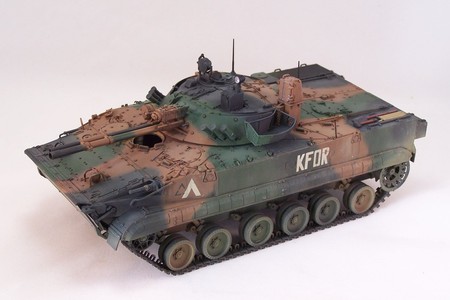
The version purchased by the UAE is different from the basic version. It includes insulation applique on the roof, air-conditioning and an improved fire control system including the Namut French thermal sight. The UAE BMP-3s also have additional stowage baskets around the turret and the 30mm gun has been noticeably extended. UAE purchased 448 vehicles as well as the recovery version BREM-L.
In 1999, for the NATO operation in Kosovo, UAE deployed within KFOR a mechanized battalion partly equipped with BMP-3s under command of the French brigade.
The kit
Trumpeter extends its series of BMP-3 kits with this UAE version.
In a large box, you have 9 beige plastic sprues, 2 green plastic sprues for the guide teeth, 1 clear plastic sprue, 2 hull halves, 1 upper turret shell, 1 bag containing 180 track links and 2 small photoetched parts sheets. 1 decals sheet, 1 instructions booklet and 1 color sheet for the decorations supplement the content.
The instructions booklet comprises 12 pages. The assembly is split into 13 steps. Several part numbering mistakes will be explained later on.
The level of detail is good. The cast is overall good and there are few molding lines to remove. The build is easy.
However Trumpeter omitted the stowage baskets for the turret and does not provide the extended version of the 2A72 gun. An interior is included for the hull and the turret. This is a good idea but Trumpeter did not seriously researched it so many parts are wrong, essentially in the hull.
The assembly
The KFOR version, I chose to build, features some modifications which will be explained later on.
The hull
The suspension is not a problem. The sprocket final drive needs to be enlarged. The sprockets and the idlers are lued at this stage to facilitate the tracks assembly. The latter require a lot of work. You need to clean the 168 track links and glue the same amount of guide teeth. I chose to temporarily build the tracks to faiclitate their painting. Once the tracks are glued, they are removed as well as the sprockets and idlers.
Then Trumpeter suggests you build the interior by sub-assemblies (internal walls, driver compartment, rear alleyway). No color indications are given. You need to find the appropriate documentation. I mainly used Steve Zaloga Concord book Russia's BMPs. The few pictures of the interior show that Trumpeter made big mistakes. For instance, the rear seats A9 should be foldable and fixed to the hull sides and not to the floor. Some extinguishers are not at the right place. Others are of the wrong type. The driver compartment for its part is quite simplified and the instrument panel is wrong. The vertical stiffeners quite visible on the pictures are omitted. It is advised not to show the interior or otherwise to do some extensive upgrading work.
The
interior of the roof is dealt with at step 8 and has some mistakes too. 2
episcopes A7 are missing at the rear. The central episcope A7 does not
correspond to the reality as in the BMP-3 this is a mirror system. Numerous
lamps C18 are provided but several are missing. The driver hatch opening device
is wrong and too large.
Concerning the part number errors, part D26 is in fact E26. The wall D55 with
the missiles brackets is over simplified too and half of the brackets are
missing.
At
this stage, contrary to the instructions, the hull can be glued to begin to add
details to the upper hull. I decided to use the PKT MG with their covers (C26 et
C27). The rods A34 for the hatches over the rear alleyway are very fine and
fragile. The driver hatch is part C8 and not B8 as mentioned on the
instructions. The glasses of the headlights are not glued yet. To glue part
PE-A4 on part B14 you need to sand the latter. As stated in the instructions, be
careful to glue parts A34 before gluing part B14.
If you intend to show hatches N1 and N2 open, you need to detail the handles
inside hatches A42 and fill the ejection pin marks.
As seen on many pictures, the unditching log on the left side is not installed. At the final step 13, ou need to invert parts B6 and B9.
Prior to starting the turret, the lower hull is plainted black then the running gear is definitely installed.
The turret
The assembly begins with the interior and the turret basket. It is simplified but acceptable. At step 11, you need to drill the holes for the part E25 which is omitted by Trumpeter. Those two holes are visible on the instruction drawing in front of the commander station.
The 100mm gun breech is over simplified and the 30mm gun one is missing. Again Trumpeter did not look for documentation enough to give a satisfactory interior. The both guns are glued on a theoretically mobile part but the mantlet E20 makes the assembly fixed.
At step 12, to depict a KFOR vehicle you need to replace part P18 with part D35. To depict the right length gun, a 1.5cm long bit is cut from a 2mm diameter rod. The flash suppressor is drilled and thinned. Then to get the flared shape, a drill bit is rolled against the inner face.
As Trumpeter omitted the stowage baskets for the turret, I used a Eduard reference. Unfortunately, the baskets structure is made of tubes and the Eduard parts are flat. So I used them as templates for the structure and made them for 0.6mm rod. I only used the mesh parts for the Eduard set.
The decoration
The vehicle is painted according to a scheme close to the French camouflage in three tones of green, brown and black. The shades used by the UAE are not those of the French camo. Trumpeter advises XF-26 Deep Green for the green and XF-59 for the black (in fact it is XF-69 NATO black). No match in the Tamiya range for the brown is given. So I made a mix of XF-60 Dark Yellow and XF-64 Red Brown progressively adding some XF-64 until I got a shade slightly lighter than the real one to take into account the darkening effect of the gloss varnish used before applying the decals.
The inverted Vs have been shortened. Once the markings were set, some gloss varnish is sprayed to seal the decals then a pinwash is applied. Some streaking is done with AK OIF streaking effects. Then some coats of diluted XF-64 and XF-60 are unequally applied with a handbrush to give a dusty look to the vehicle.
Conclusion
This kit allows to build from the box a UAE vehicle based in the Emirates. For The KFOR version, some modifications are required. In all cases, you need to add the turret stowage baskets and fix the 30mm gun length.
Reference : Concord Mini Color Series 7507 Russia's BMP Infantry Combat Vehicles by Steve Zaloga et David Markov ISBN 962-361-672-4
Click on a thumbnail to see the full sized picture

|

|

|

|

|

|

|

|

|

|

|

|

|

|

|

|

|

|

|

|

|

|

|

|

|

|
||||