ref: Hobby Boss # 83856 IDF Achzarit APC - Early

The Achzarit is an Israeli heavy armored personnel carrier based on a T-55 chassis. Its development was decided after operation Peace on Galilee in June 1982. The first prototype was built in 1985 and the production started in 1987.
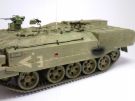
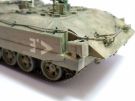
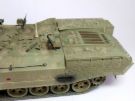
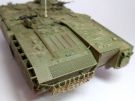
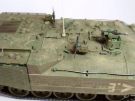
The vehicle weighs 44 tons due to the additional armor fitted to the base chassis. To accommodate the infantrymen and allow them to exit under cover a ramp and a corridor have been installed to the rear right of the vehicle.
The crew is of 3 : a driver, a vehicle commander and a gunner. The mounted section is of 7 soldiers.
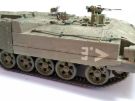
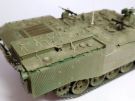
The armament comprises one 7.62 mm MAG MG mounted to a remote weapon station designed by Rafael and two more MAG installed on swing mounts at the roof hatches. At the beginning a 60 mm mortar was fitted on the roof. The Achzarit is also equipped with 2x6 smoke grenades launchers.
Since its entry in service within the infantry brigades, among which the Golani brigade, the Achzarit has been deployed to Southern Lebanon and in the Gaza Strip. It has been upgraded by the replacement of the Soviet original running gear by a Centurion (Shot in the IDF) suspension and Merkava tracks. The commander station has been improved by the addition of armored windows. A remote weapon station armed with a 0.50 cal MG has also been developed by Samson.
The Achzarit variants are as follow: command and MEDEVAC. It has not been exported and should be progressively replaced by the Namer.
The kit
Released in 2011 by Hobby Boss, it r epresents the early vehicle with the T-55 suspension. The box includes 12 green plastic sprues, 4 black plastic sprues for the wheels tires, 7 plastic sprues for the track individual links, 1 clear parts sprue, 2 hull halves, 2 photoetched parts plates, 1 braided metal length, 1 brass wire length, 1 decals sheet and 1 instructions booklet. Sprues A, Z and M come from Trumpeter T-62 while sprues F1 come from Hobby Boss Merkava 3D.
The cast is good with a satisfactory level of detail. However the antislip coating is not represented. If the overall shape is good Hobby Boss has ill-designed the corridor area beside the engine deck. Moreover the Toga grilles on the sides are not accurate as they are a mix of various types. The less accurate parts are gathered on the PE plates.
The overall fit is good. However you need to pay attention to the alignment of the parts which make the corridor. The latter is designed to stay open however no interior is issued by Hobby Boss.
For the decoration Hobby Boss gives markins for 2 vehicles with no unit indications.
The instructions booklet has 12 page and split the assembly into 13 steps. In several steps the part numbers are not clearly linked to the parts. It is advised to thoroughly read the schemes.
The build
The first step deals with the roadwheels. The wheels and the tires are painted separately before being assembled. The sprockets and idlers are painted tooand the stops staying invisible the original ones are kept.
At step 3 you need to ensure the swing arms are aligned.
Before gluing the roadwheels at step 4 the lower hull is entirely painted.
At step 5 the tracks are fitted. Hobby Boss asks for 88 links per track but 87 are enough. When dry the tracks are removed and are painted and partially weathered.
Stpe 7 deals with the MGs. It is completed at the end of the build.
At step 8 you need to assemble the fixed parts of the corridor. The locking hook E10 is useless in the closed position. The housing for the fire extinguisher is added to the left side of the hull. To do so you first have to drill a 3.5 mm wide and 2 mm high rectangular hole above the second roadwheel. Inside the hull a plastic card piece fills the hole. On the outer perimeter some 0.25 mm styrene strip is added to make a frame.
At step 9 the upper hull is glued. Then instead of gluing the various details of steps 9, 10 and 11 I added the main elements (ramp, corridor roof, hatches). You need to carefully look at the drawings as the part number are not systematically linked to the parts.
When the hull is assembled the outlets of the power cords of the headlights and the smoke-grenades launchers are drilled into their protections.
At step 11 the E40 mortar muzzle is hollowed.
At step 12 the supports of the Toga grilles PE-A19 need to be carefully folded to be perfectly aligned with the other supports PE-A7 and PE-A13. The right headlight protection is assembled. The reinforcement part PE-B5 is slightly too long about 1 mm. Part PE-B6 is too much long. Each end is to be shortened by 1.5 mm.
At step 13 the headlight protection must be modified like the one in step 12. Plate B23 at the rear of the smoke-grenades launcher must be positioned in a different way depending of the side. Hobby Boss does not give any indication. On the left launcher, the power cord plug is at the top and on the right side it is at the bottom. If you intend to use the canvas cover you need to thoroughly thin the edges at the rear.
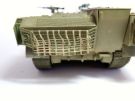
The antislip coat is made of sand crushed with a hammer. The surface is brushed with matt varnish and some sand is sprinkled over the varnish before it is dry. You need to work small area after small area. At the rear of the basket the strap net is made with masking tape. You need 9 vertical 1.5 mm straps and 8 horizontal ones. The lengths are approximative. Several tests have been made to get the right sagging.
The MGs are built and painted separately. The MAG on the RWS can remain mobile in elevation if part PE-B10 is not glued to the vertical support D15 but only to the cradle. The MGs have been glued only after the painting of the vehicle.
The decoration
Hobby Boss provides 2 sets of markings without unit indications. The registration plates are issued as a decal and so totally flat. They are applied to rectangles of 0.25 mm plastic card before being glued to the vehicle. The decal markings are used to make masking tape templates.
The vehicle is painted with Ammo-MIG 131 Real Sina� Grey. Some color spots are painted according to reference pictures. The cables supports and some handles are painted black. The extinguisher housing is painted red. On several Achzarit some hinges, handles and boltheads are painted either red or black. The straps and the net at the rear are painted XF-78.
For the weathering several veils of earth and sand are sprayed. Then some MIG Syrian Ground and Gulf War Sand pigments are applied with a large brush all over the vehicle with more on the lower part and the front.
Reference
Achzarit Heavy APC in IDF service, IDF Armor Series, by Michael Mass and Adam O'Brien, N�8, Desert Eagle Publishing ISBN 978-965-91635-4-0
Click on a thumbnail to see the full sized picture

|

|

|

|

|
|

|

|

|
|
|

|

|
|

|

|
|
|
|
|

|

|

|
||
07/2022
Created with Easy Gallery Generator - EGG V2.1 - LATSOMEP