ref: Tiger Model #4603 Panhard VBL armoured
vehicle French Army 1987-Present
Blast Model #BL35242K VBL Wheels XZL Type 2011
Blast Model #BL35253K French Stowage VBL OPEX Africa
Blast Model #BL35354K French MAG58 for VBL AANF1 Replacement

ref: Tiger Model #4603 Panhard VBL armoured
vehicle French Army 1987-Present
Blast Model #BL35242K VBL Wheels XZL Type 2011
Blast Model #BL35253K French Stowage VBL OPEX Africa
Blast Model #BL35354K French MAG58 for VBL AANF1 Replacement
The VBL development started in 1978 to replace the jeep Hotchkiss in the reconnaissance units. It entered service with the French army in 1990 and is used in all the cavalry, armor and infantry units. Two basic versions were designed from the beginning of the program : the VBL reconnaissance and the VBL Milan for the antitank role.
The VBL is a light vehicle protected against small arms and shells splinters. It is also protected against the NBC agents. It is amphibious and moves in the water with a propeller at the back of the vehicle.
In the reconnaissance version the crew is of 2 with an additional seat in the back of the cabin. The armament is a 7.62 mm MG fitted to a ring mount. The AA-NF1 which was the original MG is being replaced by a MAG 58. The VBL carries 3000 rounds in boxes ready to fire.
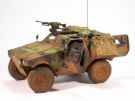
The VBL has been deployed by the French army in all the conflicts in which it took part since 1990. Its protection against antitank weapons has been reinforced by additional armor plates in particular in Lebanon and Afghanistan.
Some reconnaissance vehicles are fitted with a 0.50 cal MG in a cupola. A long-bed version known as VBLL or VB2L is mainly used by units commanders.
Approximately 1700 VBL in all types have been purchased by the Frecn army. Around 15 countries utilize the VBL among which Greece, Kuwait, Mexico and Portugal are the biggest users.
The kit
Released in 2014 by Tiger Model it has been the first plastic model. It depicts the arly version with the 7.62 mm AA-NF1 MG.
It includes 4 green plastic sprues, 2 hull halves, 1 clear parts sprue, 4 vinyl tires, 1 length of metal twisted cable, 1 photoetched parts sheet, 1 decals sheet, 1 instructions set and 1 color sheet for painting the exterior and the interior.
The carving is good. The cast presents some minor flaws like a bit thick mold lines. The fit is satisfactory but may require some care when assembling the hull halves. The interior is nicely detailed even if there is room for extra detailing. The clear parts are really clear and perfectly fit. All the doors and the hatches can be presented open and the wheels are mobile. The PE parts are few and useful. The shaping is trouble-less even if the instructions do not always show the final shape. The decals sheet includes stencils for the interior and the dials of the dashboard and the markings for the missiles and 2 options for the decoration.
The instructions are clear and include 18 steps with no mistake except a little one for the markings.
To depict a VBL during operation Barkhane a number of Blast sets are used.
The build
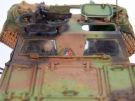
It begins by the interior up to step 7. No paint indications are given and Tiger Model tells you to refer to the color plate which is not comprehensive. Some documentation will be very useful if the doors and hatches are presented open.
At step 1 you have to drill holes in the hull floor. The radio set is not very sharp. The handle in parts A18 and A19 are hollowed. The headset which is supposed to be attached to the roof is plugged to the radio set and rests on it. The heater ducts A31 and A39 are thinned.
At step 2 the ammunition boxes are assembled. The fit lets to be desired and some gaps between the parts are hard to fill. The issue is the same at step 4.
Until step 7 the interior assembly is trouble-less. The interior looks empty for a vehicle in operation. Some bags are made with air hardening modeling material and resin accessories are added.
Steps 8 and 9 are dedicated to the front suspension. The build is straightforward. The positioning tabs of the tow eyes B19 must be shortened a bit.
At step 10 the edges of the propeller need to be thinned.
At step 11 there is one mistake to fix. The rear right light cluster C22 does not have the red and white lights block L2. So you have to replace the part by a 4.5x3 mm rectangle of plastic card in the center of which you have to drill a hole of 0.5mm diameter. Take note that there really is a gap between the upper hull and the lights cluster A and B. No need to putty the gap.
At step 10 you assemble the inner face of the right door C6. For all the doors Tiger Model provides FAMAS rifles attached to their brackets. In operation the rifles rarely are attached so they can be immediately available. The FAMAS are cut and the brackets parts are hollowed before being glued to the doors. The lock of the door B21 can not be used when the door is closed. To facilitate the painting of the doors which will be open, those parts are not glued yet.
At step 13 the wheels are replaced by the Blast ones. The are the newer type used on the VBL. The rims are different as are the tires. All the roof hatches will be open but to ease the painting they are fixed with blu-tac.
At steps 14, 15 and 17 the fuel cans, the tools support, the cover C25, the exhaust extension and the cover of the engine grill C3 are not glued so the Blast parts (baskets made of bastion wall elements and fuel can holder on the back) can be used.
At step 15 the antenna is not glued as there is only one radio set on board.
At step 18 the cable is not used and the AA-NF1 is replaced by the MAG 58 from Blast. Unfortunately Blast molded the MG support with the ring mount.
Blast side baskets require some work to fit well. If they are glued as per the instructions they prevent the hatches from fully opening. But when the vehicle is on the move and the hatches are open they must be locked. So you just need to open the commander's hatch before fitting the right side basket. Concerning the left side basket you have to glue the gunner's hatch and then adjust the basket. On my sample I thinned it by the size of 2 mesh squares which makes 4 mm and then I glued the basket lower than designed.
The decoration
The Central-Europe camouflage scheme provided by Tiger Model is correct but the color references in the Ammo and Tamiya ranges are wrong. So the colors are made by mixing other references.
Dark Green: XF-5 Flat Green
and X-24 Park Green (70/30). Then I added to this mix some Pale Green MIG 0060 (environ 20%).
Earth Brown: XF-10 Flat Brown, XF-52 Flat Earth and XF-3 Flat Yellow (60/30/10
approximately) then I added some XF-78 Wooden Deck Tan (approximately 10%).
Le noir est du XF-1 Flat Black.
Beforehand you need to create the antislip coating on the front of the VBL. It is made with some Mr Surfacer 500 applied with a brush and tapped on with an old brush.
Once the camouflage is airbrushed a coat of Klir is sprayed to ease the application of the decals. The decoration I chose is for a vehicle of the 1er r�giment de spahis. No information allows to tell if the vehicle took part in operation Barkhane. The railway class number #7 is present on the right side only. The grey being too light the marking is replaced by the extra one on the VBL Milan decal sheet. The French Army symbols #8 are not used because they are too light too and are often missing during operations.
The weathering begins with a dark brown wash applied to the green and brown areas. The black areas are drybrushed with a dark grey shade. To create a dirty look some mat varnish is brushed over the lower parts of the hull. Before it is dry some pigments are sprinkled over the varnished areas which allows to simulate dried earth. Then pigments are applied with a brush all over the VBL insisting on the lower parts and the wheels sides.
Click on a thumbnail to see the full sized picture
|

|

|

|

|

|

|

|

|

|

|

|
|

|

|

|

|
|||
12/2021