ref: Tiger Model #4618 Panhard VBL armoured
vehicle French Army 1987-Present

ref: Tiger Model #4618 Panhard VBL armoured
vehicle French Army 1987-Present
The VBL development started in 1978 to replace the jeep Hotchkiss in the reconnaissance units. It entered service with the French army in 1990 and is used in all the cavalry, armor and infantry units. Two basic versions were designed from the beginning of the program : the VBL reconnaissance and the VBL Milan for the antitank role.
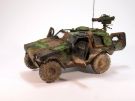
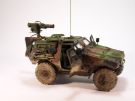
The VBL is a light vehicle protected against small arms and shells splinters. It is also protected against the NBC agents. It is amphibious and moves in the water with a propeller at the back of the vehicle.
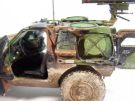
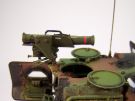
In the antitank version the crew is of 3. The armament is a Milan firing post on a support at the rear of the roof. The Milan can hit targets up to 1900 m. The MIRA thermal camera allows the firing of missiles at night. 6 missiles are stowed in the vehicle. While on the move the firing post is usually secured in the vehicle.
The VBL has been deployed by the French army in all the conflicts in which it took part since 1990. Its protection against antitank weapons has been reinforced by additional armor plates in particular in Lebanon and Afghanistan.
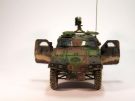
The versions in service with the French army include the reconnaissance vehicle (armed with a 7.62 mm MG or a 0.50 cal MG in a cupola) and the long-bed version known as VBLL or VB2L mainly used by units commanders.
Approximately 1700 VBL in all types have been purchased by the Frecn army. Around 15 countries utilize the VBL among which Greece, Kuwait, Mexico and Portugal are the biggest users.
The kit
Released by Tiger Model in 2016 it can be built with the early or the current wheels.
It includes 7 sand plastic sprues 3 of which are specific to the Milan version, 2 hull halves, 1 clear parts sprue, 8 vinyl tires, 1 length of metal twisted cable, 1 photoetched parts sheet, 1 decals sheet, 1 instructions set and 1 color sheet for painting the exterior only.
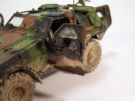
The carving is good. The cast presents some minor flaws like a bit thick mold lines. The fit is satisfactory but may require some care when assembling the hull halves. The interior is nicely detailed even if there is room for extra detailing. The clear parts are really clear and perfectly fit. All the doors and the hatches can be presented open and the wheels are mobile. The PE parts are few and useful. The shaping is trouble-less even if the instructions do not always show the final shape. The decals sheet includes stencils for the interior and the dials of the dashboard and the markings for the missiles. Even if all the markings for the reconnaissance version are on the sheet only one option for the Milan version is provided. It represents a VBL of the 3e regiment de hussards.
The instructions are clear and include 17 steps with some parts numbers omitted and a little mistake for the markings.
The build
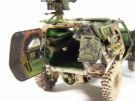
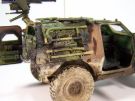
It begins by the interior till step 5. No paint indication are given even if Tiger Model tells you to refer to the color plate. Those who own the VBL reconnaissance can refer to the color instructions for the interior. Otherwise some documentation will be mandatory if the doors and hatches are presented open.
At step 1 the radio set is not very sharp. The handle in parts A18 and A19 are hollowed. The headset which is supposed to be attached to the roof is plugged to the radio set and rests on it.
At step 3 part A22 is visible whereas its number is missing.
At step 5 part A34 is visible but the number is missing too. Part A24 is in fact A29. It is advised to assemble the missiles, to paint and decal them before gluing them on their supports which are very simplified.
Steps 6 and 7 are dedicated to the front suspension. The build is straightforward. The positioning tabs of the tow eyes B19 must be shortened a bit.
At step 8 the edges of the propeller need to be thinned.
At step 9 there is one mistake to fix. The rear right light cluster C22 does not have the red and white lights block L2. So you have to replace the part by a 4.5x3 mm rectangle of plastic card in the center of which you have to drill a hole of 0.5mm diameter. Take note that there really is a gap between the upper hull and the lights cluster A and B. No need to putty the gap.
At step 10 you assemble the inner face of the right door C6. The lock of the door B21 can not be used when the door is closed. To facilitate the painting of the doors which will be open, those parts are not glued yet.
At step 11 one of the parts B24 has its number missing. The roof hatches except the driver's one are open. To facilitate the painting they are attached with blu-tac.
At step 13 the ends of the exhaust extension C16 are drilled out. The latter is glued upside down to allow the commander's hatch to fully open. The antenna must not be glued as there is only one radio on board.
At step 14 the door is numbered C5 and C2. The first number is correct.
At step 16 the firing post and one missile are assembled. The grooves on the missile to show the markings locations must be filled. To depict a live round before firing a round cover made of 0.25 mm plastic card is glued to the front end. The support E3 of the firing post is very simplified. In reality there are 3 claws actuated by a handle.
At step 17 the wire in the box is not used because it is too thick. It is replaced by a cable made of twisted metal wire. Unlike what Tiger Model states the cable is 7.5 cm long and not 10 cm long.
The decoration
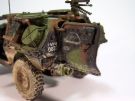
The Central-Europe camouflage scheme provided by Tiger Model is correct but the color references in the Ammo and Tamiya ranges are wrong. So the colors are made by mixing other references.
Dark Green: XF-5 Flat Green
and X-24 Park Green (70/30). Then I added to this mix some Pale Green MIG 0060 (environ 20%).
Earth Brown: XF-10 Flat Brown, XF-52 Flat Earth and XF-3 Flat Yellow (60/30/10
approximately) then I added some XF-78 Wooden Deck Tan (approximately 10%).
Le noir est du XF-1 Flat Black.
Beforehand you need to create the antislip coating on the front of the VBL. It is made with some Mr Surfacer 500 applied with a brush and tapped on with an old brush.
Once the camouflage is airbrushed a coat of Klir is sprayed to ease the application of the decals. The only decoration which is provided represents a vehicle of the 3e r�giment de hussards. The railway class number #7 is present on the right side only.
The weathering begins with a dark brown wash applied to the green and brown areas. The black areas are drybrushed with a dark grey shade. To create a dirty look a mix of PVA glue, plaster and Airfield Dust (Ammo) pigments is applied up to half the height of the hull. Some splashes are made with a stiff brush. Once the mud is dry some wet mud is added to the lower parts. To get it some varnish is brushed then Dark Earth (Ammo) pigments are sprinkled several times over the varnished spots until the desired texture is got. This wet look of the mud is enhanced with a gloss varnish coat.
Click on a thumbnail to see the full sized picture
|
|
|
|

|
|
|
|
|
|

|

|

|
|

|

|
||||
12/2021