
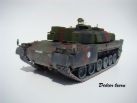
MARS
References : Tamiya #35279 Leclerc Series 2
Bronco #AB3525 Leclerc MBT workable track link set
Conversion, texts and photos by Didier Lecru
1/ Introduction:
As soon as I saw this vehicle on a little stealthy picture, I vividly looked for documentation about this Leclerc MARS. In fact, a main battle tank which costs about 10 millions Euros and has no its 120mm gun, it is sometimes quite original. Thanks to my patience and tenacity, I finally found the pictures of this vehicle in this website. The green light was given. Given the old Heller kit I had, I got the Tamiya one. To my great surprise, one of the tracks was broken. Never mind, I decided to get the Bronco set. As opposed to the AMX30 FORAD I previously built, I wanted a rather clean vehicle. So I decided to build a MARS without its turret front bins and its side skirts.
2 / The running gear:
The Bronco set is satisfactory. However, I detailed the tiny holes in the links connectors ends. The whole set is easy to build. Nonetheless, be patient! The rendition is excellent. The tracks are painted silver grey. The rubber pads are painted one after another in matt black. The connectors are painted with an oil paint in a rusty shade. The whole set gets a matt varnish coat. When dry, a wash of nearly white sand is applied. The setting of the tracks is easy even if you must be cautious. Two parts have been made to support the tracks near the sprockets. Some bolt heads are glued to the base of the roadwheels arms. The sprockets are modified. The conical hub of the old type Heller sprockets is used.
3 / The hull:
First of all, I made all the modifications I found on the Internet and in the Leclerc tweaks list of this site. Having not bought the Tamiya photoetched parts set, I used the Heller engine grilles. I also kitbashed my old Heller kit to get the front mudguards. The side skirts with their rubber flaps have been removed. Only the front parts are used and thinned. The thin supports for the rubber flaps are added. Working on the Tamiya kit, I had to deal with the bolted add-on armor plates on the sides. I sanded them away. I hollowed out the both hatches with the handle. The rear mud flaps have been redone and lengthened. The sun cover over the three driver vision blocks is modified. In fact, the side vision blocks do not feature this cover unlike with the Leclerc Series 2. In the same way, the washers and the hatch opening handle are modified. The handles of the front side bins are redone. The front lights wiring is added. The towing system on the rear of the vehicle is made from scratch using the reference pictures needed. It is just a pair of towing bars attached to two of the four towing eyes at the bottom of the hull rear plate. On the top of the rear plate of the vehicle, the stowing device for the towing bars is made. In addition, the part enabling the connection between the towing bars and the towing hook is added. As it is a recovery vehicle, I added on the engine deck a cable coming from the AMX30 Heller kit. The exhaust is detailed with new straps.
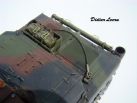
4 / The turret:
This
is the hardest part of the project. The front bins are removed. Consequently the
front of the turret is redone with the addition of the bins brackets. The hole
created by the removal of the main gun is covered by a plate with large bolts.
The same is done on the gunner sight.
The rear part is made from scratch. It is composed of two large hatches and an
antenna base. The bin found on the Leclerc 2 bustle is removed. However, its
brackets are detailed. The bustle basket locking device is detailed as well. On
the turret rear, spare track links holders are added and let empty. I decided
not to install the MG. I'll use it for my AMX10 RCR project. The locking devices
for the hatches of the commander and the gunner are redone. On this version, the
commander sight is removed. Its base is modified. To improve it, a searchlight
coming from the AMX30 kit is added. In the same way, a smaller light is added.
The latter has been spotted on some pictures on the Internet. A flashing light
from the spare box is added on the turret. It is detailed with its coil power
cord. Accordingly with the pictures of this site, some cables have been added
although I have no idea of their use.
5 / The painting:
The
entire vehicle is washed in warm soapy water. Once dry, the tank gets a grey
primer coat. Then the three Tamiya NATO colors are sprayed. The green color only
has been mixed with some drops of bright yellow. The recesses get a wash of
Sienna earth. Then a layer of mat varnish is sprayed followed by a very light
wash of white. A dry-brush of white is applied over the whole tank. As I didn't
get the expected result, I did another dry-brush of bright yellow.
All the electrical wires are painted semi-gloss black (Humbrol 86). The towing
device and the two fire extinguishers are painted with some Humbrol 150. Some
silver grey is applied to the spare links brackets and the two caps located near
the hatches of the commander and the gunner. When it is done, the tank gets a
last mat varnish coat. As this type of vehicle is used in the limestone regions
of eastern France, I use white and light beige chalk powders. For the rear of
the vehicle, I do it unrestrainedly.
Advice: wait for 12 to 24 hours between each layer of paint and varnish.
6 / The decals:
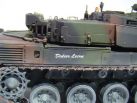
I simply used those issued in the Tamiya kit but I altered the order of the figures to stick to the reality. The khaki circle with the number 62 is hand painted, the figures being dry transfers. The decals with the France map and the Lorraine cross come from the AMX30 old decal sheet. They are finally covered with mat varnish.
7 /The accessories:
Some shackles coming from old kits (AMX13, AMX30 and probably BTR80) are added.
Get your knives ready and enjoy modeling!

|

|

|

|

|

|

|

|

|

|

|

|

|
|

|
|

|

|

|

|
|

|

|

|

|

|
|

|

|

|

|

|
|

|

|

|

|

|

|

|