


Leclerc RT5
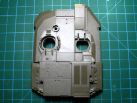
Now that the hull is over, I must address the biggest part of the project with some stress as I have to make the cut-out in the roof of the model. The plastic is rather thick, I first scribe the precise delineation of the future cut-out then I cut the plastic using a mini saw (Hasegawa). The cut-out was finally easy to make (a big sigh of relief at the time).
Once the turret is clean again, I put a 2mm thick plastic plate cut to size. On this one, I scribe the lines of the different structures representing the various hatches and add the handles (still copper wire).
Then I turned to the smoke launchers on the sides of the turret. The launchers were often armed with Galix grenades on the Leclerc deployed in Kosovo and Tamiya represent them empty. So I decided to use the set proposed by Blast Models. It is very finely cast and cheap. The installation is simple and fast, I just added the cable (a hair of my girlfriend) that connects the cap to the support of the smoke launchers.
The turret at this stage gets its new non-slip surface again made with Mr. Surfacer 1500. Then the air vent fins are made of thin plastic sheet.
I then tackled the wind sensor at the rear of the turret. Again the original part is unconvincing. Using a bit of plastic rod and spare parts from the PE set, a new and better one is quickly made.
Then follows the Sagem sight step, I took the transparent part provided in the box and sanded away the details. I used the PE part to represent the faceplate. The wipers are made of PE leftovers as those provided by the Voyager are too flat. The arm is made from a handle of the Voyager set and the wipers are made of copper wire glued on a thin aluminum strip.
Just below the sight a rebate in relief is made of aluminum foil with the screw made of plastic.
All around the rear bin, the fastening hooks are completely redone with wire and aluminum foil. The latch is also in aluminum foil and I added a small lock with plastic card and electric wire.
I installed the basket on the back of the turret. Disappointingly enough from Tamiya, the mesh at the bottom of the basket is not included in the box but on a separate sheet of PE costing 15euros (which also includes the engine grilles).
Fortunately the Voyager set contains a superb part that fits easily.
Now let’s turn to the barrel and the last modifications before the painting. The gun mantlet canvas is made with paper towel soaked in wood glue. The latter is placed in making sure that it matches the shape of the mantlet and doesn’t jut out of the retaining frame.
Until it dries and I can definitely glue the barrel, I focus on the turret hatches. I represented the protective padding inside the hatches with several layers of acrylic paint. I first put masks in BluTac to simulate the deterioration of the padding. I redid the outside handles with plastic card while those inside are made with PE parts.
Of course I used the aluminum barrel proposed by Voyager. This barrel is the real asset of the PE set. The gun is composed of finely molded resin parts for the canvas near the mantlet and the muzzle reference system. The final rendition is very realistic. However it still lacks the drain holes beneath the thermal sleeve. I counted 10 holes set at non-regular intervals. These holes are drilled using a mini drill 0.8.
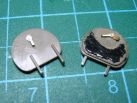
Once the gun in place, I focused on the Sagem HL-70 panoramic sight which also went through small changes. First, helped the documentation available on the Internet I corrected the overall shape of the sight housing by rounding the upper part, flattening the sides and making a more flat facade.
Then on the front, I drilled 3 holes on each side representing the screws. The latch of the protective cover is done in very fine wire connected with a section of a hair to a round fixing rod made of plastic. The PE cover is placed on top of the sight. The wiper arm is made of thin wire and the wiper is a plastic section.
Finally, below the panoramic sight and in front of the tank commander vision blocks, I added the gas evacuation port of from the coaxial machine gun.
The snorkels are installed; I have little to say except that I redid the straps with lead foil and improved the clamp collar.
Last step: the loader’s MG. The ANF-1 proposed by Tamiya is pretty, but still lacks finesse. I used the one issued by Dragon in their set of modern weaponry. Then I redid the support of the gun. Voyager Models issue in the PE set the ammunition box and its support. On most pictures I found on the Internet, the MG was not armed, so no need to make the ammunition belts.
The building of our Leclerc RT-5 is finished, now let’s turn to the painting.
|
|
|
|
|
|
|
|
|
|
|
|
|
|
|
|
|
|