Ref : Bronco #CB35100

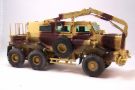
The MPCV (Mine Protected Clearance Vehicle) Buffalo is a vehicle designed for road clearance and demining under armor. Based on the South-African Casspir, it features an excellent protection thanks to its V-shaped floor which deflects the blast of an explosion. The cabin armor protects the crew against small arms fires.
For its demining mission, the Buffalo is fitted with a telescopic interrogation arm equipped with a claw. When fully extended it measures 30 feet. The claw allows the crew to handle suspect devices while being under protection.
The Buffalo has a crew of 2 and can carry a team of 4 EOD operators. A tub at the back of the vehicle can carry a supplemental load. For its deployment in Iraq and Afghanistan by the US army, the Buffalo has been equipped by various IED jammers. Its protection has also been upgraded in various phases. First, it was fitted with bar-armor then with reactive armor blocks.
In 2009, France decided to purchase 5 Buffalo from the USMC and modified them to the French standard. Amongst the most visible modifications, anti-crushing bars have been fitted between the front and mid axles. The interior was modified in particular to fit the French PR4G radio set. At the early stage of its deployment in Afghanistan, the French Buffalos were equipped with neither IED jammers nor bar-armor.
The kit
Bronco issued the first kit of the Buffalo in 2012. The kit is composed of 10 beige plastic sprues, 2 clear sprues, 2 hull halves, 8 tire treads, 1 photoetched parts sheet, 1 decals sheet, 5 lengths of soft plastic pipes in 3 different diameters and 1 instruction booklet.
The molding is top quality and the level of detail very good. The fit is not perfect and many dry fit tests are required especially for the cabin. For the suspension, many molding lines must be carefully removed to facilitate the assembly. The photoetched parts are quite fine. Bronco could have given jigs to bend the hood grille, the aisles light protections and the protection of the arm control box.
The instruction booklet comprises 35 pages and 51 steps. Options are given throughout the building but with no mention of the corresponding vehicle (US or French). So before starting the building it is necessary to check one's documentation. Instructions are clear but Bronco made some mistakes which will be mentioned later.
The building
It starts by the lower hull and the suspension. The larger work is cleaning the parts, some of which are really tiny. The axles can be mobile. On the front axle Bronco has omitted the brake chambers. The latter being invisible when the wheels are in place, they haven't been added. On the protections of the rear brake chambers, you need to drill two small holes for the pipes.
Step 8, Bronco has you choose between parts G20 and B5. Unlike the mistake I made, you must use the part G20 for a French Buffalo.
Step 12 (wheels assembly), Bronco made a mistake. Part F38 must be used on the rear wheels. To ease the painting the wheels are not installed.
The building continues with the interior.
The floor is very thin and it is advised to add stiffeners under it so it is
horizontal. The interior being barely visible when the cabin is closed, it is
not detailed. The dashboard B10 needs to be thinned to go inside the part B15.
The whole must be painted but Bronco does not give any shades indication.
Step 14, you have to make a bin for the rear tub. This one is too high which I noticed too late. For real, it doesn't rest on the floor. It should be shorten by at least 5mm.
Step 18, Bronco gives two options for the shackles brackets. For the French version, you must use the parts B23, B24, C66 and C67.
Step 21, you have to bend the photoetched grille on the hood. It is not easy as Bronco does not provide any jig. You also have to shape the protection of the arm control box which is very fragile. The windows glasses are not installed yet.
Step 24, Bronco gives the possibility to represent the roof hatches open. Being lazy I opted for the closed position. All the parts need to be thinned and more especially the attachment points of the hydraulics jacks.
Step 27, the arm resting bracket is improved with some plastic card to hide the glue seams.
Step 28, some dry fit tests are needed to make the exhaust. Its photoetched protection is a no-brainer.
Step 29, the lights protections are bent without any jig. The horizontal plate is glued with the help of the documentation because Bronco does not give any locating mark.
Step 32, the photoetched part P3 only is used. The roof cameras are not used on the French Buffalos. The spare wheels brackets F28 are modified so the wheels can rest on them. All the molded bolts must be removed.
Step 40, at the top of the supports E72, you must add the photoetched plates P35 which is not mentioned by Bronco.
Step 41, you need to make the French antenna base and glue it in the slot for the part C76 just behind the driver window.
Before finishing the hull, you need to create a bin on the right side of the rear tub. Bronco has simply omitted it. Some plastic card will do the trick.
At this stage, the hull is over. You just have to add the factory serial number at the rear of the hull (parts G1, G2, G3, G6, G7 and R16). Unfortunately none looks to be correct for a French vehicle.
The toughest step of the build starts
with the interrogation arm. You need to add all the hydraulic lines. Bronco
gives some soft plastic pipes for a part of them but the quantity is not enough.
Moreover, a part of the real ones are metal tubes. So you need to make all what
is missing and this begins with finding the good documentation. Rob Skipper's CD
is a must to spot each line and its connections. Then you just have to get the
appropriate stuff (brass, evergreen, soldering wire) and create the parts needed.
On the French arm, the camera (parts D16-D17) is not used. You just need the
square plate.
The assembly is finally complete. The painting may start.
The decoration
The French Buffalos sport a sand and brown two tone camo. It complies with a regulation but is applied with variations from a vehicle to another. However, Bronco gives you a scheme quite different from what you can see on reference pictures. So you must refer to these to apply the brown patches.
For the sand, I mixed some XF60, XF3 and XF2. It happens to be too yellowish. The brown is XF10 which tends to be a bit too red. Once the colors are applied, the windows are installed. Beforehand, their inner faces have been sprayed with some Tamiya clear green. A coat of satin varnish is applied before setting the scarce markings.
The weathering starts with a wash in the recesses. The dusty look is created by sprayed highly diluted XF57.

|
|

|

|

|

|

|

|

|

|

|

|

|

|

|

|

|

|

|

|

|

|

|

|

|

|

|

|
||