Références : Heller 81140
Accurate Armour Trakpax T56 AMX-13

The AMX13 APC was a 14-ton armored vehicle based on the AMX13 family chassis
It could carry 12 soldiers. Entering service in 1967, it equipped the mechanized
units.
Protected against the effects of NBC weapons, it initially mounted a cupola
fitted with a 7.5mm AA52 MG then the following versions mounted a 0.5 MG and a
20mm cannon.
The kit from Heller depicts an early model. It comes with 8 green plastic
sprues. 1 clear plastic sprue, 1 soft plastic sprue for the tracks and the tow
cables, 1 sheet of decals for one decoration and a bit of metallic wire
for the antenna.
The whole set allows to represent a model with its crew and a part of the
section (6 men whom 2 are seated) A basic interior for the troop compartment is
provided. Several parts intended to represent the artillery ammo carrier
version are useless for the APC.
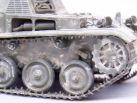
The level of detail is standard of this brand and typical of the 70s. Some parts are too thick and need a thorough sanding. Except one, all the hatches can be presented open and many are moveable without the hinges being oversized. The soft plastic parts are mean and the tracks are replaced by the Trakpax set for the AMX13 MBT. Unfortunately, the set is too short for the APC of which the running gear is longer than the MBT one. Moreover, the links are slightly slantwise which does not ease the alignment of the various lengths. Accurate Armour has not provided individuals links for the sprockets and idlers.
The fit is generally correct but the upper hull was warped.
The building starts with the chassis without any major difficulty. The sprockets are enhanced with the addition of bolts on the outer ring. The resin tracks are set in place after a basic painting. Of course, the missing links have previously been cast.
Once the running gear complete, the interior is detailed. The most difficult is to find the necessary documentation. The pictures on the internet are rare.
The bench seats are thinned and engraved to "break" their smooth look. The sides are detailed with various stowing bins and racks and their latches. To the front, the radio set support is added with its power and other cables. The vision blocks are filled with plastic card. The interior is painted white beside the engine and XF-62 green for the troop compartment.
The exterior detailing starts with the front glacis. Heller modeled two recessed hatches. New hatches must be made from thin plastic card so as they are flush with the glacis. 4 bolts are added at the corners. On the contrary, the main access hatch border is raised. This line must be sanded away and a new recessed one carved. The driver hatch is detailed and the hinge redone as it does not match the available pictures. The front splash-guard is replaced by another made from thin plastic card. The fixation system is added. It comprises bolted strips on the sides and two stiffeners. The most difficult is to redo the headlights protections. The ones in the kit are too thick and extremely simplified. After a long search for the needed documentation, the headlights supports are in their turn done with shaped and flattened brass wire. The mirror protection is done with Evergreen strips. On the spare roadwheel, one half-moon shaped handle is added.
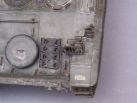
The pioneer tools support is fully redone from styrene trips, the tools come from various references. Above the support, the stops for the upper hatch are added. On this hatch, a strip of rubber is made from styrene strip carved with a cutter tip. Around the cupola base, a strip is added to represent the rail of the elevation limitation system ( the rest of it being on the cupola).
The cupola is detailed too. At the front 2 tiny holes are drilled in front of the sight. On the hatches, the bolts are redone. Between the 2 right side vision blocks, the hatches unlocking button is added. The searchlight is drilled out. The bulb is added and the glass made from clear plastic. The wing nuts are added to the bracket. The power cable is added too. The MG is changed as the kit one is not correct. The barrel from the AA52 of one soldier of the kit is used. A gap under the barrel is filled with a bit of thick plastic card. At last, the elevation limitation system is added between the right side of the cupola and the searchlight bracket. When the cupola is traversed, the limitation arm makes contact with the rail on the roof and prevents the gunner from firing at the latter.
The roll bars on the roof are thinned and detailed with the addition of one hinge and 2 plastic card rectangles per roll bar. The rods of the hinges are replaced by bits of plastic rod. All the hatches are thinned. Before doing that, the locking handles are removed then glued again. The central handles are made from brass rod. On the lower hatches, every firing port is thinned and gets its rounded handle. The stops on the hull are shortened as the open hatches must be horizontal. Similarly, the grab handle between the stops is made from brass wire to enable the good positioning of the open hatches.
The hull sides are detailed with eyelets for latches. On the right side, the exhaust cover is thinned and gets 4 missing bolts. On the left side, one handle is added in the hollow as well as 5 bolts. The parts #74 are not glued directly to the hull. One space must be created as in reality they rest on tiny bits of metallic tube. The right one is located slightly forward as compared to the kit instructions. 6 tiny plastic parts are placed in pair and triangle to the left of each part #74.
The rear doors are thinned like the hatches. The exhaust is drilled. The mud flaps are thinned too. The real ones are thin sheets of metal assembled with eyelets what Heller represented on the outer face. The towing hook is replaced by one from the spare parts box.
Concerning the decoration, the choice is scarce. Nonetheless, one can represent the model under the French or Belgian colors. In this case, you'll need to create the markings on your own. So I chose the French decoration given by Heller. It represents an APC from the 5th mechanized infantry regiment belonging to the 2nd AD. The shade is Tamiya XF-62. The decals are set after the model is sprayed with gloss varnish. The 2nd AD insignias are wider than the parts they are applied too. So they need to be cut. The rest comes without any problem.
The light effects are made by melting oil paint spots of various shades then the dusty look due to the chalk of the Champagne training camps is realized with pigments.

|

|

|

|

|

|

|

|

|

|

|

|

|

|

|

|

|

|

|

|

|

|

|

|

|

|

|

|
|

|

|

|

|

|

|

|

|

|

|

|

|

|

|

|

|

|

|

|

|

|

|

|

|

|

|

|

|

|

|

|

|
|
|||