AMX 13/90
ref: Takom #2037 French Light Tank
AMX-13/90
Takom # 2061 French Light Tank AMX-13 tracks with Rubber (for Tamiya, for
Heller)
Star Decals # 35-C 1008 AMX-13 Chaffee; AMX-13/75 SS-11

The AMX 13/90 is the result of a
modernization program of the tanks armed with the 75 mm gun which started in
1966. The CN-90-F3 gun is in fact a re-bored CN-75-50 gun. It also was fitted
with a thermal sleeve.
The modified tanks were based on
the hull types 2A, 2B and 2C. The hull type 2D was never used for the conversion
into the AMX 13/90.
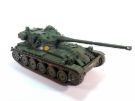
Whatever the hull type is all
the AMX 13/90 feature the IR driving lights, the late type gun travel lock with
short legs and the mudguard. The gunner IR sight is stowed in a box bolted to
the glacis.
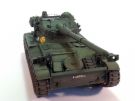
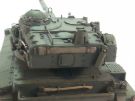
At the rear there is only a
single light on each side plus a little black-out one on the left side. The
towing hook is the first type with a kinf of horn (Takom gives the both types).
The infantry telephone on the rear right fender is removed.
The turret also is modified. At
the front, on the commander cupola there is a level. Three studs are welded to
support a firing training system which was finally not accepted. The gunner
central vision block is removable to be replaced by the IR sight.
At the rear there is a support
for the PH-2 IR searchlight. Initially the support had slots to fit the bars
between the loading hatches. This support is bolted to the roof. Later the
support will be welded and there will be no slots. This requires the
modification of the bars. However on can find first type support with modified
bars. On the right of the right loading hatch a stop is welded to avoid damaging
the IR searchlight.
On the right side a travel
support for the searchlight is fitted. The grab handle is deleted. The jerrycan
holder is the second type with three bolts.
At the back of the turret a
bracket for the NBC 2.5l decontamination bottle is fitted. At the base of the
turret, under the dust cover there are three horizontal welded plates probably
to protect the dust cover when the turret is traversed.
875 AMX 13/90 were converted and
they replaced all the AMX 13/75 tanks in the French army except those equipped
with SS11 missiles. When it was replaced in the tank regiments by the AMX 30, it
kept on serving within the tank company of the mechanized infantry regiments
until 1987. The AMX 13/90 was also in service with the armies of Ivory Coast,
Djibouti, Lebanon, Morocco, Tunisia and Venezuela.
The kit
The box includes 12 grey plastic
sprues, 1 clear parts sprue, 10 sprues for the track links, 1 lower hull, 1
upper turret, 1 vinyl dust cover, 1 decals sheet, 1 photoetched parts sheet, 1
instructions booklet with an additional color leaflet for the decoration
instructions.
Takom proposes an upgraded type
2A (with sloped bins) hull tank. The hull features the same mistakes as for the
other models with the early hull. The infantry phone needs to be removed, the
rear lights must be modified as they are the early type with 2 lights per side.
The tracks are the all steel ones whereas they should be the rubber padded ones.
The turret also has to be
modified and detailed. The IR light support is the second type.
The details are quite crisp and
the fit is good. The instructions are easy to follow with few options. The main
one concerns the fitting of the dust cover. If you intend not to use this part
you'll have extra cleaning to do on the junction between the turret halves at
the front.
For the decoration, Takom
proposes two French tanks and one Venezuelan. The markings for the French ones
are nearly all wrong (see below).
The build
The hull
The first modification is the
inversion of the torsion bars fixations on the right side. You need to remove
the molded ones with a sharp blade and glue them back in the right direction. On
the picture below the type 2D hull features the right orientation.

Then you have to fix the plugs
round
access hatches. They should be
flush with the hull sides. With a scribing tool the circumference is engraved.
The screw heads are deleted and their location is drilled out. The molded
hatches are sanded away and screws heads are inserted in the holes. On the
picture, the hatches of the hull at the bottom are deleted but the screws are
still missing.
Then you need to make new
supports for the sprockets mud scrapers. Takom molded the parts too thin and too
aft from the sprockets. Some 2 mm rod is used to make new parts. To place them
adequately the simplest is to install temporarily the sprockets.

On the front end you have
to modify the hull top as follows.

You have to engrave a panel line
on the whole width (yellow oval). Then you have to drill the location of the 5th
bolthead on the right hatch (yellow circle). The other markings do not deal with
the AMX 13/90.
On the engine fan grille you
have to add three threads which are used to lift the panel. The three holes are
placed at the same distance one from another.

At the rear of the hull, you have
to engrave the panel line in front of the fuel tanks.

The holes on the hatches (yellow
circles) are molded solid by Takom so you can drill them out. On the right a
little stud is missing.
At the rear right corner the
infantry phone parts must be cut away. The back of the light with its wiring
needs to be made. The right light only is kept and it is glued upside down so
the oval is above.


At the rear left corner you need
to modify the light. Takom molded two lights which is an exceptional lay-out.
The light close to the hull is removed and replaced by a small black-out light.
The large light is glued back upside down again so the oval is above.

At the front the lights
protections must be modified. The main plastic part is designed to rest on the
fender and Takom omitted the studs on the glacis. You need to make them from a
1mm long bit of plastic rod. Then the IR light is modified so it rests on the
protection and not on the fender. The leg is deleted and a rectangle of plastic
is added at the bottom between the front and rear bars. Then the light will be
glued on the rectangle. Do not forget that the light is placed more to the aft
than the main light.


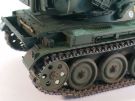
The spare track links holder is
to be modified too. In fact all the AMX 13/90 were fitted with the rubber padded
tracks which were thicker. The side rails were raised by welding a metal strip
which was drilled out to allow the insertion of the links axes.

The securing screw for the gun
travel lock is added.
Finally you need to replace the
all metal tracks of the box by some rubber padded ones. I used the Takom
reference.
The turret
Don't cut the gunner hatch that
much (in yellow). When the hatch is closed it does not make contact with the
vision block protection. Some hatches were simply not modified.

The molded rectangles (red
circles) need to be sanded away. The anchor point for the antennas strings is
added with a bit of 0.25 mm thick plastic strip shaped around a drill. The stops
for the gunner hatch (blue circles) are deleted and redone with plastic card and
glued at the right positions. (next picture)

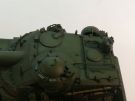
The AMX 13/90 turret is on the
right. The rain protection around the hatch is suppressed. The front of the
ventilator dome should be straight unlike the Takom part. A single stroke with a
file does the trick. The four studs on the dome are removed.
On the right of the commander
cupola the level is made from plastic card.
The three studs for the firing
training device support are added too. The grab handle on the right side is not
present so the positioning holes need to be filled.

The coaxial MG cover is
shortened. On the French tanks it is shorter than the one depicted by Takom
which is good for a Israeli tank.

The bases
of the auxiliary sights are modified. The rear must be beveled.

At the rear of the turret
roof the power outlet for the PH-2 serchlight is added. The slots in the light
support are drilled even though this is not mandatory.

The stop for the right loading
hatch is made from 0.88 mm rod for the large part and 0.64 mm for the
intermediate one.
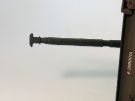
The PH-2 searchlight is
detailed. Its base is thinned. The transport handle is added as well as the
power cable.

The support on the turre tside is improved with the addition of the rubber
protection on the top and the welded support below. When the searchlight is in
place the securing strap is made from masking tape.


Under the turret bustle the panel
lines are engraved.

The protection plates at the
base of the dust cover are added. There is large central plate and too smaller
ones on each side.

The NBC 2.5 l decontamination
bottle is added with a spare part.

The DREB (smoke dischargers)
breeches are detailed with a handle made from metal wire.

To conclude the build, the holes
under the thermal sleeve are drilled out.

Sketch by Guy Gibeau
The decoration
The base color is a
mix of XF-13 and AK4082 French Army Green (3/1). Highlights are made by adding
some XF-15 to the base color. Then the markings are applied. Most of the French
markings given by Takom are useless. There should be only one bridge class disc
(yellow disc) applied and it has no black outline. The white discs for an AMX 13
should have a 3 instead of a 5. Finally only the registration number 288 0014 is
right. To have correct markings I used a Star Decals decals sheet.
Reference :
The AMX 13 Light Tank, A complete
history. Images of War. MP Robinson, Peter Lau, Guy Gibeau ISBN 1526701677
Click on a thumbnail to see the full sized picture
Index
05/2021