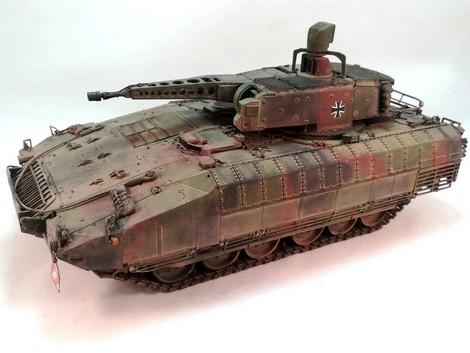
The Puma is an infantry fighting vehicle which development started in 2002 to replace the Marder within the mechanized units of the Heer. The first vehicles were issued for a series of tests in 2010. The Puma officially entered service in 2015. Half of the German mechanized battalions are equipped with approximately 350 vehicles.
The Puma is designed to have a low silhouette and an optimized protection. The whole crew sit in the hull and the turret is unmanned. The driver is in front of the turret, the commander and the gunner sit face to face on the right side. The Puma carries 6 fully equipped combatants.
The main armament is a 30 mm automatic cannon with a 3000 m range and a 200 rounds/minute rate of fire. The two types of ammo used are sub-caliber armor piercing and kinetic energy with air burst capability. 200 rounds are ready to fire and 200 more are stored.
The secondary weapon is a coaxial 5.56 mm MG4 (to be replaced by a 7.62 mm MG5) with a range of 1000 m and a 850 rounds/minute rate of fire. 1000 rounds are ready to fire and 1000 more are stored.
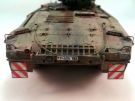
The protection of the vehicle relies on the AMAP modular armor capable of defeating 14.5 mm rounds. The roof additional armor can defeat artillery splinters and bomblets. The Puma is fitted with the soft kill system MUSS against ATGMs and is designed to resist to antitank mines up to 10 kgs.
The commander and the gunner have a thermal camera, a wide angle camera and a laser rangfinder. The Puma has the hunter-killer capacity. 5 CCD cameras allow the crew in the back to have a good situational awareness.
Currently the Puma is only in service with the German army and has never been deployed in operation.
The kit
Released in 2018 by RFM, it includes 11 beige plastic sprues, 1 clear parts sprue, 1 photoetched parts sheet, 1 length of brass cable and 1 sheet of decals. The instructions come as a 20 page booklet including a decoration scheme and a detailed view of the content.
The level of detail and the cast are excellent. The molding lines are thin and overall the preparation work is limited. The fit is generally good but the plates over the sprockets require more attention. RFM gives the option of mobile hatches as well as some optics.
Several PE parts are tricky to place because of the vagueness of the instructions and the lack of marks on the plastic parts. The bracket of the camera above the rear ramp is oversized and prevents a good fitting between the rails.
Concerning the decoration the scheme proposed by RFM is wrong and it is advised to refer to the one in the Revell kit as well as to reference pictures in particular for the color of many details.
The build
It begins with the turret and the cannon. I advise to paint the interior of the structure before the assembly. On the part F27 the pin to locate is very tiny. It is better to replace it by a bit of metal rod.
At step 3 bending PE part Y8 is tedious. Moreover there is no mark to put it in place.
At step 4 RFM gives the option to show the coaxial MG boxing open with different parts.
At step 5 a cable has to be inserted behind the gun muzzle. The instructions are vague concerning its position. The end of the cable must be inserted in the first round hole of the structure.
At step 6 there is one more PE part (Y10) to glue with vague instructions.
The turret assembly ends at step 9 without any issue.
The build of the hull begins with the running gear from step 10 to step 13 without any issue. However I advise not to glue the mud flaps Y14 to facilitate the following handling. The clear parts can be painted before being installed and masked.
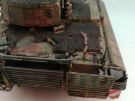
RFM omitted to mention the step for the tracks assembly and fixed the mistake with a separate leaflet. The tracks are mobile and comprize 71 links. Each link is made of the side in contact with the ground, the side in contact with the wheels and the axes and connectors. Take note that the connectors are handed. Only the outer side is detailed. The cleaning of the parts is tedious but necessary to get a perfect fit. RFM gives three jigs which can be assembled and thus allow the assembly of 18 links.
From step 14 RFM begins the upper hull assembly. As far as I am concerned I prefer gluing the both hull halves before adding any details. To do so I paint the runngin gear and the tracks.
Step 14B deals with the camera above the ramp. The bending of the PE parts is easy as well as the setting of the plastic parts within the PE parts. However the sub-assembly is too high t obe inserted between the both rails B12 and B13. So I ended by trimming the top of part Y16.
At step 16 the commander and driver hatches are installed. They are mobile but there is no stop to prevent them from falling apart. I decided t oglue them closed since RFM gives no interior parts.
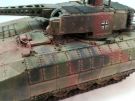
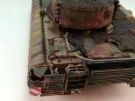
Steps 17 and 18 mainly deal with the installation of the roof add-on armor which is easy provided that beforehand the positioning holes are correctly drilled.
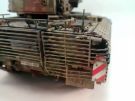
Steps 19 to 22 deal with the side armor blocks. The assembly is easy but the slats require a thorough and tedious cleaning.
At step 23 the fit of parts G5 and G6 to the upper hull are not great. I used CA glue to deal with the gaps.
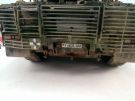
At step 24 I modified the rear view mirrors so they can sit on the stowed position.
At step 24D it is advised to paint the recess in part E3 before adding the window T12. Do not forget to mask the window before gluing the slat armor panel A15.
At steps 28 and 29 it is advised to first glue the slat armor panels for the lower part and the sides and then only the upper panels. Moreover on part A25 (step 29) you need to cut one of the pins to facilitate the installation under the foldable ladder already in place.
The decoration
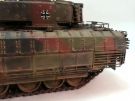
The Bundeswehr three tone camouflage proposed by RFM is wrong. It is better to use the Revell one which is for an early production vehicle. So this scheme is completed by looking at reference pictures for some areas which also helps fix Revell mistakes on the turret for instance.
The pains used are the Tamiya NATO references XF-67, XF-68 and XF-69. The roof protection is not camoed in real life. They are painted with XF-85 Rubber Black. After the base paint is applied the few markings are applied. The decals are quite thin and stick well to the paint. RFM does not give any NATO unit symbol. Only one plate is provided but blank plates and separate numerals allow to depict a specific vehicle. On a side note RFM gives orange and red rectangles to depict the reflectors. But they are hardly noticeable on the instructions which do not show the decals numbers.
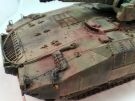
The weathering is only done with brown washes and earth color pigments
Conclusion
RFM released a high quality model with no real issue for the assembly. As always with plastic models the slat armor is a bit overscaled. The bravest could replace rhem by styrene strips.
Reference: Panzer Modell: Puma walkaround
Click on a thumbnail to see the full sized picture
|
|
|
|
|
|
|
|
|
|

|
|
|
|
|
|
|
|
|
|
|
|
|
|
|
|
|
|
|
|
|
|
|
|
|
|
|

|
||
08/2021