ref: Meng # TS-019 German Panzerhaubitze 2000 Self-Propelled Howitzer w/Add-on Armor

The Panzerhaubitze 2000 is the successor of the M109 in the armored artillery of the Bundeswehr. The first prototypes were built in 1989 and the development ended in 1996. The Bundeswehr ordered 185 vehicles of which the first entered service in 1998.
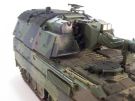
The PzH 2000 is designed with the engine at the front and the turret at the rear of the hull. Its steel armor can withstand fires up to 14.5 mm and artillery splinters. The add-on armor modules give a reinforced protection to the upper surfaces. The PzH 2000 is also protected against the NBC attacks.
The PzH 2000 is armed with a 155 mm of 52 cal length with a range of more than 40 km. It carries 60 rounds. The rate of fire is 3 rounds within 9 s or 20 rounds within 2 mn 30s with its autoloader. The secondary armament is a 7.62 mm MG3 installed on a ring mount of the top of the turret.
The crew is of 5.
The PzH 2000 has been deployed to Afghanistan by the Dutch then by the Germans from 2010. Its capacities have been highly appreciated by the supported units. I naddition to Germany and the Netherlands the other users of the PzH 2000 are Croatia, Greece, Italy and Qatar.
The kit
After releasing the initial version of the Panzerhaubitze 2000 Meng released the version with add-on armor in 2015. The box includes 11 plastic sprues, 1 sprue of clear parts, 2 hull halves, 1 upper turret, 1 aluminum barrel in a separate package, polycaps, 3 bags of 220 parts for the tracks in a separate box, 2 sheets of photoetched parts, 1 length of thread and 1 instructions booklet.
The cast is clean and the level of detail is excellent. The suspension is workable which I dislike as I don't build dioramas. The tracks are workable too. Meng gives the choice between the German and the Dutch versions. You have to choose at the beginning of the build to avoid mistakes in the parts choice and the details to remove or the holes to drill. The instructions are sometimes obscure on this point. There are 4 decoration options: 1 in the Bundeswehr desert scheme , 1 in the Bundeswehr NATO 3 tones camo, 2 in the Dutch army NATO 3 tones camo in Afghanistan.
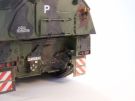
The fit is generally good except for the bins at the rear of the hull for the German version I opted for.
The build
It comprises 25 steps and starts with the running gear from step 1 to step 5.
From step 6 you have to choose between the German or the Dutch versions. Meng made a first mistake for the German version B by requiring to fill the hole at the right of the rear panel. This is the tow cable attachment point which have to stay open. Meng also requires to glue all the PE parts X5 in the same direction. The left most part must be glued with the opening downward to properly secure the cable.
At step 7 Meng gives the choice between parts D33 and G16. Generally parts from sprue G concern the Dutch version only. Likewise part G20 which Meng requires to use for the German version B must not be glued. Unfortunately I noticed it too late.
At step 8 the footsteps are very fragile. I advise to glue them as late as possible.
At stpe 9 you have to shorten the rods of the saw D40 or fully drill the holes to attach it.
At step 10 part D28 is visible on the drawing but not its number. It is better not to glue it at this time because it will prevent the good fit of the add-on armor module.
The next steps are problem free. You just need to be cautious at step 13 to remove the molded details depending on the version you chose.
Step 14 deals with the tracks assembly. It is tedious because you need to thoroughly clean the 3 parts per link and you have to theoretically prepare 98 links per track. Once the tracks are assembled you have to paint them as well as the lower hull because the installation of the skirts will prevent installing the tracks later.
At step 16 part D25 requires a thorough sanding of the inner faces to fit.
At stpe 17 I replaced the length of thread by a metal cable of the same diameter. It is important because the cable must run into the U shaped brackets.
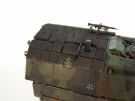
I did not install the add-on armor modules at step 18 to paint the hull camo more easily.
At step 19 the assembly of the turret begins by building the gun. You have to thoroughly clean the seam of the plastic fume extractor. Meng gives the choice between a muzzle with or without a muzzle cover.
At step 21 there is a tiny gap between the bolted plates and the turret roof. Fortunately the add-on armor modules will hide the gaps. So the putty is not necessary.
At step 22 Meng requires to glue part E16 at the rear of the turret. In fact it is part G19 and thus is only needed for the Dutch version.
At step 23 you need to thin the inner edges of part F21 on the MG3 ring mount. Meng gives a open ring mount F27 and a closed one F28. If the hatch is closed so you must use part F27. The drawing in the notice shows the reverse.
At step 24 I did not glue the add-on armor modules on the turret like on the hull.
At step 25 you must shape PE protection X3 on the gun mantlet. It is very stiff and hard to bend properly. Once it is bent and glued it is impossible to change the elevation of the gun upward.
The decoration
I chose the German NATO 3 tone camo decoration. So I used the Vallejo set for the Bundeswehr. Unfortunately the paint totally clogged my aribrush several times. I finally sprayed a coat of XF-67 NATO Green then I applied the Vallejo Brown and Black shades with a brush. It is very frustrating as the Vallejo shades are very accurate.
The muzzle cover has been painted orange with the reflective stripes painted in XF-16 Flat Aluminum with a small amount of XF-2 Flat White.
A coat of gloss varnish has been sprayed before applying the decals and another one sealed the decals. Then I added the add-on armor modules which were beforehand painted in XF-69 NATO Black .
The weathering has been made with oil dots (ochre, duck egg white, umber) drawn downward. Then several shades of pigments more or less diluted have been sprayed to create a dust effect.
Click on a thumbnail to see the full sized picture

|

|

|

|

|

|

|

|

|

|
|

|

|

|

|

|
|

|

|

|

|

|
|

|

|
06/2020