Ref: Hobby Boss #84508 LvKv 90C Anti-air Vehicle
The Gulf War in 1991 showed the importance of antiaircraft vehicles capable to accompany and protect a mechanized force espcecially against attack helicopters. That is why the Luftvärnkanonvagn (LvKv) 90 was designed on the basis of the CV 90. The first vehicle was delivered for testing in January 1992. After a year of trials a series order was placed.
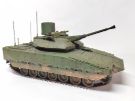
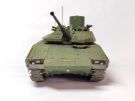
The LvKv 90 is armed with the same 40 mm automatic cannon as the IFV however it can elevate higher up to 50°. It can fire a fragmented programmable explosive round and an armor-piercing (APFSDS-T) round. The standard load is 200 explosive rounds and 32 APFSDS-T rounds. The secondary armament is a 7.62 mm m/39C coaxial MG (or MAG 58 for the LvKv 90C) with 1000 rounds.
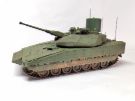
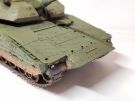
The LvKv is equipped with a bi-dimensional PS-95 radar which can detect targets up to 15 km and allows to engage up to 5 km. The radar can simultaneously track 6 targets and determine if they are a threat.
The crew is of 7 men: the driver, the vehicle commander, the gunner and in the rear compartment the combat leader, the loader, the radar operator and the air traffic observer.
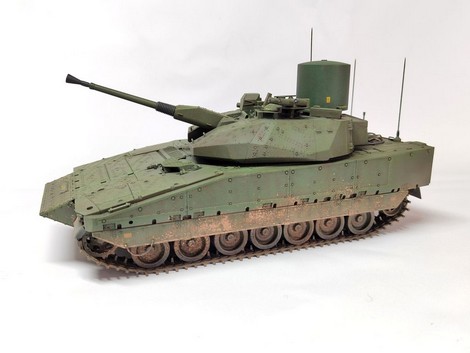
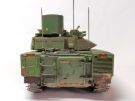
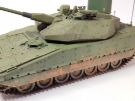
The version C is fitted with the same add-on armor package as the CV 9040C. The coaxial MG has been replaced by a MAG 58 mounted onto the roof. No major upgrades has been implemented. In 2002 one vehicle was taken out to be used as a technology demonstrator.
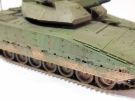
Between September 1997 and June 1999 30 vehicles have been built of which 3 have been upgraded to the standard C. The LvKv has never been deployed in operation.
The kit
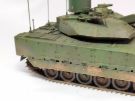
Released in 2020, it depicts the up-armored version of the LvKv 90 built in only 3 vehicles. It comprises 14 beige sprues, 4 black sprues, 2 hull halves, 1 upper turret half, 1 clear parts sprue, 180 individual workable track links, 1 PE plate, 1 sheet of decals and 1 instructions booklet with a color page for the decorations.
Logically it includes the sprues for the CV 9040C. The new parts are on the sprues S, V and T. The upper hull and turret shell are new parts too like the PE plate.
The level of detail is good, the mold lines are usually thin and there is nearly no flash. The fit is good and the putty is not needed. The tracks are theoretically workable but remain fragile. It is advised to glue them. The decals sheet gives the choice between 2 vehicles. However the proposed winter camo scheme is not suitable for the C version but only for the standard one.
The build
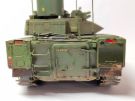
Like with the CV 9040C it begins with the rear wall. The parts to detail the interior of the door can be omitted as there is no interior provided. PE-6 part is slightly too small to be glued to part B34 (ski rack bottom). So I applied some CA activator and only glued one edge. When in place, I've added a small amount of CA on the opposite side to fill the gap. The details were only added to the wall C16 when it was glued to the hull.
Step 2 deals with the roadwheels, idlers and sprockets assembly. To facilitate the installation of the tracks, the roadwheels have not been glued and only the inner wheels were glued to the swing arms.
Step 3 concerns the suspension.
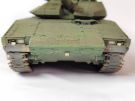
At step 4 you have to glue the headlights and the front turn lights. Befroehand you need to paint the bottom of their location. Mudgaurds C14 and C15 need to be trimmed to fit into their location.
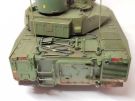
At step 5 you have to assemble and install the tracks. Hobby Boss call for 82 links per track. A supplementary one proves useful in particular if you glue the tracks. I chose t oglue the tracks to the sprockets and the idlers then to paint the both assemblies before they are installed to the suspension. Then the outer roadwheels are glued. Armor package J9 and rear rubber flaps B22 and B23 are only glued when the tracks are installed.
At step 6 the tow cable is painted separately. It is attached once the hull is painted.
At step 7 the positioning rods of the bar T16 do not match the holes in the hull. The easiest is to delete one of them.
At step 8 the spades are painted after their edges are thinned. They are installed after the hull is painted.
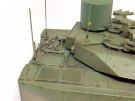
At step 9 the antennas and the foot-steps F4 are not glued to avoid any breakage. The antennas end is thinned.
From step 10 the assembly of the turre begins. I chose to replace the PE tie-downs by electric wire. So I drilled out their locations before inserting the new tie-downs. This must be done before the turret halves are glued together.
Steps 11 and 12 do not require any comment.
At step 13 you need to thoroughly clean the parts making up the stowage bag at the back of the turret. The bag is poorly represented by Hobby Boss and looks like the stiff bin.
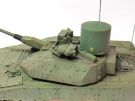
At step 14 you have to shape the canvas cover PE-21 over the gun mantlet. It is very stiff. I is advised to anneal it beforehand. Hobby Boss provide a drawing for the shape.
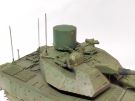
At step 15 you should not glue in place the assembly V8-T18 (MG ammo feed system) on the turret roof before having positioned the radar.
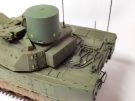
At step 16 you have to install the radar. This one being painted in a different shade of green it is not glued yet. You msut ensure it sits horizontally. Hobby Boss designed a small and a larger holes t oavoid any mistake. Unfortunately the rods under the base S2 are inverted. However the V shaped end is depicted in the right direction on the instructions. The gunner sight cover includes a PE part for the mobile shutter. As the interior is almost empty it would have been more simple to mold the entire cover as a single plastic part.
Step 17 deals with the installation of the tie-downs for those who prefer the PE parts. The antenna is not glued yet and its end is thinned.
The decoration
All the reference pictures show the LvKv 90C are painted plain green with a darker green shade for the radar. I chose the references XF-67 NATO Green for the vehicle and XF-26 Deep Green for the radar. A coat of gloss varnish is sprayed to facilitate the application of the decals. You have to paint the orange reflectors on the side skirts. Hobby Boss did not provide them as decals unlike with the CV 9040C model. A red reflector on the rear access door is missing too.
The weathering started with the application of oil dots. Then a nearly black brown pinwash followed by a drybrush with oils are applied. The dust and the dried earth effects are done with liquid and dry pigments.
Conclusion
It is a good model of an original and rare vehicle (only 3 were built). The assembly is quite simple unless you do not like workable individual links tracks. For the decoration there is no choice despite Hobby Boss indications.
References
CV 90 Photo guide Stridsfordon 90 Swedish Armour Historical
Society ISBN 978-91-633-7880-5
CV 90 Swedish Infantry Combat Vehicle - History, Technology, Variants Carl
Schulze Tankograd International Special 8003
Click on a thumbnail to see the full sized picture
|
|
|
|

|
|

|
|
|
|

|
|
|

|
|
|
|
|
|
|
Last updated: 05/2025