Ref: Takom # 2067 British APC FV432 Mk.3 Bulldog

The FV432 has been the APC of the British Army since 1963. With more than 3000 vehicles built, it is still in active duty in this latest mark entered in service from 2006 to meet the operational requirements of counter-insurgency operations.
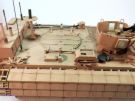
The FV432 is a light armored vehicle designed to carry a ten man squad. It is armed with a 7.62 mm GPMG crewed by the vehicle commander. On the Mk3 the cupola is raised and the gunner is protected all around with armored plates. A variant with a remote weapon station has been designed too.
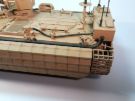
Its armor protects the personnel against small arms and artillery splinters. On the Mk3 an additional armor package developed by Rafael has been fitted as well as slats which protects the vehicle against RPG-7 hollow charges.
The Mk3 also features a new engine and a modified steering to improve its mobility and cross country capacity. Its top speed is 72 kph instead of 53 kph originally.
Because of its design the FV432 is the base for many variants without major modifications. So there are mortar carrier, ambulance and command post vehicles. The vehicle was also used as the base for the following specialized variants: self-propelled howitzer FV433 Abbot, recovery vehicle FV434 Fitter and antitank vehicle FV438 Swingfire.
The kit
Released in 2017, the kit utilizes some sprues from the original model issued by Takom but not the interior ones. The box includes 10 light grey plastic sprues, 2 hull halves, 1 clear parts sprue, 1 sheet of PE parts, 1 sheet of decals and 1 jig to assemble the tracks. The notice is a A4 booklet with 3 color decoration options.
The plastic is nicely carved, the cast is good. However my model had the lower hull warped. The level of details is really good too. Some parts have heavy molding lines you need to clean thoroughly to get a perfect fit. The fit is usually good except for the slats at the corners of the vehicle and as the base of the cupola in contact with the engine grilles.
The hatches can be open or closed. The suspension is static. The tracks are the lengths and links type you need to assemble around a jig. The main option is the armament with a choice between the armored cupola and the remote weapon station.
The notice is usually clear even if you need to be careful with the parts used according to the armament option.
The build
It begins by the running gear. The track assembly jig is also used to align the roadwheels arms. The axes are a bit thick to get inserted in the roadwheels. So you need to enlarge the holes in the inner faces of the roadwheels.
At step 5 you assemble the tracks according to the instructions. However between the section under the sprocket and the lower track run you need 2 links D5 and not only 1 as stated by Takom. Once the both tracks are ready the lower hull and the running gear are painted. Then the tracks are fitted.
At step 8 the hull sides are glued. The hull of my model being warped I started by gluing the rear part of the sides and progressively continued forward. PE part TP5 can be omitted as it is invisible when the skirts are installed.
At step 9 you need to glue the clear lights. Takom does not give any color indication. The outer lights are red and the inner ones are orange.
At step 11 it is not necessary to glue the interior parts of the rear door.
At the end of step 12 the glacis plate is immediately glued to the hull unlike what the instructions state.
At step 14 the additional armor elements are glued to the glacis.
At step 16 you have to assemble the tow ropes with a ring between the ropes and shackles at their ends. Takom tells to cut the shackles and the ring and insert the ropes ends. This is not the easiest way in particular for the shackles. It would be way easier to cut the shackle axes, drill the ends and make workable axes with styrene rod.
At step 17 the headlight guards are assembled and the mirrors should be glued to them. To avoid any breakage the mirrors are not glued yet. On the PE grilles Takom did not engrave any marks to bend them and there is no marks on the headlights covers. The lower side lights should be orange and the top ones clear.
At step 19 the part E47 needs to be trimmed on both ends. The camo poles holders M12 are drilled further than what is done by Takom.
At step 20, the parts B26, TP 5, TP 6 and TP 7 which are invisibles are not used.
At step 23 I had to cut nearly all the slats of parts K45 and K46 to get them properly aligned with those of the glacis.
At step 24 I did not glue the various jammers aerials which are very thin and fragile. They have been glued after the painting.
At step 26 I did not glue the central slat panel K40 to facilitate the painting and allow the decal application. On my model there is misalignment issue between the panel K38 on the right and the corner part K44. This certainly is my mistake.
From step 29 you have to choose the armament option because the roof hatches are different.
As I chose the man operated cupola I skipped step 30.
At step 31 the cupola is attached which is the final step of the assembly.
The decoration
Takom proposes 3 decorations for vehicles of the 1st battalion Scots Guards in Iraq in 2008. 2 are fitted with the RWS and only 1 has the cupola. The first decoration seems to have been used only during a training session at Hohenfels in Germany.
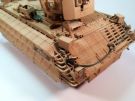
I chose the vehicle with the cupola. In terms of painting this does not change anything because the 3 vehicles are painted sand. I represented this shade with XF-78 Wooden Deck Tan. Then I added some white to the base color to highlight the top panels. The details have been paint brushed with the same color.
A coat of Klir has been sprayed to allow the application of the decals and of a dark brown wash.
The weathering started by applying the dark brown wash around the details. Then some streaking is created with water pencils. The dusty look is done with high diluted XF-57 Buff sprayed all over the vehicle and a bit more on the lower areas. To give it its final touch some sand color pigments are applied.
Conclusion
Despite some fit issue with the slat armor this kit is pleasant to assemble. It allows to get a variant really different from the original vehicle with a more aggressive look especially with the remote weapon station. However the choice of decorations is a bit limited.
Click on a thumbnail to see the full sized picture

|

|

|

|

|

|

|

|

|

|
|

|

|

|
|

|

|

|

|

|

|
|

|

|

|

|

|

|

|
|