ref: Trumpeter # 05534 German Fennek LGS
German version
Master Model # GM-35-013 Modern AFV antenna Comrod VHF 3088VM Straight version

ref: Trumpeter # 05534 German Fennek LGS
German version
Master Model # GM-35-013 Modern AFV antenna Comrod VHF 3088VM Straight version
The development of the reconnaissance vehicle Fennek started in 1993. It was designed as a successor to the Luchs for the Bundeswehr. The first vehicles went into the test stage in 1997 and the first vehicles were fielded into service with the Bundeswehr and the Dutch army in 2003.
The Fennek can be armed with a 40 mm automatic grenade launcher or a 7.62 mm MG3 MG on a manually operated cupola fitted with a day sight and a thermal camera. The version A2 is fitted with a RWS FLW 200 armed with either a 0.50 cal MG or the 40 mm automatic grenade launcher.
The reconnaissance vehicle is equipped with an observation mast fitted with a thermal camera, a day CCD camera and a laser rangefinder. The mast can be raised up to 3.3 m above ground level. The head with the sensors can be dismounted and used on a tripod as far as 40 m from the vehicle. It can detect a target up to 10 km and identify it within 2 km.
The Fennek is protected by a STANAG 3 armor and can be up-armored with add-on plates. A spall liner also protects the crew. In addition 6 smoke grenade launchers are fitted to the rear of the vehicle.
Whatever the version the crew is of 3. The crew has all the means necessary to work alone during 5 days.
The Fennek has been built in several versions: reconnaissance, ground to ground fire support, air to ground fire support and engineer reconnaissance. The Dutch army designed more versions. The total number of vehicles in service with the Bundeswehr is 220.
The Fennek was deployed by the Bundeswehr in Afghanistan and by the Dutch army in Mali.
The kit
Trumpeter has first released the Dutch version in 2013 before the German one in 2014. So the latter includes all the original parts and the German specific parts on the sprue G.
The kit comprises 10 light grey plastic sprues, 2 hull halves, 1 clear parts sprue, 4 vinyl tires, 4 polycaps, 1 plate of photoetched parts, 1 sheet of decals, 1 instructions booklet and 1 color sheet for the decorations.
The mold and the level of detail are good. However Trumpeter has omitted the brushes under the front wheel arches and the stowage bags on the inner face of the doors. The antenna bases are not all correct for the German version.
The notice is clear regarding the assembly but is a bit vague or even wrong concerning the colors for painting the quite detailed interior.
The PE parts are not always easy to use. The protection of the convoy light is a perfect example of it. Even if Trumpeter gives a plastic template to shape the wheel shock, the bending is still complicated. The handles are particularly hard to shape.
The color plate for the camouflage schemes presents many mistakes. The NATO 3 tone scheme is wrong. It is advised to use the one available at Panzerbaer. I didn't check in detail the scheme of the vehicle deployed in Afghanistan but at first sight it is wrong too. Finally the references for the paints in the Tamitya range are wrong. Trumpeter also gives references for the following brands:Ammo, Mr Hobby and partly for Model Master and Humbrol.
The decals sheet includes 3 sets of vehicle ID plates, the nationality markings, the ISAF markings, 2 white crosses for the convoy light and the dashboard. The latter seems hard ot use as is because of the numerous raised details on the dashboard. The white cross will need to be cut before being used.
The build
It begins by the lower hull. Stpes 1 and 2 deal with both the exterior and the interior which is a bit strange but not complicated. You only have to begin painting the interior. To do so it is better not to follow the scarce paint indications provided by Trumpeter but to rely on the walkaround provided by Hans-Hermann B�hling at Prime Portal (see the reference section at the end of the article).
For the dashboard D24 Trumpeter does not tell to use the decal at step 2 but at step 9. It is better to use it before gluing the part. Moreover given the numerous raised details it is easier t ocut the decals in several bits which will be applied at the proper locations.
At step 3 you need to thoroughly clean the mold lines on the suspension arms.
At step 4 the wheels are assembled and painted. The vinly tires are painted too to avoid any reaction with the plastic. Beforehand you need to remove the mold line. A soldering iron is perfectly suitable for this. When done the wheels are set apart.
At step 6 you have to shape the PE protection for the convoy light protection E33. The bending is easy but getting the right angles is tricky. The registration plate holder is provided both in plastic and as a PE part.
At step 7 do not use the antenna base E5 which is wrong for a German vehicle. The true difficulty is building the wheel shock and its PE bracket. However Trumpeter give a useful template to bend the main part. The true issue is the shaping of the handles PE13.
At step 8 you need to fill the rear of the driver headsrest.
Steps 9 to 11 deal with the interior. To facilitate the build all the elements were assembled in sub-assemblies which were painted before being glued. The shaping of the stowage bins PE1 and PE9 requires several attempts.
Fro mstep 12 the build deals with the upper hull. It is not necessary to glue the windows as they are secured by the armored frames. However it is necessary to paint the inside edges of the frames before adding the windows.
At step 13 the wipers are not glued yet to allow the masking of the windows. The antenna base G16 is cut. The spring part is removed and replaced by one of the Master Model reference. Then you need to drill through the base to fit the turned brass antenna at the end of the build.
At step 14 the side windows are not glued. They are secured by the armored parts at the next step.
At step 15 take care of the antenna base protection bar E12. It is fragile and easily breaks. On the observation controls you need to remove the mold and assembly lines.
At step 16 the PE shutter PE17 must be aligned with the front edge of the observation head.
Steps 17 to 19 propose 3 options for the installation of the observation mast: folded down, partly deployed, fully deployed. The mast has not been glued to facilitate the handling and the painting.
At step 20 the hull is assembled. It is advised to fill the holes on the rear plate now which is only mentioned at the final step. You also need to remove the shovel brackets which only exist on the Dutch Fennek.
Steps 21 to 23 concern the weapon station. Weirdly enough Trumpeter provides the side vision block as clear part whereas the main sight is molded solid with the cupola. The assembly of the weapon station requires some attention as many parts are fragile. The flash suppressor of the grenade launcher has been hollowed. Trumpeter did provide a hollow one but the edge is too thick. Along the grenade launcher there is the PE33 part which you need to bend by following a scale 1 drawing.
At steps 24 and 25 you install the weapon station and the doors. For the latter you need to add the 5 stowage pouches that Trumpeter has omitted. They are made of 1.5 mm plastic card and worked with a scriber and a round engraving tool. I also added the winch cable at the front. It was of twisted thin electric wire. The brushes under the front wheel arches have bee nmade of 0.75 mm plastic card. The bristles were simulated with a scriber.
All the clear parts are set apart pending the painting of the vehicle.
The decoration
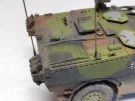
Trumpeter proposes one decoration with the NATO 3 tone camo and another with the desert scheme used in Afghanistan. Both schemes are wrong. It is useful to download the right scheme at the Panzerbaer site mentioned above and in the references section. The paints used are XF-67 NATO green, Vallejo 71.249 Lederbraun/NATO brown and XF-69 NATO black. All the rubber parts are painted XF-85 Rubber Black including the tires.
The markings include the vehicle ID plates (3 options), the nationality crosses and the convoy light white cross. The bridge class disc and the NATO unit symbols are missing. For the latter I used those from the Revell Luchs model on which I hid the armor units track symbol.
For the weathering I first applied a brown wash all over the vehicle. A light drybrush is applied before the dust is created with Lifecolor liquid pigments. The mud splashes and packs are made with some A.MIG-1701 Thick soil
Conclusion
Trumpeter issued a nice model with an interesting and futuristic look. However it is a pity to have omitted such characteristic features as the brushes under the wheel arches and the bags inside the doors. Likewise the research to spot the differences between the German and Cutch versions has not been detailed enough.
Despite these flaws I don't regret having this vehicle in my collection.
References
Book: Light reconnaissance vehicle Fennek and its family, Trackpad in the field, 2019, Trackpad Publishing
Photoscope Prime Portal: http://www.primeportal.net/apc/hans-hermann_buhling/fennek/
3 tone camouflage scheme: Panzerbaer
Click on a thumbnail to see the full sized picture

|

|

|

|

|

|

|

|

|

|

|

|

|

|

|

|

|

|

|
|

|

|

|

|

|

|
||||
Last updated: 02/2025