Ref : Revell #03233

The Allschutz-Transportfahrzeug (ATF) Dingo was developed to meet the requirements of the situations in which the Unimog 2t trucks didn't provide enough protection to the troops on board and where the armored vehicles Marder and Fuchs were too large. Initially designed on a Unimog U-1550-L chassis, the Dingo 1 was followed by the Dingo 2 developed on the Unimog U-5000 chassis enabling a heavier load.
More than 1000 Dingo 2 have been produced 600 of which for the German Army in various versions.
The Dingo 2 PatSi (Patrouillen und Sicherungsfahrzeug) has been used in Afghanistan since 2006. Its V-shaped hull gives it an excellent protection against mines. The armored cell accommodates 6 soldiers and provides protection against 7.62 mm ammunition. The crew has a type 1530 remotely operated weapon station equipped with a 7.62 mm MG3A1. From 2010, an automatic grenade launcher has been fitted to a number of vehicles. The Dingo 2 is also protected against NBC threats.
The box content
The kit by Revell depicts the ATF Dingo 2 GE A2 PatSi version which can be recognized by the mirrors on the hood and the tie-down points under the doors. In the box, there are 8 plastic sprues in the usual dark green plastic, 2 sprues of clear parts, 4 vinyl tires, 1 sheet of decals enabling three German decorations and one Czech decoration and the instructions booklet with the usual bit of wire.
The level of detail is pretty basic and
generally simplified. Some parts are molded solid when they should be hollow.
The molding is correct but there are some sink marks on the right side of the
cell. The upper part of the four doors is warped. The mold lines are prominent
particularly on the parts of the chassis. Numerous ejection pin marks are
present in particular on the inner sides of the cell. The clear parts are quite
thick but remain transparent.
The vehicle dimensions are correct.
The build
It begins with the chassis and is covered by 28 steps. The chassis itself is composed of 2 beams and 7 crossbars plus the gearbox. The difficulty is to align the parts to get a straight frame. The following operations are quite easy thanks to clear instructions. The installation of the exhaust pipe between the engine and the muffler is a bit tricky because of the particular shape of it. The end of the exhaust pipe could be hollowed out even if it remains invisible when the assembly is over.
The wheels are not glued to facilitate the painting and the weathering. The vinyl tires do not present any mold line and the tread pattern is correct. There is marking on the sides. The tire diameter is to small whereas the rim one is correct.
Steps 29 to 52 deal with the armored
cell assembly. Revell provide us with a pretty comprehensive interior but a bit
basic detail wise. We need to paint and apply the decals as the build goes
along. If you intend to open the doors or the weapon station hatch, you must
detail some areas like the gunner controls which are over simplified. The doors
being warped, I decided to go the easy way and let them closed.
The fitting of the roof requires some care. It is advised to first glue the
windshield and the cell sides.
Pending the painting, the wipers can be set apart to facilitate the masking of
the large windshield.
The cargo compartment assembly is easier. Revell give the option to omit the rear tarp but thus you have to scratchbuild the inner frame. To facilitate the installation of the rear tarp, you need to assemble the hull, glue the rear side and end with the tarp. For some reason, the cargo front support is too short. You have to first glue the armored cell and then lengthen the support to ensure the both compartments are level.
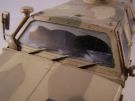
The build ends with the setting of the
hood and the MG3 cradle. The hood being composed of 4 parts, you have to fill
and sand the joints between the parts. The doors mirrors brackets must be
modified as they are molded solid with the mirrors.
On the MG cradle, the ammo box comes in 2 parts. You need to fill the gap or
replace the box and make a new support for it.
The painting
Revell offer three German camouflage schemes (Center Europe three-tone, Desert two-tone, Desert three-tone) and one plain green for the Czech army.
The scheme applied is the Desert three-tone for a vehicle deployed in Afghanistan in 2012. The unit identity is not given by Revell. The colors are those of the Vallejo Umtarnfarben German ISAF color set. In spite of its denomination, this set also includes the colors for the Center Europe three-tone camouflage.
The base color is Sandbeige. Then the Sandbraun and Helloliv colors are applied. The weathering is done by spraying various shades of Tamiya and Lifecolor sand and earth. Some pigments were added to accentuate the relief. The tires are simply weathered with pigments.

|

|

|

|

|

|

|
|

|

|

|

|

|

|

|

|

|

|

|

|

|

|

|

|

|

|

|
|||