Ref: Takom # 2026 British Main Battle Tank Chieftain Mk.11

The Chieftain Mk 11 is the last mark of the iconic British main battle tank of the Cold War. Officially accepted for service in 1963, the Chieftain really was operational in 1966 with the Mk 2. Only the Mk 1, 2, 3 and 5 were new-factory built. All other marks were rebuilt along the operational life of the tank.
The Chieftain was originally designed around the powerful 120 mm L11 rifled gun. Protection was the second priority and mobility the third. The L60 engine generated a lot of issues till the end of the years 1970s when the program Sundance finally solved the reliability problems. The original protection, especially of the turret, proved unsuccessful against the Sagger missiles and T-72 125 mm rounds during the Iran-Iraq war. This initiated the design of an additional armor package named Stillbrew fitted to the turret front and around the driver station. The tanks modified were designated Mk 10.
The Mk 11 resulted from the adoption of the thermal visor TOGS (Thermal Observation and Gunnery System) on the Mk 10. This resulted in the reduction of the number of stored rounds as well as the loss of the contra rotating ability of the commander's cupola. However the night fighting capability dramatically improved.
The Chieftain Mk 11 is armed with a 120 mm L11A5 rifled gun with a range of up to 3500 with APDS rounds. 60 rounds are on board. The secondary armament consists of a 7.62 mm coaxial MG and a 7.62 mm MG fitted to the commander cupola. 12 smoke-grenades dischargers are dispatched on both sides of the turret.
The tank is protected against the NBC agents and against the mines thanks to the V shaped floor.
The crew is of 4. The driver is at the front in the center of the hull. The 3 other members are in the turret. The commander is on the right with the gunner. The radio operator-loader is on the left.
The Chieftain has been exported to several countries in the Middle-East were it saw combat. On the contrary the Mk 11 never saw combat and was decommissioned in 1995.
The kit
First released in 2015, the kit is the first in the Chieftain series by Takom. It comprises 7 grey plastic sprues plus 6 more for the track pads, a bag with 200 individual track links, 2 hull halves, 2 turret halves, 1 clear parts sprue, 2 polycaps, 1 soft vinyl gun canvas, 1 PE parts sheet and 1 decals sheet. The instructions come in a A4 booklet with an additional sheet for a correction on the turret and a color leaflet for the decorations.
The plastic is nicely carved, the cast is really good. The level of detail is really good as well. Some parts present mold lines which need to be thoroughly cleaned to get a perfect fit. The fit is good except for the turret because of an over-engineered design of the left side due to the will of utilizing the turret upper shell for the other Chieftain models.
The hatches can be represented open or closed. The suspension is static. The gun is static too despite the use of polycaps. Excepted the engine deck handles, the PE parts really add a lot. However the left turret basket side mesh is a pain to shape.
The instructions are clear and only have a small mistake for the driver hatch. A separate sheet shows an additional operation to do on the turret top.
The build
The hull
The build basically starts with the running gear. The roadwheels are made of 4 parts which is time consuming in terms of preparation. Once the running gear is in place, the tracks assembly can begin. Takom requires 97 links butt you really need 99 of them. The rubber pads are not glued yet. The whole running gear and the lower hull have been painted in XF-67 NATO Green. The tracks are painted in XF-84 Dark Iron and only the pads which are visible are glued because the skirts hide most of the tracks.
From spep 3 the hull assembly begins. As usual I build the main structure before adding the details to facilitate the handling.
At step 4 I replaced PE part TP24 with a bit of metal wire and I drilled the box C5 to glue it.
At step 5 you need to thoroughly clean the parts to get a perfect fit of the rear mudguards.
At step 7 the shaping of parts TP12 and TP13 is tedious. The parts has no bending marks. It is the same for parts TP20 and TP21.
At step 8 Takom gives the option to show the driver hatch open. To do so you have to use part C51 which is useless if the hatch is closed.
Steps 9 to 11 do not need any comments.
At step 12 the mirrors arms have been modified to be stowed. The mirrors are not used.
The turret
Before starting the assembly you have to apply the modification on the separate sheet.
Then like for the hull I prefer assembling the large elements before adding the many details. The biggest fit issue comes with the left side part B17. You need to sand down the upper edge at the front and to putty the seam.
At step 18 the shaping of the mesh of the basket is tedious because there is no marks to help bend the part. You need to do several test fits before gluing the PE part.
At step 21 it is possible to show the TOGS flap open. However after those in the know Takom missed the right representation of the part. So I glued the flap closed.
The build is over without any major issue.
The decoration
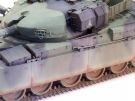
Takom proposes 3 decorations of tanks at BATUS in a sand and green livery, 1 plain green and 1 in a green and black camo in Germany. This the one I chose.
The tank belongs to the Royal Tank Regiment as in Hildesheim in 1992. The camouflage is green with large black stripes. The base color is XF-67 NAT OGreen. The stripes are painted with XF-1 Flat Black. The thermal sleeve is painted with XF-65 Filed Grey whereas the lower section is painted with some white lightly tinted with some XF-65.
The few markings are applied. There is a doubt about the white of the call sign and the bridge class disc. It should be yellow. Takom gives the markings for the squadron commander tank but omitted to provide the third antenna typical of this type of tank.
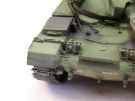
For the weathering I applied some very diluted oils to get a faded look. On the green I used some light yellow and on the black I used some pure white. When the oils are dry, I applied a dark brown wash to enhance the details.
Streaking is doe with washable pencils in various shades. The dirt effects are done with various shades of earth brown applied to the lower parts and the side skirts. Between the armor plates some darker brown is sprayed downward. The same is done on the lower hull.
Conclusion
Despite the fit issue of the left side of the turret, the model builds pretty well. Takom really gives the choice between the many decorations and offers many options to personalize the model which is a good point.
Reference : Chieftain Main Battle Tank, Development and Active Service From Prototype to Mk11, Robert Griffin, Photosniper 7, Kagero
Click on a thumbnail to see the full sized picture

|

|

|

|

|
|

|

|
|

|

|

|

|

|

|

|

|

|

|

|

|

|

|

|

|

|

|

|
||
10/2021