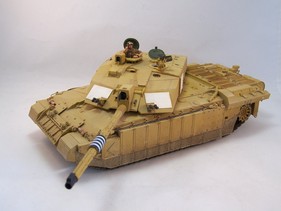
réf Tamiya : #35274 Challenger 2 (desertised)
The Challenger 2 entered service in
1991. A first order of 127 tanks was followed by another one for 259 placed in
1994. Compared to the Challenger 1, the fire control system was improved. Now
digitized, it includes an independent panoramic sight for the tank commander and
a second generation thermal viewer. The Chobham armor has also been improved.
The introduction of a new transmission and new connector ends tracks allowed an
increase of the mobility.
The new rifled 120mm L30 gun is more accurate and provides a higher muzzle
velocity. It can fire any type of rounds including depleted uranium ones. The
secondary armament includes one 7.62mm coaxial MG and a 7.62mm L7A2 MG for the
loader. For its close defense, the Challenger is fitted with 10 smoke-grenade
dischargers.
During the second Gulf War, operation Telic for the British, 120 Challengers were deployed within the famous 7th Armoured Division, Desert Rats. On this occasion, the tanks were fitted with additional armor packages on the front glacis and the sides. Exhaust extensions were added to reduce the heat signature. The skirts got canvas extensions to reduce the dust. Like the US tanks, the Challengers were fitted with identification panels.
The Challengers 2 performed outstandingly during the size of Basra in March 2003.
The kit
Molded in a light beige plastic, it includes 6 sprues plus one lower hull. To complete these parts, there is 1 clear plastic sprue, 1 tracks set, 1 bag of polycaps, 1 bit of clear film, 1 bit of white plastic card, 1 string, 1 sheet of decals and 1 instructions booklet.
As usually with Tamiya, the cast is high
quality and the detail level very satisfactory. The ejection marks are generally
located in invisible spots.
The instructions are clear and split the assembly into 29 steps.
The build
There is no bad surprise. The fit is nearly perfect.
The hull
The running gear assembly does not need
any comment. The roadwheels are not installed yet to allow an easier painting.
On the rear panel, the spare track links and the clear lights are not glued.
They will be added once the base paint coat is applied on the tank.
The armor blocks fit with no problem. However, one should notice that the large
securing bolt molded on the parts D41 and D44 is not aligned with the one on the
parts D42 and D43.
The side skirts will be glued after the painting of the running gear.
The turret
The assembly starts with the gun and its
mantlet. To avoid gaps, the parts of the mantlet must be carefully glued. The
inner face of the sight G7 must be painted before it is glued. The flap B41
installation is a bit tricky.
The gun barrel joint requires the usual sanding for this type of two-part
barrel. The gun is not glued to facilitate the handling of the turret.
The assembly of the turret itself is easy. For the panoramic sight, some care is
required to avoid gaps. To complete the build, the identification panels are
installed. Tamiya give a pattern to cut the front ones.
The decoration
The base color is a mix of XF-59 Desert
Yellow and XF-3 Flat Yellow. The canvas skirts are painted with very diluted
XF-49 Khaki.
The whole tank gets a coat of gloss varnish to ease the decals setting. The
decals come for the box sheet which gives three decorations, all for tanks
belonging to the Royal Scots Dragoon Guards.
A second coat of varnish is sprayed then the weathering begins with pin washes
to enhance relief and panel lines. When dry, some mat varnish is sprayed prior
to creating the dust effect with some XF-57 Buff and then Mig pigments.

|

|

|

|

|

|

|

|

|

|

|

|

|

|

|

|

|

|

|

|

|

|

|
||