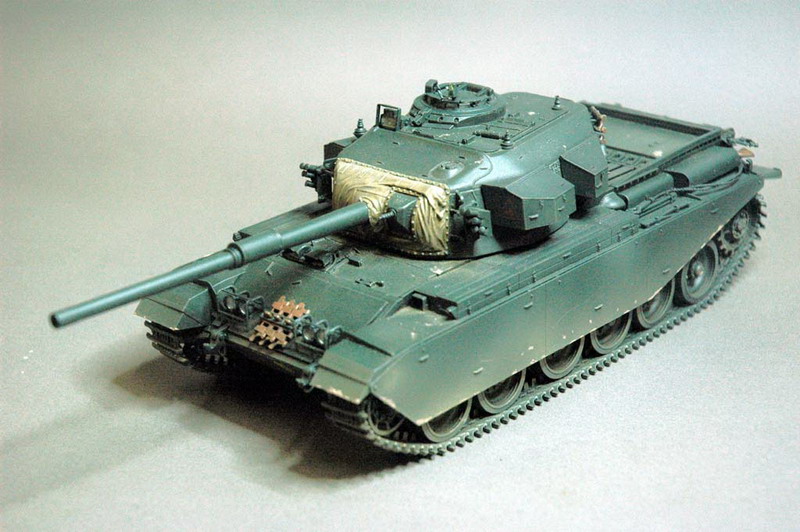
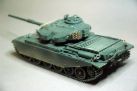
Centurion Mk 5/2, Mk 6 (NATO)
Reference AFV Club : #AF35122
Text and photos by Christophe Jacquemont
This is the second Centurion release from AFV Club after their “Royal Australian Armoured Corps Mk.5/1 (Vietnam Version)” reference AF35100. You get most of the Australian version parts, except the rubber part for the spare road wheels but you get more spare track links (nine instead of four). A new plastic sprue has the side skirts specific to this kit. The turned metal barrel is different, as well as the photo-etched fret which is slightly larger. All in all, those who built the Australian variant will be in familiar territory, but it’s not possible to build the RAAC Cent from the NATO kit. The tracks and part of the road wheels are in black flexible plastic. It’s the outer part of the road wheels and not only the “rubber tire” that is molded in that material, which enabled AFV Club to depict the fine ridges on the outer periphery of the metal wheel. I found the one piece tracks to be well detailed and frankly only the most die-hard super detailers will need individual links. I used the kit tracks on this build but purchased also for a future project a set of the AFV Club workable Centurion tracks (reference AF35102), which is just amore complete set of the same individual tracks as the nine spare track links in the kit. A good point is that some of the parts are in resealable plastic bags, very neat!
I chose to build this kit “straight from the box” as the Mk.6 version, I personally think this one looks better with the bigger headlights and extra armor on the glacis. This is also the type depicted by the box art, which rightly shows a canvas mantlet cover, not present in the box. I decided to use a Firestorm resin mantlet which I had bought some time ago, “FST141 Centurion Canvas Covered Mantlet”. Firestorm do another type with searchlight mount.
Construction
As I started building, I noticed there were no letters identifying the sprues, but the parts are numbered on the sprues, and you do get a parts list and sprue plan at the end of the instructions. Steps 1, 2, 3 and 4 deal with the suspension units and road wheels, everything went smoothly and the fit was great. The suspension units are meant to be workable, complete with metal springs. Some rods are supposed to be secured permanently by melting the end of pins with a heated nail. As the fit was so good, I didn’t do that only to regret it later as they tended to pop off when you pressed the top of the tank with too much force, so follow the instructions or at least glue everything in place if you don’t need the workable suspension feature. The wheels are fixed on their axles by small caps of flexible plastic (similar to the Academy or Tamiya polycaps in concept, but different material) and unfortunately this doesn’t work very well, the caps are a bit too big and have to be forced into place, you can then cut the excess flush. The flexible black plastic “tyres and rims” can be glued with normal plastic cement but tended to come off later in construction, if I had to do it again, I’d use super glue instead. Also better fit the hubcaps(E1) to the outer road wheels (E10) before the black plastic “tires and rims” (R5).
Steps 5 and 6 deal with the fitting of the various suspension parts to the lower hull. Note that the fit of the lower rear hull panel to the lower hull is nothing short of fantastic, it would hold in place without glue! On the other hand you get more ”polycap” problems with the drive sprockets and idlers. I let the idler arms loose rather than gluing them on to be able to adjust them later. If you do the same, I suggest you fit the tracks at the end of step 6, check and adjust the idler arms’ position to get the correct track tension remove the tracks, glue the idler arms on, and when dry, put the tracks back on again. For some reason the return rollers are supposed to be assembled out of two parts (E6 and E7) to be aligned by mean of a raised half circle and corresponding depression, however they won’t fit together, so I just sliced off the half circle to glue the two parts together.
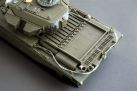
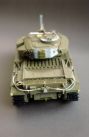
Step 7 involves the detailing of the lower rear hull, there are some fiddly bits here, I would suggest assembling the parts in the following order : H24 then C16, then H25. After that add when dry the subassembly C18/C20/C17 and lastly H17 (after removing the faint ejection pin marks on that part). Steps 8 and 9 deal with the engine deck and vents, many parts were molded with injection rods on the inside, not visible parts, those are quickly removed with a pair of side cutters. Also be wary of some flash on grille C40, and of the bad fit between C38 and C41, the hinges need some work with a file otherwise you can’t get the two parts together.
Step 10 deals with the top hull plate and front glacis, if
you do a Mk 6 like I did you have to carve off some detail as per instructions,
to prepare for the fitting of the front armor plate. If you do the Mk 5/2
variant then there is some filling and sanding to do with shallow depressions in
the plastic. Front glacis plate C24 was slightly warped and there was injection
rods to remove underneath, as on part C34.
Careful gluing and taping with Tamiya masking type while the
glue set got rid of the warpage.
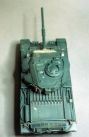
In step 11, detail is added to the rear, be extra careful with the ten grab handles (parts B29) they are tiny and fragile and there are no spares... To prevent breakage I cut off handles individually keeping the sprue runner, then cutting off the handle itself.
Steps 12, 13 and 14 deal with the mudguards and exhaust system. The mudguards (parts H1 and H26) even have delicate detail on the underside! There are also some sink marks, but anyway all will be invisible with the tracks and skirts fitted.
In steps 15, 16 and 17, you go back to detailing the front hull. For the Mk6 version, I recommend sanding the underneath of the extra armour plate (part F8) which is also slightly warped and also needs the bending/controlled gluing treatment. I also ran into trouble with the Mk6 headlight guards (assembly of parts B12 and B18), the parts tend to shatter when you try to remove them from the sprue. The only proper way I found was to heat a model knife on a flame and carefully slice through the plastic with a hot blade. Luckily I was able to source a replacement for the broken parts by using the same parts in a RAAC Centurion kit (being for a Mk 6 they are not needed in that kit anyway).
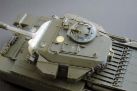
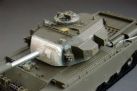
Steps 18 to 22 deal with the turret construction and detailing. This is were I incorporated the Firestorm canvas covered mantlet. The fit of the resin part is almost perfect, you just have to bend the sides under very hot water to gently coax it into place (this is explained in the Firestorm instructions). I made sure the joint with the plastic turret was good by “painting it” with Tamiya Liquid Surface Primer (reference 87075, comes in a small glass bottle). I you want a canvas covered mantlet “the easy way” you can also use the very good Lionmarc Centurion turret (at the moment reference “1/35 Centurion RAAC Turret w/ canvas”, you’ll have to carve out the projector support but I’m told another turret will be released soon for the NATO Centurion), this time a complete turret based on the AFV Club one but with all the seams taken care of, and with enhanced detail. I’ll definitely use one for my next Centurion project. Speaking of seams, there is one to deal with around the top of the turret but most of the work is needed on the back turret plate, worst point in an otherwise perfectly fitting kit, this will need some serious puttying. I found the wire reel part (assembly of parts I39 and I40) to be overly fragile. I broke mine and didn’t use it in the end as it was too difficult to repair.
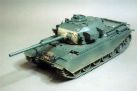
The jerrycan assembly at the back of the turret, with plastic and photo etched parts, is rather complex but I was careful and in the end it wasn’t a problem. The spare track to go into the little hangers (parts B36) didn’t fit, I had to enlarge the holes in the links slightly with a file. After that the track links just click into place, which is quite handy as you can now remove them easily for painting.
Another tricky area to deal with is the fit of the smoke dischargers on each side of the turret front. I didn’t have any reference with me and the instructions were rather vague... The turned aluminum gun is beautifully done and fits the Firestorm mantlet quite well once you drill out a slightly larger hole. The smoke recuperator is made of two plastic parts and the fit to the metal gun is overly tight but I got it into place with some gentle coaxing.
Step 23 which has more rear hull detail added, including cables made from nylon thread (you have to attach the cable ends with super glue) while step 24 deals with the tracks and side skirts. The side skirts (parts K1 and K2) are absolutely awesome, the best I have seen in any kit by far, very thin and in scale, and they fit perfectly. I chose to put the side skirts on before painting but you could probably do it afterwards if you want to be more thorough in your suspension painting (but most of it is hidden anyway).
Last thing I did was to mask the numerous transparent parts with a masking liquid, Mr Masking Neo from Mr Hobby/Gunze Sangyo.
Painting and weathering
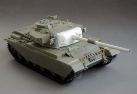
The model was now given a good scrub in warm water with dish washing liquid. When dry, everything was given a coat of Tamiya grey primer from a spray can. The suspension and tracks was given a coat of a dark grey brown Tamiya mix while the rest of the tank was painted in Tamiya XF11 J.N. Green.
Everything was coated with Tamiya gloss lacquer varnish from a spay can to prepare for decaling. The decals are fragile but as they are small they’re not much chance of them breaking up. I chose the only Mk.6 option in the instructions (E, British Army unspecified unit).The decals were then sealed with another coat of gloss lacquer.
Final weathering was done with washes of Payne Grey oil paint and, after a coat of Gunze Sangyo Mr Color matt lacquer varnish from a spray can, pastels and very diluted airbrushed coats of Tamiya XF52 Flat Earth and Tamiya XF57 Buff.
Overall, another great, very detailed model from AFV Club, light years ahead of the old Tamiya Centurion Mk 3. Hopefully more versions are to come from the Taiwanese manufacturer, in the meantime excellent conversions are available from Azimut (Centurion Shot Kal 1982) and Cromwell Models (Mk1 and Mk2).
Many thanks to AFV Club/Hobby Fan Trading for the review sample.
Highly recommended.
|

|
|
|
|
|

|

|

|
|
|
|
|||