Ref : AFV Club #35016

The AIFV is the Belgian infantry fighting vehicle. It is based on a M113 hull that has been modified to improve its protection and enable the installation of one-man turret mounting a 25mm automatic cannon. At the beginning the Belgian AIFVs were fielded in 3 variants : IFV with the 25mm gun, antitank with a Milan team and command. In 2009, the IFVs are used in a support role and the Milan antitank vehicles got transformed into APCs. This vehicle is currently being phased out. Some units have been sold to Lebanon.
The model issued by AFV Club comes in a
sturdy cardboard box. It has about 250 plastic parts and 9 photoetched parts.
The lower hull is a separate part and the tracks are in soft glueable vinyl. A
sheet of decals allows 5 different decorations. The sprues are wrapped in
individual plastic bags. The green plastic is easily worked.
The level of detail is very good and the cast quality very satisfying. While it
can be built straight out of the box, nonetheless some details omitted by AFV
can be added. Some tiny parts need to be cautious while they get removed from
the sprue.
The 13 steps build starts with the hull
following the instructions except for the roadwheels. The hull was warped which
generated some fitting issues. The use of cyanoacrylate glue helped in resolving
this problem. The external fuel tanks need a little sanding to remove the beams.
The vehicle having no interior, all the hatches are glued closed.
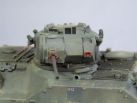
The troubles arrive at the step #5. The
trim vane and the stops for the troop compartment roof hatch must be set in
place. Concerning the trim vane, AFV forgot to hollow the inner face thus
preventing the stiffener (part C11) to get inside. While taking care to not
piercing the inner face, a hollow rectangle must be drilled. Then 2 stops are
added to the inner face. In the middle of the trim vane base, a J shaped hinge
must be added.
Concerning the roof hatch stops, the photoetched parts are too stiff and get
broken when bent. One needs to be cautious or simply delete the horizontal part.
It is to notice that AFV did marked all the bending lines.
The engine grilles fit without difficulty.
The lights are fitted and the wiring is
added from thin electrical wire. Each light cluster needs approximately 6 wires.
At the rear, a protective plate for the cables that has been omitted is added.
It is made from a 7x4mm bit of thin plastic card. Then it is beveled to fit
between the back of the cluster and the roof. Two bolt heads are added to each
cluster.
Before shifting to the turret, the exhaust of the personnel heater is drilled
out. Two small tubes are added to the front armor plate at the end of the bolted
stripes above the sprockets. They are flags supports.
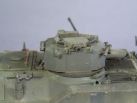
The turret is complex and comprises 12
parts for its structure without numbering the details. Most of the parts
necessary to do the Dutch YPR765 are present, so you must carefully follow the
instructions. The hatch locking device is detailed. The chains of the caps of
the smoke grenade launchers are added . Weirdly enough, AFV state to cut one of
the SGL (E27) to reverse the tube direction.
The 25mm gun muzzle is drilled out. The Minimi co-axial MG is not given.
At last the wheels are added. The bad surprise is as they come from a sprue of the M730 Chaparral kit they do not fit to the AIFV hull axis. We need to enlarge the hole in the inner face of each wheel. Then the tracks are glued in place with the usual sagging. This must be done prior to gluing the side armor plates.
The chosen decoration depicts a vehicle of
the 1st Regiment de Chasseurs Ardennais. The decal sheet enables to represent 3
Belgian vehicles, 1 of the Philippine army and 1 of the Turkish army in UN
service. No unit indication is provided.
The basic color is Tamiya XF62 Olive Drab. After the gloss varnish coat is
applied, the decals are applied. AFV provide numerous stencils which
unfortunately are quite useless as they are wrong and with some letters printed
reversely.
The vehicle gets a mat varnish coat and the weathering starts with the use of
oil paint spots to break the uniform look. The vision blocks are painted mat
black then received a coat of Tamiya X19 Smoke.
The dust is made with various ochre and earth pigments.
With a little attention, this kit enables to represent an interesting vehicle that is not often seen.

|

|

|

|

|

|

|

|

|

|

|

|

|

|

|

|

|

|

|

|

|

|

|

|

|

|

|

|

|

|

|
|

|

|
|