
Text and photos by Christophe Jacquemont
I won’t go into the detailed history of this self-propelled gun, this is better done in some of the references listed at the end of this construction review. Suffice it to say that the M40 was an impressive artillery piece and until now unavailable as a 1/35 model kit. I vividly remember how awed I was when I first saw my first real M40 “in the metal” at the Imperial War Museum Duxford some years ago!
The AFV Club kit looks magnificent in the box, with an incredible amount of fine detail, with minute weld seams and casting numbers, clearly a labor of love from this manufacturer! The kit had been announced some years ago but was only released in late summer 2006. Some parts are from their old “Long Tom M59 155mm cannon” kit (reference AF35009) while the HVSS suspension parts had been released some time ago as a separate set (“M4 Sherman Medium Tank (HVSS) Horizontal Volute Spring Suspension” reference AF35030). The kit has an imposing turned aluminum barrel, a sprue of transparent parts, a photo-etched brass fret, flexible black plastic T66 tracks and a large and colorful decal sheet with no less than seven marking options, six US and one British.
The M40 (actually still designated T83 at the time) was first used operationally very late into WW2 as part of the Zebra Mission, whose purpose was to test in combat some of the latest equipment. It later saw battle in Korea. I wanted to do my model as a Korean War vehicle and with little reference available when I started this project I aimed for a relatively straightforward “out of the box” build. Some information later surfaced on the Internet and I also got some useful reference right at the end of my project such as Ground Power issue 152 and the Japanese book “Self-Propelled Gun Model Fibel Vol.1”.
One problem I found early on was the type of track provided in the kit (T66). Apparently only the prototype and maybe very few early production vehicles had the T66 track. Wanting to do one of the Korean options on the decal sheet, I ordered a set of AFV Club HVSS T80 workable tracks (reference AF35032) from Blast Models, who delivered them very quickly. Strangely, AFV Club gives you T84 (parts A40) and not T66 spare tracks to put on the front glacis...
ConstructionI did some of planning ahead before starting construction and decided to deviate from the instructions slightly. I did the basic hull construction first then moved on to the suspension and track, to leave the more delicate detail parts for the end. The gun subassembly was kept separate until the final stages of weathering.
I jumped to steps 7, 8, 9 and 10 of the instructions, which involved basic hull and suspension assembly. I assembled the hull parts first, no real problems here but the walls of the fighting compartment are quite thin and were warped in my kit. Got rid of most of this warping by gently twisting the parts in hot water, and the gluing of the storage racks E1 and E2 (reinforced by thick plastic rods made from bits of sprue frames) on the inside, maybe not entirely necessary but I wanted to be on the safe side). Firewall B33 was also slightly warped but more easily fixed. Before fitting part F1 (which covers the engine compartment and front driver and radio operator compartment), I chose to paint the inside of the compartment in flat black, so that the plastic wouldn’t show later on through the grilles or the transparent viewing ports of the two cupolas. Part F1 needs some injection rods to be removed on the underside (three per side).
The HVSS suspension was straightforward to build except the return rollers which don’t fit without some coaxing. The AFV Club workable tracks, not included in the kit but which I chose to use to get the proper type for the Korean War M40 I wanted to do, were another story altogether. Those were very difficult to build, despite some tricks like crimping the pins and thickening them with Mr Surfacer. Apparently the best product to use for this is Microscale Micro Sticky Tape, but I couldn’t obtain some in time. In the end, I got the track built, after much time spent and a liberal amount of swearing....
Before moving on to the hull detailing, I started building the gun itself (steps 1 to 3). The aluminum barrel still had some metal shavings in the muzzle and had to be cleaned up with a file and sandpaper. The rest of construction was easy but when complete I had to slide out the gun to modify it. This is because it surfaced on the Internet that the gun was too short. In the words of Kevin Kenny on Missing Lynx “I've found that the barrel is 8.5 mm too short, or about one foot 1/1 scale. Two spacers have been added, 4 mm in the center band and 4.5mm at the breech end. Interestingly, I used Pz IV steel road wheels for the spacers. “ Comparing the kit to period photos it was fairly obvious that Kevin was right, the gun was indeed too short! I was able to make the modification myself without too much trouble using the same ingredients (Dragon Pz IV steel road wheels leftover from an old “Zwischenlosung” kit, but others have used Sherman VVSS road wheels). The modification is very worthwhile and changes the general outlook of the model completely (see photos). The final touch to the gun subassembly was the addition of the gun shields, which need a bit of sanding to remove faint ejection pin marks at the back.
The rest of construction involved smaller detailing and the rear spade assembly, you really need to be careful as some parts are tiny and/or fragile. The photo-etch parts on the other hand are just the right thickness (i.e. not too thin) and fit perfectly. Transparent parts are provided and you need to do some masking to protect them during the painting stages. AFV Club gives you rear lights in transparent plastic (parts K2 and K3), not really useable as you’ve got to paint them black and red anyway. On the other hand, you don’t get clear lenses for the front lights, I had to drill out parts D2 to add my own after market lenses from Gasoline/Tarmac. I also run into trouble with the hyper-fragile gun crutch support rods (parts A27 in step 21), had to repair one but it broke again and I ended up scratch building a replacement using brass road, be extra careful with those parts.
As for the rear spade and rear platform assembly it’s easier to depict the vehicle in firing mode but I wanted mine in traveling mode... The instructions are not the clearest but if you study them carefully. The only thing I couldn’t make out until I saw the feature in “Self Propelled Gun Model Fibel” was how the two rods B31 were fitted when the rear platform was folded up. Running the nylon “cable” through all the pulleys was a bit tricky but it looks great in the end.
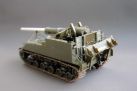
Painting and weatheringThe model was now in two subassemblies, chassis and gun, which were given a good scrub with dish washing liquid, in warm water. When dry everything was given a coat of Tamiya grey primer from a spray can. I had to sand and fill again the gun as the primer coat revealed some cracks, after that and another coat of primer it looked perfect. The suspension and tracks was given a coat of dirty grey brown (Tamiya acrylic mix) while the rest was painted in Tamiya Olive Drab.
After another coat of Tamiya gloss lacquer varnish, I proceeded with decaling. The decals are very fragile and tend to break up. If you are very careful you should be able to put them on without too much damage. I chose the “G” option in the instructions : “Big Bruiser” 937th FA Korea 1953.The decals were then sealed by another coat of gloss lacquer.
Final weathering was done with washes of Payne Grey oil paint and, after a coat of Gunze Sangyo Mr Color matt lacquer varnish from a spray can, pastels and very diluted airbrushed coats of Tamiya XF52 Flat Earth and Tamiya XF57 Buff.
My thanks go to Hobby Fan Trading/AFV Club (http://www.afvclub.com.tw/) for sending me the review sample, Blast Models (http://www.blast-models.com/) for delivering the track set I ordered so promptly, Roy Chow for his online review of the kit on the AMPS website and Kevin Kenny for his postings on barrel correction on the Missing Lynx website (http://www.network54.com/Forum/110741/message/1165778211/M-40+155mm+barrel). Highly recommended.References :
Roy Chow’s excellent review on the AMPS website :

|

|

|

|

|

|

|

|

|

|
|

|

|

|

|

|

|

|

|
|