Ref : Tamiya #35264

The M2A2 ODS entered service to make profit of the lessons
learned from the operation Desert Storm
hence the denomination ODS. It comprises many modifications to the basic M2A2.
In fact, there are two kinds of ODS vehicles, those coming straight from the
factory and older vehicles upgraded to the ODS standard. The latter does not get
systematically the full batch of modifications included in the program which
gives the modeler some freedom of interpretation.
The vehicle is an old one upgraded to the ODS standard. So it
has not the new front armor plate neither the new designed side skirts. But I
chose to represent the new driver and gunner hatches.
Running gear
Hull
At the front, we need to extend the notch on the part E26 to
the upper armor plate. The upper hull is modified to fix the basic model and to
adapt it to the ODS standard. The swim barrier brackets are added on the glacis
plate. Several lifting eyes and bolts are added as well as a large handle on the
engine cover. The bolts can be recovered from the older skirts.
On the edge of the grille under the exhaust shroud, 2 large
lifting eyes are missing. The engine grille is detailed with the weld marks. On
its edge, Tamiya have represented 4 eyelets solid, they need to be drilled out.
The driver's hatch is of the newer style with a totally
redesigned hinge mechanism. The hinge is cut away and redone with thin plastic
card and Grandt Line bolts. The vision blocks cover is made of thin plastic card,
it is attached to 5 bits of rod with 5 large bolts coming from the kit part. The
locking lever is added as well as a locking device at the bottom of the hatch
just in front of the driver. On both sides of the hatch, there are two poles
with a square plate on their top.
On the left side, 4 "slices" of tubing are missing. They
served as brackets for the swim barrier. 2 more are to be added on hte right
side. The fire extinguisher handle and its cover must be redone as the part of
the kit only suits an early M2. The platform E28 is removed which requires to
remove its brackets on the left skirt, to fill the gap on the hull and to alter
the pioneer tools arrangement. The straps of the tools are thinned and detailed.
On the back, the cargo hatch bumper is added between the
vision blocks.
Sides skirts
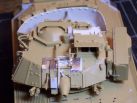
Turret
The bustle rack has a wrong shape. We can replace the part E39
by a new one made of plastic card. The bottom of the rack is retained and its
shape fixed by adding a piece of plastic card. The whole holes are drilled out
even if they will disappear under the crew gear. A stiffening arm is glued
between the antenna mount and the bustle rack wall. It has a stretched S shape
and gets 2 bolts on each end. 2 stretched eyelets are added behind each ammo box
rack. Behind the gunner, a large lifting eye is added too. On both sides of the
turret back, we need to add a rectangular part nearly flush with the turret roof.
The gunner's hatch is modified to represent the newer style
one. The kit one is used as a template. The hatch is cut out in a piece of 1mm
thick plastic card, its rear edge is beveled to enable the fit of the hinge. The
2 gunner's small vision blocks and the commander's left one get a cover from
very thin plastic card.
The TOW launch box is modified to represent the TOW2 launcher.
The one in the kit is of the older style. As it is represented in the stowed
position, the bottom will not be hollowed and the bracket B45 remains unchanged.
Painting
The build starts with the running gear. The sprockets are replaced by those of
the Tamiya LVTP7A1 which shape is more accurate. We need to drill the 6
lightening holes in the outer ring and redo the shafts from aluminum tubing. The
last skirt panel being raised, we need to add the track adjuster and the last
shock absorber. To do so, the main body of the parts B69 and
B70 is cut out and and only the idler shaft remains.
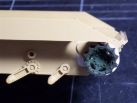
At the front, the transmission housing is too thin and thus there is a gap
between the housing and the upper armor. To fix that, a strip of 1mm thick
plastic card is shaped around the kit part. A little rectangular part (approx
2x1mm) is glued to the front of the housing. On the sides, the cover (B61 - B62)
must be correctly positioned, its upper edge being parallel to the hull.
The back of the hull requires a lot of work as Tamiya
over simplified this area. First, we need to remove the "wings" of the ramp
frame as well as the oblique parts of the hull on which they rest. On the real
vehicle, the wall is flat there. The wings are cut in 1mm thick plastic card. On
the wings, we need to fix 2 thin plates, with a gap between both, on which are
glued the stowage bins. The kit parts will serve as a template. To give the
model a more living look, the left side bin has its door torn apart. The bin is
done with aluminum foil. The hinges are detailed as well as the straps. The
rearlights covers are detailed with their 4 bolts. A metal plate is fixed to
their back.
Between the wings and the ramp opening, there is a pipe made of plastic rod with
its upper end flattened. Under the ramp, there are 2 "steps" made of 1mm thick
plastic card.
The headlights covers are corrected. On their top, Tamiya have represented a
rectangular part too thin and too short. One bolt must be added on the top of it
too. The left side cover has to be corrected by extending it to the rear.
In front of the lights, there should be the power cord and its conduit.
The skirts are rebuild to match the real ones. Tamiya molded them in one piece
whereas the real ones are made of 2 thin armor plates with a gap between them.
Each portion is cut out then thinned from inside to keep the outer details
intact. The inner plates are made of thin plastic card. Both plates are glued
with round spacers at their bottom and rectangular ones at their upper edge. The
last rear portion is raised.
On the upper part, 3 series of tiny holes are drilled out even if they are
hardly visible.
On top of the front end of the left skirt, a piece of plastic card has to be
added to give it its correct shape. Tamiya molded a cut-out there to ease the
positioning of the swim barrier.
Its is the area requiring the most extra work. We need to
rebuild the bustle rack and the gun mantlet. The TOW launcher will be
detailed too.
In fact, Tamiya retained the parts of their initial kit, thus the mantlet is
wrong. On the real vehicle, only the central portion is moveable. The
upper armor is made of aluminum foil. A webbing piece is added on the mantlet.
The liaison arm between the gun and the sight is modified. Once again Tamiya
retained the original kit part which is not suitable for a A2 vehicle. This arm
is secured to the rounded part of the gun base and not to the mantlet. To fix it,
we need to cut the front end of the arm where it is angled, then to glue a piece
of rod on the left side of the remaining part and to make the bracket on the
rounded base with thin plastic card. The rear part of this arm should be hollow.
A circular sight made of copper wire is added opposite to the collimator.
On top of the gun base, there is a groove to be engraved. A handle-shaped part
is glued in it.
The smoke grenades stowage boxes are thickened and lengthened, their hinges are
redone. Unlike what state the kit instructions, both boxes are fit to the right
side of the gun. As a consequence, the left location gets a bolted beveled
plate.
The main gun and the co-axial MG muzzles are drilled out. The smoke discharger caps are engraved to
represent unloaded tubes.
The antenna mount guard is raised by the addition of 1mm long plastic rods where
it makes contact with the turret roof.
The GPS is detailed with the 2 missing eyes on the right side. The flags holders
on its back are drilled out.
The front door is modified by sanding the rectangular extension at the bottom.
The door opening arm is made of plastic rod, the ends are flattened and shaped
into a hexagon. The launch box sides have 7 bolts that Tamiya omitted. The rear
side of the box has to be redone. The TOW2 launcher gets only one unloading
handle. The bottom edge gets 4 missing bolts. The interior is fully detailed.
Prior to painting, we need to represent the anti-slip coating. Then the
vehicle gets the NATO 3 tone camo. The markings are those of B company, 1/26 Inf
Rgt in Kosovo in 1999.
The weathering is done by spraying some well diluted XF57 Buff then applying
Ochre and Grey Mouse pastels.
The accessories and the figure come from the Tamiya box.
References
Warmachines n�5
Concord Publications Min Color Series n�7506
Major Rob's Motorpool

|

|
|

|
|

|

|

|

|

|

|

|

|

|

|

|

|

|

|

|

|

|

|

|

|

|

|

|

|

|

|

|

|

|

|

|

|

|

|

|

|

|

|

|
|