M1117 ASV Guardian
Ref: Trumpeter #01541 M1117 Guardian
Armored Security Vehicle
Blast Models #BL35158K Guardian update set
Blast Models #BL35155K Guardian sagged wheels and system controls air pressure
Blast Models #BL35135K Rhino IED pre-detonation device
Echelon Fine Details #D356103 81st Brigade Combat Team M1117 ASV Guardians in
Iraq

The M1117 Guardian is based on the Cadillac Cage LAV 150 and
has been designed from the beginning as a vehicle suited for counter-insurgency
operations. So it can fulfill the following missions: area security, battlefield
circulation control, prisoners of war operations, law and order operations.
Adopted in 1995 as a replacement for the Humvee variants used by the Military
Police, it entered service in 2000 with the 18th MP Brigade.
The M1117 Guardian provides the 3-man crew with a high
protection with its V shaped all steel hull which is reinforced externally by a
MEXAS modular armor and inside by a spall liner against various projections. The
M1117 can withstand 12.7 mm AP rounds hits and 155 mm shell splinters. Its
wheels withstand the blast of a 12lb mine.
It is also fitted with a central tire
inflation system, a NBC protection system and a 6.7 tons capacity winch.
The M1117 is fitted with a one-man UGWS
turret similar to the one of the AAV-7. This turret mounts a 12.7 mm MG with 200
rounds and aMk19 mod3 automatic grenade launcher with 96 rounds. At the rear of
the turret there are 8 grenade launchers which can fire smoke and non-lethal
grenades. One M240H MG can be fitted to a pedestal on the right of the turret.
The M1117 has been used for the first time
in operation in Kosovo in 2001 and has been deployed into Iraq in 2003 with the
18th MP brigade. It has fulfilled numerous missions like convoy escorts, urban
security operations, reconnaissance and surveillance, cordon and search and
quick reaction force. It was also used in Afghanistan.
The M1117 is also in service in various
variants in Afghanistan, Bulgaria, Colombia and Iraq.
The kit
Released by Trumpeter, it comes in 6 light grey plastic
sprues, 1 clear parts sprue, 2 hull halves, 1 grenade launcher feed chute and 4
tires in vinyl, 2 photoetched parts sheets, 1 length of chain, 1 decal sheet, 1
instructions booklet and 1 color plate for the decorations.
The level of details is satisfactory and the fit is good
except for some PE parts. The instructions are split into 14 steps and are very
clear. The options are limited to the choice between the rear mirrors supports
and between the plastic or PE engine grille.
The Blast Models set enables to add some anti IED antennas,
charged smoke-grenade dischargers, a barrel for the 12.7mm MG with its canvas
dust cover and accessories on a jerrycan holder. A riot control device called Long Range Acoustic Device and the interface for the Rhino system (without
the Rhino itself) are provided too.
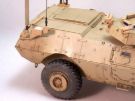
The wheels present a slight sagging and the central inflation
system. Unfortunately when the round protection plate is in place, the system is
barely visible.
The Rhino set includes the support, the main rod, the extension, the emitter and
a length of elastic to represent the power cable. The system can be shown either
in the horizontal position or the vertical one. The extension has to be cut at
the desired length.
The build
It begins with the wheels. So I skipped this step as I
decided to use Blast wheels. You must keep parts A3, A22, A36 and A55 for the
end. From step 2 to step 4 you have to build the axles and the transmission
shafts. Apart from removing the molding lines, there is no difficulty there. The
wheels are not glued yet to facilitate the painting.
The assembly of the hull is quite easy and the fit is good
except under the wheel arches where some putty is needed. The interior being
empty I did not glue the various parts to detail the interior of the access
doors. At step 7 I chose the PE engine grille which is more realistic. I did not
glue the wipers and I masked the windows. On parts B11 and B14 you need to
enlarge the positioning holes. for the headlight clusters D27 and D30. The clear
parts are not glued to facilitate the painting.
At step 8 you need to glue the PE wheel arches protections. I
had to trim some of them. But probably it was my fault.
At step 9 the assemblies N et O are
reversed. The inner face of the doors is not detailed. Obviously you do not need
to apply the decals 21 and 24 now. Anyway they will be covered by the jerrycans.
At step 10 you deal with the most fragile
parts of the kit: the rear mirrors brackets and the rear lights protections. The
jerrycans are replaced by the Blast resin parts. Unlike what Trumpeter states I
advise to glue the PE protections of the lights PE-A5 only when the lights are
glued to the parts D51 and D52. At this point the Blast resin antenna bases can
be added. However I did not glue the antennas to avoid any breakage. Step 11 is
the final one for the hull and deals with the axles installation.
The Rhino is prepared but only the
interface piece and the support are glued to the hull. The rod will be glued
after the painting to avoid again any breakage. The power cable is made from tin
wire in place of the provided elastic length which does not always behave well
when time goes.
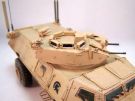
The turret assembly is dealt with the last
two steps. The 12.7mm barrel is replaced by the resin one and it is the same
with the smoke dischargers. The seams between the two parts of the grenade
launcher protection must be thoroughly cleaned.
The decoration
Trumpeter gives two options for a 3-tone camo vehicle and
another two for a tan vehicle. As usual there is no indication about the unit
unless you know the US bumper codes.
I had the Echelon decal sheets dedicated to the 81st BCT
comprising the markings with the Spartan helmet which I decided to use.
The base color is AK 122 OEF and OIF US vehicle base color.
It is protected with a coat of Klir prior to applying the decals. When
they are dry, another coat of Klir is sprayed to protect them before the
weathering.
I applied a filter all over the vehicle which makes the antiskid coating more
visible. Then a brown wash is applied in the recesses and around the raised
elements. Some streaking effects are done with oils. And to conclude a dust
effect is created by spraying some XF-57 Buff and applying some pigments in
various shades.
Reference : Concord Mini Color Series 7518 Iraq Insurgency US Army Armored
Vehicles in Action (part 1)
Click on a thumbnail to see the full sized picture
Index
11/2019