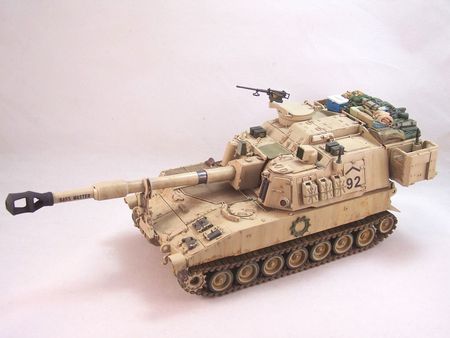
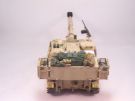
M109A6 Paladin
ref : Italeri #372 Paladin SP
Howitzer
Skunk Models #35002 T-154 individual Track Link Set for M109A6
Blast Models #BL35205K M109A6 Stowage AFV CLub
The M109A6 Paladin is the current self-propelled 155 mm howitzer of the US army. It entered service in 1992. At the time it was a true improvement over the older versions thanks to the numerous state of the art technologies it incorporated.
Along with a totally new turret, the M109A6 introduced increased armor, a redesigned internal arrangement for safer ammunition and equipment storage, engine and suspension upgrades, and product improvement of the M284 cannon and M182A1 mount. The greatest difference was the integration of an inertial navigation system, sensors detecting the gun orientation, automation, and an encrypted digital communication system.
Thanks to the computerized fire control system, the M109A6 can fire its 39 caliber gun from on the move within 60 seconds to 24 km or 30 km with assisted projectiles. Its basic load of ammunition is 39 rounds and it has a maximum firing rate of 8 rounds per minute. Its secondary armament can either be a M2 .50 MG or a Mk16 40 mm automatic grenade launcher.
The 4 man crew is protected against NBC weapons, shell splinters and small arms fire.
The M109A6 saw action during Operation Iraqi Freedom from 2003 to 2011. Whereas the previous versions have been operated by many countries, the M109A6 has only been in service with the US army and more recently with the Saudi army. The next generation M109A7 is being fielded.
The kit
Released by Italeri and based on their earlier M109 kits, the kit includes the original M109 hull and a new turret. So it can't be built into an accurate A6 straight from the box. The box contains 4 large sprues, 2 of which are new, 1 piece of mesh, 2 stiff vinyl tracks, 1 small sheet of decals and 1 instructions foldable sheet.
The quality is average and the details are a bit soft. There are a lot of molding seams to remove as well as many ejection pin marks in visible locations. The fit is pretty good. Unlike AFV Club, Italeri only gives separate hatches for the driver, the MG gunner and the rear access door. The tracks are not only poorly represented but they are the wrong type for an A6. The decals sheet in my kit was the very early one with only one decoration.
As I got the kit second hand, I didn't have the instructions and the parts for the Mk19 were missing. I downloaded the instructions for the kit as well as those for the Tamiya re-release as they were clearer in some areas.
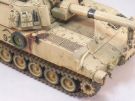
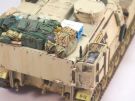
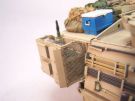
To give the model a more modern look, I added Blast Models stowage set. Even though it is designed for the AFV Club kit, it is quite easy to adapt. The correct tracks are from Skunk Models and come as separate links with separate connectors. For the lazy ones, each sprue contains a length for the lower section. I recommend not to use it as the connectors are not detailed like the separate ones.
The build
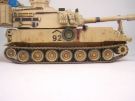
It basically starts with the running gear. The sprockets miss the central hub cover. A 3mm diameter disc of thin plastic card fills the gap. The sprockets can be built moveable. This was a useful feature to adjust the Skunk tracks. Likewise the roadwheels and the idlers are moveable.
At step 9, before gluing the upper hull,
you need to cut out the banana shape part behind the driver station. It was part
of the former flotation kit no longer in use with the M109A6. Then you have to
fill the large hole. For this I used 0,75 mm plastic card.
When the both hull halves are assembled, some sanding and putty are required to
get a perfect fit.
At step 15, you are supposed to attach the tracks to the running gear. So I started assembling the Skunk tracks. Unfortunately the connectors fit was too loose so I had to glue them to the links. Therefore I made 2 runs for each side and put them around the sprockets and idlers and let them dry so they have the right shape.
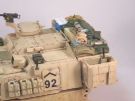
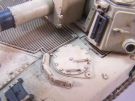
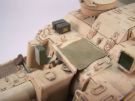
The rest of the hull assembly did not require a particular attention except that you need to add the add-on armor on the driver hatch. It is a round piece of metal attached with 12 bolts to as many spacers. I also added the pump outlet in front of the engine compartment.
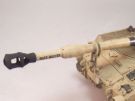
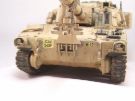
The turret assembly started with the gun cradle and its breech. For the ease of handling I didn't glue the gun barrel yet. Italeri omitted the muzzle velocity radar so I had to make one from scratch with some 1mm thick plastic card. Here Tamiya instructions were useful as this part is included in their kit.
At step 28, I modified the M2 spare barrel. The one in the kit is awful and the brackets are wrong. Some plastic card and a spare barrel from another kit came to my rescue.
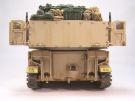
At step 31, the assembly of the large rear turret section requires some attention as the fit is far from perfect. I also sanded the lip around the hatch on the turret left side and engraved a new panel line. The antenna bases are cut and and replaced by Djiti Productions resin parts.
The side baskets are replaced by the Blast Models ones. They are designed for the AFV Club model so the hinges of the kit must be modified. The baskets miss most of the mesh parts which are included in the AFV Club box. I used the S06 Aber reference to make the missing parts.
At step 44, I modified the sledgehammer bracket with strips of plastic card. At step 46, I did not use the cable to facilitate the fit of the Blast Models stowage. For the same reason, the spade #93 is not used.
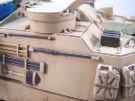
At step 48, the canvas over the gun is modified. The plastic brackets are cut, the canvas itself is replaced by a piece of tin foil which is glued to the brackets. The gun barrel misses a kind of sleeve just in front of the mantlet and a bolted ring. I create those parts in thin plastic card.
As in my kit the Mk19 grenade launcher was missing, I used the M2 MG instead. The ammo boxes were replaced by leftovers of a Tamiya modern accessories set.
The decoration
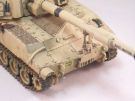
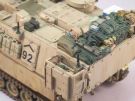
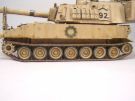
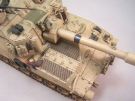
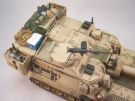
I first sprayed a base color with some Tamiya Buff. Then I sprayed the AK122 OIF US vehicles base color. When dry, I applied some Klir before setting the decals. I used some AFV Club decals kindly shared by Hans Hermann a long time ago. A second coat of Klir seals the decals before the weathering begins.
For it, I started with some washes of brown and ochre yellow. Then a pinwash of brown is applied to enhance the recesses. The raised parts are paintbrushed with some AK paint to reinforce the contrast. The running gear gets some pigments to depict mud cakes.
Then I used the oil dots method to give a more used look to the whole vehicle. A final coat of dust is sprayed over the vehicle and more specifically on the running gear.
Conclusion
With a bit of work this kit can turn into a nice rendition of the M109A6. However, it does not compare with the AFV Club kit. So the latter is your best choice if you intend to build an accurate M109A6. Even the Tamiya re-release includes unchanged wrong parts (upper hull and tracks).
Click on a thumbnail to see the full sized picture
|
|
|
|
|

|
|
|
|
|
|
|
|
|
|
|
|

|
|
|
|
|
|

|
|
|
|
|
|
|
|
|
|
|
|
|
||||
Last updated: 06/12/2018