Ref : Panda Hobby # PH35001 M-ATV MRAP
Def Model # DM35054 US M-ATV MRAP 16.00xR20 wheel set
Blast Models # BL35181K US MRAP Radio Set
Blast Models # BL35232 US Duke Front Antenna

The M-ATV (Mine Resistant Ambush Protected - All Terrain Vehicle) entered service in 2009 to replace the M1114 which did not offer enough protection to their crews. Built by Oshkosh, the M-ATV has been designed to be lighter than the other MRAPs to have a better mobility.
It is designed around
an armored cabin which accommodates the crew. It is protected by a V-shaped
floor which deflects the blast of an explosion. The 40 cm ground clearance and
the independent TAK4 suspensions also contribute to the protection against mines
and IEDs. To improve the passengers safety, the seats are hung to the ceiling
and feature safety harnesses.
At the rear of the vehicle there is a cargo bed.
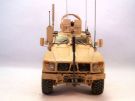
The crew of 4 includes a driver, a vehicle commander and two passengers including the gunner who has a semi-open turret OGPK (objective gunner protection kit) which can be fitted with the following weapons: M240 7.62 mm MG, M2 0.50 cal MG, Mk19 40 mm automatic grenade launcher. The gunner overhead protection is reinforced with a roof.
Initially the M-ATV has been designed in two versions. The second is fitted with the M153 CROWS remotely operated weapon station. A version specific to SOCOM ahs also been designed with a protected cargo bed.
Around 10000 M-ATV have been built. Since 2014, the amount of M-ATV within the US forces has been downsized to approximately 7000. Around 1500 vehicles underwent an upgrade and standardization program. The M-ATV is expected to be replaced by the JLTV (Joint Tactical Light Vehicle).
It first saw action in Afghanistan then everywhere the US forces were committed. Many countries also use the M-ATV among which Saudi Arabia, United Arab Emirates, Portugal, Croatia and Poland.
The kit
Released in 2011 by a new manufacturer Panda Hobby, it was warmly welcome. In the box there are 12 beige plastic sprues, 1 beige plastic hood and 1 cabin, 2 clear parts sprues, 5 vinyl tires, 3 photoetched parts sheets, 1 decals sheet and 1 instructions booklet.
The level of detail is usually good. The cast is not the current standard. Many parts show flash and the molding lines are often large. A tedious cleaning work is mandatory at every step.
The clear parts for the windows are perfectly clear. On the contrary those for the lights are slightly opaque. The photoetched parts sheet comprises a lot of parts without too small ones. The bend lines are present but the thickness of the parts often makes the shaping hard.
The decals sheet comprises many markings but only allows the decoration for one vehicle.
The instructions booklet includes 24 black and white pages with the last one dedicated to the decoration and theoretically to the decals. The assembly is divided into 24 steps which look clear. However the assembly unveils many mistakes of part numbering and some imprecision concerning the parts location or the decals application. For the decoration Panda Hobby does not give any indications of colors even if the interior is included.
To conclude, the accuracy is far from perfect especially concerning the interior and the tires dimensions. One can regret the lack of an engine and the radio sets which is barely noticeable when the doors are closed. However at the back of the cabin the bin for the Duke control system is lacking whereas the antennas are included in the kit.
The build
As an introduction, it must be sais that all the parts need to be thoroughly cleaned and the contact surface checked before gluing the parts. The alignment of the various positioning holes and pegs must be checked. Concerning the pegs they are systematically thinned. The shaping of the PE parts need to be cautious as some drawings are far from precise.
The build starts by the chassis. Part G17 between the both
sides of the winch is too short. At the rear of the frame, part E34 on which is
attached the towing hook has no number on the sprue. However its peculiar shape
helps find it quite easily. The tabs of part A34 must be thinned to allow the
fitting with the both girders B1 and B13.
At the end of step 1, you have to use part C5 and not C32 as stated in the
instructions.
At steps 2 and 3, when the springs are glued, you need to clean the joint.
Steps 4 and 5 do not require any comment.
I skipped step 6 as I used DEF Model wheels. However parts D6 and D9 require to be thinned so the resin wheels fit.
Step 7 requires to shape two long PE parts with multiple angles. Panda Hobby does not give any drawings of the shaped parts which would help have the right profile.
At step 8 you need to
bend and assemble parts PE-C15, PE-C19 and PE-B24 without any indication. But
parts C15 and C19 need to be bent at the right angle to have the assembly glued
under the dashboard. Decal 17 is not applied before the painting of the
interior. The laptop screen is not used and replaced by the Blast resin one.
However you need to keep the plastic bracket G46. The floor A22 is not accurate.
It lacks the raised parts in the seats area.
The radio rack assembly requires a lot of patience because the PE parts are
fragile.
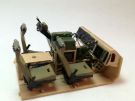
At step 9, you need to assemble the rear part of the radio rack and to glue it to the floor. Then the seats shackles can be glued to the floor. However Panda Hobby gives a wrong part number. C36 is a shackle while you must use part C12 which is the shackle and the part to which it is locked. The seats are assembled but not glued until they are painted. At the back of the seat, there is the handle C43. In total you need 8 of them while you only 6 on the sprues. I chose not to use the ones of the rear seats.
At step 11 the cabin lower part is complete. It must be painted before the next steps. Without any reference provided by Panda Hobby, it is useful to have a look at the pictures provided at Armorama (see the link at the end of the article). Beforehand, the radios are installed and the wiring is done with very thin electric wire. The interior is painted with AK122 OEF OIF US vehicles base color. The dashboard is painted satin black. Then the various decals are applied according to the last page of the instructions. The laptop is painted XF-67 NATO Green. The screen got a coat of X-19 Smoke. The seats are painted satin black for the metal parts and XF-49 Khaki for the canvas parts. The shackles are painted aluminum. The radios are painted XF-67 NATO Green and the wiring Flat Black. Once the cabin interior is painted, it is attached to the chassis but unlike what the instructions state, I glued the cabin upper shell.
At step 12 you have to install the cargo bed. To do so you need to cut the two rods on the right front shackle support. When the bed is in place you can make the rods with some 0.66 mm styrene rod. They will secure the reinforcement bar of the spare wheel support.
At step 13, the installation of the wheel arches and the bins which are attached to them is a real brain teaser. Panda Hobby asks to glue PE parts PE-B25, PE-B26, PE-C23 and PE-C24 without any marks on the parts A10 and A11. I preferred gluing PE parts straight to the chassis. Then I assembled the bins and glued them onto the wheel arches. Finally I adjusted the arches taking care of the alignment of the PE parts and the bins ends. On the cargo bed there are two small bins E19 and E32 to which you have to glue the C43 handles remaining from the seats assembly.
Steps 14 and 15 deal with the building and the installation of the structure above the cargo bed. The positioning tabs on part E16 are missing but this is not an issue. The rear mud falps are not attached yet as well as the various antennas to avoid any breakage.
At step 16 the spare wheel support is assembled. The hardest thing is to bend the PE-A1 reinforcing bar. But with a bit of patience, the result is satisfying. The spare wheel will be replaced by the resin one later on.
At step 17 the doors are assembled. The interior is painted before they are glued to the hull. The windows are painted clear orange and fixed with some Klir. The fitting to the windows frame is excellent. The rearview mirrors are assembled but not glued yet.
At step 18 the small searchlights and the wipers are not glued. The shaping of PE parts PE-C27, PE-C12 and PE-C13 is a bit complex without reference pictures. Parts C34 are badly cast. In fact you need to cut them longitudinally and glue one half only.
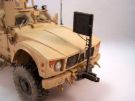
At step 19 to assmelbe the front bumpers E2 and E23 you first need to thin their inner face so the PE parts can be glued inside.
At step 20 I replaced the exhaust PE protections PE-A16 by some brass wire. Weirdly enough they are present on the step drawing but their assembly is only required at step 21. Once the hood is assembled I added a piece of plastic card which I painted black to conceal the lack of the engine. Before I glued headlights glasses GP1-5 I simulated the LEDs with small bits of styrene rods which I painted aluminum.
At step 21, I just added the power cable on the Rhino device.
At step 22, you have to assemble the antenna bracket in front of the driver side. It comprises 3 PE parts you must bend and glue together. The simplest is to bend the main part PE-C1 then to bend the other parts so you get the right angles. I did the same for the bracket on the vechile commander side even if it is covered at step 24 only.
Step 23 is dedicated to the turret assembly. The gunner protection does not require any comment. It is not glued to facilitate the painting and the weathering. The turret ring F15 gets the interior parts which are painted too. The hatch is cut to be displayed open.. On the MG mount F8 the PE part to glue is PE-B19 and not PE-B9. The MG is replaced by a Azimut one I had in my spare box. The kit one was warped and the fit of the both parts was bad.
The build is complete. Prior to painting the vehicle I wanted to add the wiring of the various antennas. To do so I had to simulate the sheaths in which run the cables. I used brass wire around which I wound very thin electric wire. For the larger sheaths behind the cabin, I wound the thin wire around 2 or 3 bits of brass wire according to the cables running out of the sheath.
The decoration
The base color is AK122. Once it was dry I applied a coat of Klir before I applied the decals you need to trace among all the assembly steps. The last page of the instructions helps a bit to find the right position but pictures of a real vehicle will help as well.
The radio antenna are painted XF-26 Deep Green and the Duke system ons are painted XF-57 Buff. The Rhino device is painted Black like the wheel rims. The tires are painted XF-85 Rubber Black. The side mirrors are painted with some Liquid Chrome Molotow.
I started the weathering with a brown filter all over the vehicle. Then I applied a brown pinwash in the recesses and around the details. The dust was made MIG Syrian Ground pigments.
Conclusion
This is a model which looks like a 70s model with poor fitting. With a lot of work and patience, the result is quite satisfying. However the recent release by RFM of a brand M-ATV gives you a better choice.
Reference: Armorama interior walkaround
Click on a thumbnail to see the full sized picture

|

|
|

|

|

|

|

|

|

|

|

|
|

|

|

|

|

|

|

|

|

|

|

|

|

|

|

|

|

|

|

|

|
|
|
03/2020