
M1A2
Ref
: Tamiya #35269
Plus Model #126
Pro Art Models #PAU-35023
The M1A2 has entered service in 1992. It added a new digitized electronics package and the CITV. The CITV allows the commander to search and designate targets while the gunner engages the current target. This tank also incorporated an auxiliary power unit (APU or basically a generator) in the turret bustle rack to power the optics and electronics without the need to run the turbine engine. The APU has been retrofitted to many M1A1s as well. The M1A2 also required a new commander's cupola because the CITV data screens took up too much room in the commander's hatch.
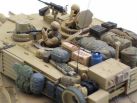
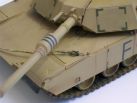
Its main armament remains the 120mm smoothbore gun. It mounts a 0.50 cal MG on the TC cupola which, unlike the previous versions, cannot be remote-controlled from inside, a 7.62mm MG at the loader's station and a 7.62mm co-axial MG.
The kit is released by
Tamiya and corrects some flaws of their M1A1 kit. It can be build
either as a M1A2 or an Army or Marine M1A1. Many parts are
identical to the original kit ones. Tamiya added a new turret as
well as the numerous accessories related to the various variants.
It comes with 8 sprues, a separate hull, vinyl tracks, a decals
sheet, clear plastic for the vision ports and sights, nylon mesh
and plastic card for the front CIP's.
The detail is excellent and the carving is neat. The main flaw is
the lack of the anti-slip coating.
The building is done following the instructions and generates no trouble thanks to a perfect fit and a clear notice. The few modifications done during the building are explained later on.
The chassis is the same as their previous kit. The sides can be detailed for those willing to show the skirts open. The sprockets are drilled out where the mud relief holes should be. The tracks are the kit ones.
The hull comes with some
flaws and missing details.
Under the bow, the weld seam is done with a thin strip of plastic
card soaked with liquid cement and worked with a knife blade. On
the upper surface, the anti-slip coating is realized by applying
a layer of cement over the needed areas than by tapping the
softened plastic with a toothbrush. We must be careful not to
press too hard.
The grab handle on the left of the driver station is moved
forward, the fenders springs are made of metal rod. The gap
between the headlights and their connections with the hull is
filled with a bit of plastic card.
The locking rod of the left fuel hatch is sanded and repositioned
on the correct side. The handles of the RHS bin are replaced by
new ones made of plastic strip.
The rear deck gets two small plates of 2x3mm aside the large lifting hooks. Tow small eyelets are added. The right taillight cable conduit is removed and replaced by a bit of plastic rod being drilled out to fix the metal wire. This wire is then connected to the back of the light.
The skirts are enhanced thanks to their fittings and bolted rubber bands. The bolts are done with plastic rod. The top of the skirts is drilled, the rod is glued inside each hole. When all the bolts are glued, they are sanded down to the right height. The last skirt section is linked to the rear mud flap with a little chain made of thin electric wire first twisted then flattened.
The turret gets its anti-slip
coating too. The missing parts are done with plastic card. There
are the APU conduit, a reinforcing plate between the TC cupola
and the loader hatch, the base and the antenna of EPLRS, the
smoke grenade launchers wiring and its protection. The grenades
are represented too.
The towing cables are replaced by others done with twisted wire.
One remains in the transport position on the turret, the other is
hooked at the front of the tank after having been wrapped in a
strip of paper tissue soaked with white glue. To hook the cable,
several shackles are used like in real. They come from the spare
parts box.
The accessories come from the Tamiya kit, a Pro Art Models set (tarps, large ammo cans, propane tank ...) and a Plus Model set (water and fuel tanks).
The decoration is one showed by Tamiya. It represents a 3ACR tank in Iraq in 2003. The base color is Tamiya XF60. The finish color is a mix of XF60 and XF57 to have a lighter shade. The weathering is done with various pigments to get some color variations.
 |
 |
 |
 |
 |
 |
 |
 |
 |
 |
 |
 |
 |
 |
 |
 |
 |
 |
 |
 |
 |
 |
 |
||