Ref: Kinetic Model #61010 RG-31 Mk3 Canadian Army Mine-Protected Armored Personnel Carrier with RWS
Verlinden #372 .50Cal Machine gun
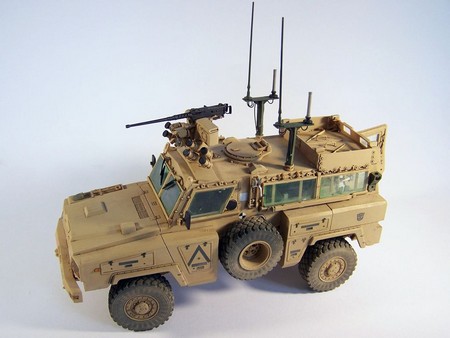
The RG 31 is an armored personnel carrier first made in South Africa and designed to withstand the explosion of antitank mines and light arms fire. Its V shaped hull along with its suspension provide the crew with an excellent level of protection. It is in service with many countries and UN forces for security missions.
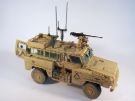
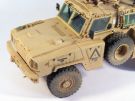
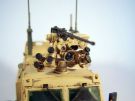
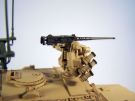
The Canadian army purchased 75 Mk3 vehicles and replaced the turret by a remote-controlled weapon station which can be fitted with either the 0.50 cal M2 HMG or the 7.62 mm C6 MG. In such a configuration the RG31 accommodates 1 driver, 1 vehicle commander and 5 soldiers of whom the gunner. The access is allowed by a large rear door opening to the side.
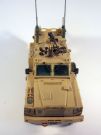
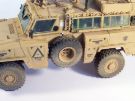
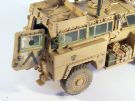
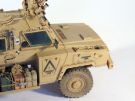
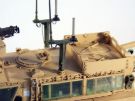
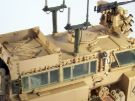
The Canadian deployed the RG31 to Afghanistan and had the configuration modified all along the conflict. The first versions had fire ports on the side windows. The antennas were fitted to mounts at the rear of each sides and the jammers were mounted to a round base on top of the roof. Then the fire ports were deleted and all the antennas were moved to T shaped mounts on the roof. The protection of the soldiers in the roof hatches was improved with blast shield all around the hatches.
The kit
Released by Kinetic it is a sequel of the US version previously released. It depicts a Canadian RG31 with the RWS and the Canadian modifications. The problem is to choose the configuration for the radios and jammers antennas before starting the build. In fact according to the instructions you have to build the whole set of antennas mounts whereas period pictures never show the Kinetic configuration. It is a shame that the final pages dedicated to the decoration of the model show different configurations sticking with reality.
In the box you get 5 beige plastic sprues, 1 clear parts sprue, 1 sheet of photoetched parts, 1 sheet of decals, 5 vinyl tires and an instructions booklet. The level of detail is average and the cast acceptable. The fit may vary and thoroughly cleaning the parts is mandatory. The instructions are sometimes vague where to place some parts. The model comes with a basic interior but Kinetic give only few painting indications.
The build
It begins with the undercarriage and Kinetic has wisely molding all the parts on the same sprue until step 5. Those steps are trouble free. The front axle can be steerable. At step 2 Kinetic give the option between plastic parts D51/D52 (rear leaf-springs mounts) and thinner photoetched ones. The issue is that on the hull the marks are modled for the plastic parts. You should be careful when gluing the PE parts. At step 5 it is advised to glue the exhaust before the axle.
From step 7 you have to assemble the interior sub-assemblies. However at step 7 you also have to build the antenna mounts. At that time your choice of the desired configuration must be made. In fact unlike what I mistakenly did you should not use mounts K35/K36 if you use the T shaped mounts on the roof. About these mounts, only one needs the base K32. The other one is glued onto a specific part including the base. The antennas are wired with one cable fore the jammer ones and two cables for the radios antennas. The cables are made from brass wire bent in a S shape as in reality the cables are secured to a hole in the T mount by a plastic collar.
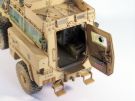
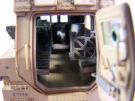
Except from the radio rack the assembly of the interior is easy. To paint it I advise to use the pictures at Warwheels website (see reference section).
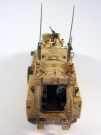
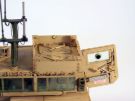
Unlike what Kinetic ask I also built and painted the upper hull interior which is covered at step 13 only. Kinetic ask to drill 2 holes in the roof. You need 4 of tehm. The are used to place the RWS mount. Positioning the gunner monitor requires you thoroughly look at the instructions. In fact no precise location is designated. But if you pay attention to the drawing you will notice two notches in the roof stiffening bar at the back of the hatch.
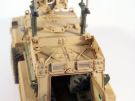
When the interior is fully built and painted it is easier for the next steps to glue the whole hull. At the left rear hull corner there is a large recess with a gap. You need to fill the gap with plastic card. In reality this is a water tank. To avoid it to break I didn't glue the rear door. But all the details and accessories can be added. Because it is easier, I do not glue the lights and the PE guards at this stage. Concerning the rear lights, Kinetic ask for painting them red and orange. This is wrong the central part is clear.
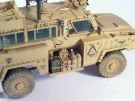
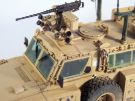
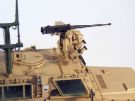
From step 15 you begin the RWS assembly. The M2 HMG is ugly and have to be replaced. The Canadians also use the C6 MG but Kinetic do not provide neither the MG nor the adaptor for the RWS. The assembly of the RWS is time consuming because of the number of parts (3 for each smoke grenade discharger). At step 16 Kinetic show part K7 already in place without giving its number.
At step 19 you have to put the blast shields around the roof hatches. Not all the RG31s were equipped with them. As their assembly is not easy it is better not to use them. The windows frames are glued without the windows yet. Kinetic ask to cut parts C16 whereas the shortened parts are present on the sprue.
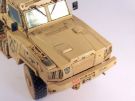
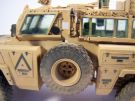
At step 20 you have to drill the engine grille to fit a light from inside. No reference picture shows this light. The plastic lights and their PE guards are not glued yet. You also have to assemble the wheels. The vinyl tires have a cast defect. You have to trim a bit the interior of one side so the rim parts can be aligned. A modeling knife does the trick. The tires are sanded to remove the shiny look.
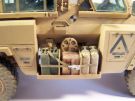
At step 22 you need to install the fuel and water cans support in place of a second spare wheel. The holes to secure the support need to be larger. The fitting of the rear axle is trouble free. However I didn't follow the instructions by gluing a complete sub-assembly. I preferred to first glue the leaf-springs onto their brackets and then the axle.
The assembly is over. However as usual, I do not glue the clear parts before the base paint coat is applied. You also need to bend and glue the PE guards. Those parts are thin and fragile but Kinetic have engraved bending lines which make the shaping easy.
The decoration
Kinetic give 3 options for vehicles in Afghanistan. The third one is not usable as it corresponds to a vehicle with the fire ports in the windows which are not available in the box. The two other options include service and nationality marks valid for the both of them. The units are not mentioned but decoration B include a parachute insignia. The decals are thin but for some of them oversized (some inverted Vs and the parachute badge).
I chose decoration A. Kinetic give very and even too small drawings to locate where to place some decals. On these drawings you discover that you had not to use the blast shileds as well as the side antenna mounts. It was too late for me!
For the base paint I used AK122 Base color for US vehicles OEF/OIF. The windows inner faces were tinted green with a few clear green drops in some Klir. I varnished the base coat before applying the decals. Then I applied a dark brown wash all over the vehicle and I applied a pinwash around the details to enhance them.
To get a dusty look I used various shades of pigments ans I also sprayed some XF-57 Buff all over the vehicle. The tires got the same treatment.
Conclusion
This model is not for beginners but permits to get a nice result. Studying the instructions is mandatory and it is advised to use reference pictures to choose a right configuration (antennas, balst shields ...). It is a pity that Kinetic did not give the choice between the M2 HMG and the C6 MG. Likewise there is no fuel or water cans to fill the empty support on the right side. To paint the interior, unfortunately Kinetic like many manufacturers do not give enough indications. It is useful to refer to the website mentioned below.
Reference : Warwheels RG31 interior pictures series
Click on a thumbnail to see the full sized picture

|
|
|
|
|
|

|
|
|
|
|
|
|
|
|
|
|
|

|
|
|

|
|
|
|
09/2020