references: Trumpeter #01519 LAV-III Wheeled Armoured Vehicle
Djiti Production #35028 Ratchet Straps

The LAV III (light armoured vehicle) is based on the Swiss MOWAG Piranha IIIH 8x8. It was developed in Canada after the cancellation in 1992 of the MRCV (multi-role combat vehicle) project which intended to replace the fleet of M113, Grizzly, Bison APCs and Lynx reconnaissance vehicles. It entered service in 1999 as the main mechanized infantry vehicle of the Canadian Army.
Basically, the LAV III is the combination of a Piranha III hull and the Coyote turret. A total number of 650 vehicles has been built in Canada by General Dynamics Land Systems. From the lessons learned in Afghanistan, the Canadian government decided to upgrade 550 LAV III to improve the vehicle protection against mines and improvised explosives devices. The first of 66 upgraded LAV IIIs was delivered on February 1, 2013.
The LAV III is fitted with 8x8 drive and can reach speeds of 100 kilometers per hour. The vehicle is also equipped with a central tire inflation system, which allows it to adjust to different terrain. Unlike earlier versions of the LAV, the LAV III does not have amphibious capabilities.
The basic armor of the LAV III provides protection against 7.62 mm rounds. A ceramic appliqué armor (MEXAS) can be added, which protects against 14.5 mm rounds. The LAV III is also fitted with a NBC protection system.
The LAV III is fitted with a two-man turret, armed with the M242 Bushmaster 25 mm caliber chain gun and a coaxial 7.62 mm machine gun. One more 5.56 mm or 7.62 mm machine gun is positioned on top of the turret. The LAV III also has eight 76 mm grenade launchers in two clusters of four launchers fitted on each side of the turret.
It has a crew of three and carries 7 soldiers.
The LAV III has seen combat in Ethiopia and Afghanistan.
The kit
Trumpeter issued the kit in 2010. It comes in a sturdy cardboard box which contains 9 light grey plastic sprues, 3 small clear plastic sprues, the upper turret part and the both hull halves which come as separate parts. In addition to the plastic parts, there are 4 photoetched parts sheets, 9 rubber tires, a length of copper wire, a length of brass wire, a sheet of decals, 3 paper sheets to make meal-ready-to eat boxes and various signs, a sheet of masks for the clear parts and the instructions which come in a 16-page booklet with a color separate sheet for the painting instructions.
The kit is based on the earlier Stryker family kits and shares a number of parts with them such as the lower hull and the drive train. The detail is generally good and the fit is good as well provided that you have cleaned the seam lines, particularly on the drive train parts. One of the main concern is the way Trumpeter have represented the numerous tie-down all around the vehicle. They are molded solid and a bit too small. The most courageous can replace them by resin or PE ones.
As
many of the add-on armor panels are molded solid, the kit can only be built into
a Canadian vehicle deployed in Afghanistan. So the decoration for a UN white LAV
III is inaccurate unless you remove the add-on armor panels.
Another option requiring some extra work is to build this kit into a NZLAV (New
Zealand LAV) as deployed to Afghanistan too.
The assembly
It starts with the lower
hull and the drive train. As the hull is the same as the Stryker kit one, you
have to modify the lower towing eye at the front of it. On the LAV instead of
being vertical, the towing eye is horizontal. This requires to cut the lower
part of the molded-on add-on armor, fill the positioning slot and glue the
towing eye at the correct angle.
Those who like to represent the front wheels steered will have to do some
surgery on the front axles parts as they are single parts.
The rest of the drive train builds quite easily. The wheels are not glued yet as
this gives a better access to paint and weather the lower hull.
The rear plate is a bit
more tricky. I found it necessary to sand down the parts G6 and G30 so they can
adjust to the rear ramp. The part G8 which represents the rear vision port lacks
the glass. It is cut from one of the turret member windshield windows I did not
use.
The spare wheel cage is easy to build. However the parts which slide in the
lower PE brackets need some sanding.
The PE jerrycans holders only have one positioning tab so be careful to glue
them at the right angle. The jerrycans are unusable as they have two handles
instead of three. The retaining straps are too short and must be replaced. On
the actual LAV, they pass in a tie-down at the bottom on the holder and in
another one at the top of the antenna mount at the top of the roof.
The upper hull assembly
begins with the large winch on the left side. The details are not really crisp
but this is not that noticeable once the cover is in place. On many LAVs, the
winch is removed providing supplemental stowage place. If you choose not to
install it, don't forget not to build the cable guide at the front of the
vehicle.
The tools holders (parts D8 and D9) present a number of injection marks which
require to be filled. The positioning pins on the tools have to be shorten or
even cut otherwise it is nearly impossible to glue the moveable covers D49.
Trumpeter give the option to represent the driver wire cutter either in plastic
or in PE. As I wanted to represent the vehicle hatch down, I decided to use the
PE parts and modify them so the wire cutter is in the stowed position. In
reality, it only is raised when the hatch is open.
At this stage, I
assembled the main winch cable guide at the front of the vehicle. I think
Trumpeter has messed up things there. It does not look like the real one and its
assembly is a real pain. The pulley assembly on the left of the driver is not
that great either.
The headlight assemblies are also a miss from Trumpeter. First, do not follow
the instructions, unlike what I did, and do not glue the part A20 which is a US
feature only seen on the Stryker headlight clusters. Then you have to slightly
bend the turning light support so it faces forward and not "skyward".
The last part which requires to be cautious is the octagonal engine grill. Even
if this is not noticeable at first sight, it is sided. I don't know whether or
not this the case on the actual vehicle.
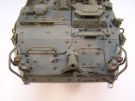
The hull halves are glued together without any fit issue. To end with the hull, I modified the side mirrors to have them in the stowed position. I decided not to use the large bin over the rear ramp. However, you have to install their supports which need a careful sanding to be assembled first and then fit the hull.
The turret is the next
large sub-assembly. Trumpeter designed a new upper part and re-used a number of
their ASLAV turret parts such as the PE parts.
The assembly of the turret body is easy with a correct fit. The add-on armor
plates adjust as expected. The first problem I faced was the fitting of the
gunner and commander sights. You need to cut the tabs of the C24 parts to enable
the fit into the housing C16. The left sight housing does not sit properly on
the turret due to a ill placed positioning slot. To fix it, you have to cut the
tab on the housing and fill the slot prior to gluing the sight. Once done, you
have to face the largest issue of this kit i.e. the turret baskets assembly.
To put it simple,
Trumpeter have got them wrong. The rear basket frame is badly warped, the PE
parts are oversized and the instructions are wrong.
The side baskets can be assembled quite easily until you try to put the mesh
parts in place. The bottom ones should be glued inside and not under the baskets
as stated in the instructions. As they are too large, you need to trim them
before doing so. The next bad surprise is that the side mesh parts have a wrong
shape which prevents a perfect fit around the basket frame. The last surprise is
that the complete baskets do not adjust to the add-on armor plates because of
the washers.
The rear basket is even worse. As it is badly warped, the assembly of the
plastic parts is difficult. The fit inside the large PE sides is all but
perfect. Like for the side baskets, the rear mesh part is a wrong shape and
hard to adapt. The bottom mesh part is too large and should be glued inside the
basket. Finally, the jerrycan holders are too small and cannot receive any
jerrycan.
The last issue with the turret concerns the smoke-grenade launchers clusters. The main support H39 does not facilitate the assembly into the perfect cross shape of the four launchers. It could be done more easily by removing the tabs on the support.
The assembly is nearly
complete. It just remains to glue the antenna mounts, attach the towing cable
and fill the baskets with some crew gear.
The Canadian antenna mounts seems to be oversized so I used the Australian ones
present in the kit. Concerning the cable, the twisted wire provided in the kit
is too thick. So I only used two threads of the six and twisted them again to
get a correct sized cable.
The crew gear comes from leftovers of previous builds. To secure the spare
wheel I used a ratchet strap from Djiti production range.
The painting
As stated above, this vehicle can only be painted solid green. The UN white LAV were not equipped with the add-on armor panels. Furthermore, Trumpeter made a spelling mistake in the mission abbreviation on one decal, it should be UNMEE and not UMMEE.
The base color is Tamyia
XF67 NATO Green. The various straps are painted XF49 Khaki. A coat of glossy
varnish is sprayed before applying the decals. Then to enhance the details, a
wash is brushed in all the panel lines and around the numerous washers. To tone
down the glossy look, a layer of white spirit with a few pigments is applied all
over the vehicle. Then the weathering process begins with the use of pigments in
various shades to break the monotony of a single reference.
The rubber tires are not painted but simply rubbed with a sanding stick than
covered with pigments and rubbed again to remove the excess of pigments.

|

|

|

|

|

|

|

|

|
|

|

|

|

|

|

|

|

|

|

|

|

|

|

|

|

|

|

|
||