ref: Trumpeter 01557

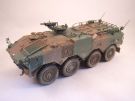
The Type 96 is the latest personnel carrier of the Japanese Ground Self-Defense Forces. It entered service in 1995 in two versions, one armed with a 40 mm automatic grenades launcher and the other armed with the 0.50 cal M2 HMG.
The Type 96 is organized in a classical way with the engine at the front left, the driver on the right, the vehicle commander/gunner behind the driver and a troop compartment at the rear. The crew is composed of a driver and a vehicle commander/gunner. Eight combatants can be accommodated in the rear compartment. The driver has a hatch which can tilt backwards. He can install a glassed hood to drive with a better environment awareness. The gunner has a cupola allowing to fire from inside.
The mounted soldiers have 2 windows on each sides and 4 hatches on the roof. To dismount they use a ramp which is fitted with a door.
365 Type 96 have been built. The Type 96 has been deployed by the JGSDF in Iraq within the Japanese Reconstruction and Support Group from January 2004 to February 2006. However only the Type 96 with the HMG has been deployed and no combat action has been reported.
The kit
Trumpeter first released the type A armed with the grenades launcher. It comes in the usual sturdy cardboard box with a separate compartment for the hull halves. The kit comprises 4 light grey plastic sprues, the 2 hull halves, 1 sprue of clear plastic, 1 sheet of decals, 1 sheet of photoetched parts, a length of chain and 8 soft vinyl tires.
The level of detail is good and the engraving is neat. The molding lines are not always well located and the fit is pretty good with the exception of the headlights protections where putty is necessary.
The instructions come in a 12-page booklet and include 21 steps. A separate color sheet gives the instructions for painting and applying the decals. The instructions usually are clear however some mistakes are present. Trumpeter do not give any indication to paint the details, I specifically think about the lights.
The build
As often and unlike what Trumpeter tell you to do, I start by assembling the running gear then I glue the hull before adding the numerous details. The assembly of the suspension is not an issue if the parts have been thoroughly cleaned beforehand. One must take care to have the wheels properly aligned. These won't be glued till the weathering of the lower hull is achieved.
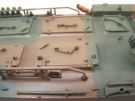
Onece the hull halves and the rear plate are assembled, the various details can be added. Some parts are tiny like parts A41. You need to carefully look at the instructions to see how to place them.
To install the rear ramp, I advise to first glue the jacks then the ramp before adding the hinges under the ramp.
The hatches on the roof have small chains attached to rings A34. To facilitate the fit of the chains, Trumpeter designed the rings A34 open. Once the chain isi n place it is possible to squeeze the rings A34 so they look closed. It is necessary to enlarge the first links of the chains otherwise they would not insert into the rings A34. To ensure a lasting fit, I drilled all the locating marks of the rings A34.
At step 11, Trumpeter ask you assemble 4 identical roof hatches. It is wrong as in reality on 2 hatches the locks are not as the same place. When looking at the drawings of the following steps you can see the correct location of the locks.
At step 12, Trumpeter ask you glue the driver hatch in the open position. I opted for depicting it closed. To do so I had to modify the arms of the hatch and thin the interior of the hatch so it would fit the opening in the hull. Lacking of reference material I omitted to sand the strip of plastic around the hatch. In fact this strip is part of the glassed hood built at step 13. It is a weird choice made by Trumpeter.
Before assembling the cupola I completed the hull with the headlights protections. They present large gaps you need to fill with putty. Then you need to shape the PE protection grilles without any template. To ensure the bonding I drilled out holes with a 0.3 mm drill. The rear view mirrors are added at the last step when the kit is painted.
The cupola is finely depicted. However the assembly is a bit tricky in particular concerning the jacks C26 and C27 of the weapon cradle. To fit the weapon on its cradle a lot of dry fit tests aare necessary as well as the thinning of several parts. I hollowed the sight C15. Trumpeter give as an option a tripod.
The decoration
You have no choice as the type A was never deployed to Iraq. So the plain green decoration is excluded. For the colors I used the ones in the Tamiya range dedicated to the JGSDF that is XF-72 JGSDF Brown and XF-73 JGSDF Dark Green. From the reference pictures it appears that the camouflage scheme is quite free. So I didn't follow the scheme proposed by Trumpeter.
For the decals, I chose option 3 representing a vehicle of 4th company of the Fuji School Brigade Infantry Regiment. Whatever option you choose, you need to paint the registration plates white before applying the numerals. Trumpeter omitted the white background.
The weathering is voluntarily light. I applied a dark brown pin wash in the recesses and a drybrush made of the base colors lightened with some XF-15 Flesh. The lower hull got a dirty look by spraying various shades of pigments with an airbrush.
Click on a thumbnail to see the full sized picture
|

|

|

|

|

|

|

|

|

|

|

|

|

|

|

|

|

|

|

|

|

|

|
|

|

|

|

|

|

|

|

|
|||
05/2019