Ref: Tamiya #35168

The Japanese Type 74 MBT is the successor
of the Type 61. The first prototypes were built in 1968 and the standard MBT
entered service en 1974.
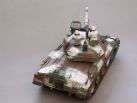
It is fitted with a low profile turret which mounts a British 105mm L7A1 gun
with a Japanese breech. Its original suspension system enables the crew to lower
the tank profile.
The version depicted by Tamiya is the D which was the first to get a thermal
sleeve. The name Winter version is a fantasy and not an official one.
The kit is a reboxing of the one release by
Tamiya in 1979. It comes with 4 dark green sprues only one of which being new, a
small sheet of clear styrene for the IR light, soft and glueable vinyl band
tracks (Tamiya replaced the original tracks), a decals sheet and the
instructions booklet.
The original sprues show their age and the ejection marks as well as the molding
seams are quite large. Thus, we need to prepare every part cautiously. The level
of detail is good (by the 70's standard) but some parts are simplified.
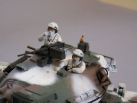
The new sprue D bears a new gun with the thermal sleeve, towing eyelets, two new
exhaust pipes, two new figures in winter dress and some pieces of equipment like
two pairs of skis.
The fit is very easy, the only difficulty was encountered during the building of
the turret basket.
The building is very simple and was done straight from the box. The only additions are the vision blocks glasses and the replacement of the towing cable which is too short hence preventing the rotation of the turret. We also needed to fill the gap under the sponsons between the lower hull sides and the upper hull as the tank doesn't have any skirt and this gap is particularly visible.
According to the instructions, the lower hull with the running gear were built first. The suspension arms can be positioned in any position by removing a pin. Tamiya give a template to align the all wheels properly. The latter are not set in order to ease the painting. A gap in the final drive housing is filled with thick plastic card.
The upper hull firstly gets a plastic card rectangle on each side to hide the gap between both hull halves. The various permanent accessories are glued. Only the tools and the spare track links are put apart to ease the painting. Before gluing the hull halves, the driver vision blocks glasses are added. They are not designed on the clear styrene sheet but this one is large enough to cut 3 glasses.
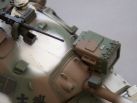
To begin with, the turret gets the various
vision blocks glasses. The glue seam must be thoroughly sanded. The rear basket
is very stiff and doesn't properly fit in the locating holes. We need to bend
the fixation rods carefully. The use of CA glue is recommended.
To open the hatches, we need to fill all the ejection marks on their inner
faces.
Tamiya give as an option a combat simulation device.
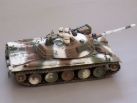
The winter camouflage doesn't stick to any
precise pattern as shown on the pictures of the website
JGSDF Maniacs. The white paint is applied
over the two tone camouflage (Tamiya XF73 JGSDF Dark Green and XF72 JGSDF
Brown). These references are new in Tamiya range and are not the one mentioned
in the instructions. To make some color variations, some accessories are painted
in XF74 JGSDF Olive Drab or XF62 Olive Drab.
Once the basic camouflage applied, a gloss varnish coat is sprayed before
setting the decals. Tamiya sheet enables to represent 4 different tanks for
various units. A layer of mat varnish is sprayed to seal the decals.
The white patches are applied with an airbrush and before they are dry, they are
gently rubbed with a brush soaked with thinner insisting on their edges. Some
scratches are also done.
The tracks are painted NATO black then get several washes prior to getting a
silver drybrush. Then, they are glued over two roadwheels to simulate the
sagging typical to the Christie running gears. For this step, the new vinyl used
by Tamiya eases a lot the modeler job. ModelKasten also issue separate links
tracks.
Conclusion
This model is easy to build. It can easily be improved by replacing some molded
details like the various handles. The use of a photoetched set can prove useful.
References :
JGSDF Maniacs
Photoetched set
Lion Roar #LE35085

|

|
|
|

|

|

|

|

|

|

|

|

|

|

|

|

|

|

|

|

|

|

|

|
|

|

|

|

|

|

|

|

|

|

|
|

|

|

|

|

|
||||