Ref: Academy 13219

The K9 Thunder self propelled gun has been
developed to replace the M109 in the Republic of Korea army. Its development
started in 1989 and the first prototypes were completed in 1994.
It entered service in 1999. Currently about 300 guns are supposedly in service
in South Korea. Finland also recently adopted the K9.
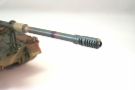
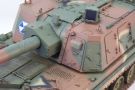
The K9 mounts a 52 caliber 155 mm gun. It can fire up to 30 kms with the standard HE round and up to 40 kms with the rocket assisted round. It rate of fire is 2 rounds per minute with a maximum of 6 rounds per minute or 3 rounds in 15 seconds.
The K9 is fitted with an automatic fire control system including an internal navigation system and a gun laying system. It can fire within 30 seconds from a prepared position or 60 seconds from the move.
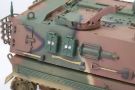
The vehicle is protected against some caliber and artillery splinters by a welded steel armor. It also features a NBC protection system. For its self-defense, the crew has a 0.50 cal MG mounted at the vehicle commander station.
The crew consists of five : a vehicle commander, a gunner, an assistant gunner, a loader and a driver.
The kit
It is issued by Academy
and comprises 5 light beige plastic sprues, two hull halves, vinyl tracks,
polycaps, a length of thread, a sheet of decals and a instructions booklet.
The level of detail
is correct but some parts are soft i.e. the headlights guards and the turret
rear baskets. Some ejection pin marks are ill-placed. The instructions are
correct and the parts are well numbered.
The fit is good and
the putty is nearly useless.
The build
It usually begins
with the running gear and comes with no trouble. As usual, the roadwheels are
not fitted to facilitate the painting of the lower hull.
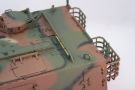
At step 5, it is better to build the whole rear panel, that is parts D1, D3, D4
and D54, before adding the details. Likewise, the mudguards D7 and D8 are glued
before the details are added. To facilitate the fit of the mudguards, the
vertical positioning mark must be sanded.
At step 8, the
ejection pin marks on the back of the hatch D15 must be thoroughly sanded. The
D13 handles axis look too high but are right. On the contrary, Academy has badly
molded the stops of the handles.
The left headlight must be glued more inward to allow the installation of the
protection grille at step 9.
At step 10, if you
intend to use the figure, you need to glue the base E1 but there is no position
mark on the turret base B2.
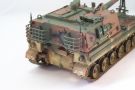
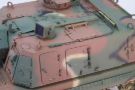
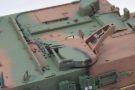
Steps 11 and 12 are dedicated to the turret assembly. The edges of the tools are
thinned. The cable is done with twisted metal wire instead of the thread
provided in the kit.
At step 13, I decided not tot use the 0.50 cal MG. The level of detail is soft and the pivot A18 way too large. The bracket A14 is thinned. For the VC hatch, you need to thin the hinges brackets A32, A33 and A34.
At step 14, the assembly of the baskets is easy but the rods are oversized.
The step 15 concerns the gun assembly. It remains mobile thanks to the polycaps. But it is so heavy that it can't stay at an angle. On the radar face A72, a sink mark needs to be filled. The part A75 has a cut-out on its right side whereas it should be on the left to allow the insertion of the radar base. The easiest to do is to bevel the whole edge.
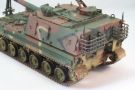
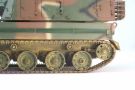
At step 17, you need to assemble the tracks. They are the 70s vinyl type with pins to melt. Even CA glue can't adhere. So I attached them with staples after having removed one link.
The build is concluded by the installation of the gun travel lock which remains mobile. However you need to fill the gaps between the parts and fix the ejection pin marks.
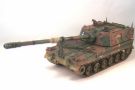
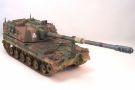
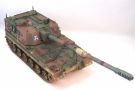
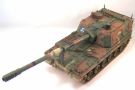
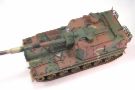
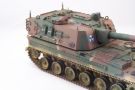
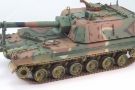
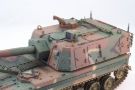
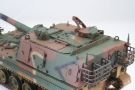
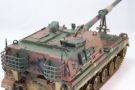
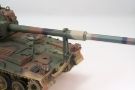
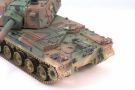
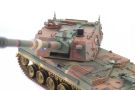
The decoration
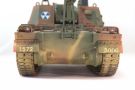
The camouflage scheme is a copy of the US Army MERDC scheme and features two main shades of dark green and brown with additional patches of black and sand. Academy gives references for 6 various paint brands. As I only use Tamiya paints I had to find appropriate matches and do my own mix for the brown.
So the green is XF-65 Field Grey, the brown is a mix of XF-64 Red Brown, XF-52 Flat Earth and XF-2 Flat White. The sand is XF-57 Buff. The camouflage is sprayed free hand .
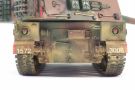
After applying a coat of gloss varnish, the decals are applied. Academy does not give any indication of units or vehicle registration numbers. So you need to refer to pictures found on the internet to be close to real markings.
The weathering is light except for the running gear. A wash is applied to enhance the recesses and the raised areas. Some streaking is done with pigments and oil paints. For the running gear, various shades of pigments are sprayed with the airbrush then washes are added to break the monotony.
To facilitate the painting of the tracks, some matt varnish is first sprayed as a primer. Then some XF-52 is used as a base. The rubber pads are painted XF-69 NATO Black. Then the tracks are weathered like the lower hull.
Conclusion
This kit is quite pleasant to build. The true low point is the tracks which require some replacement. For those who like detailing their models, reference pictures are few. Let's hope that with the guns in the Finnish army service more will be available.
Click on a thumbnail to see the full sized picture
|
|
|
|
|

|
|
|
|
|

|
|
|
|

|
|
|
|
|
|

|
|
|
|
|
|
|

|
|
|
05/2017