Ref: Freedom model kits #15107 CM-34 TICV Clouded Leopard
Historical background
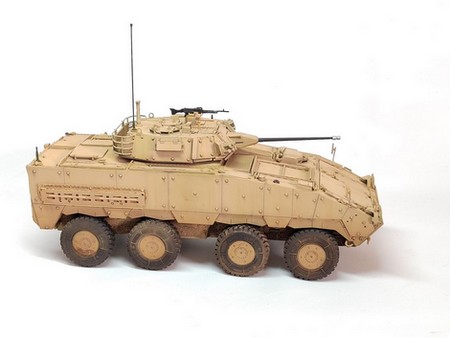
The CM-34 Clouded Leopard is a 8-wheeled infantry combat vehicle designed par the Republic of China. It is a variant of the CM32/33 armored personnel carrier. It entered service in 2019.
The CM-34 is armed with the 30 mm Bushmaster II automatic cannon, a 7.62 mm coaxial MG and a roof mounted 7.62 mm MG.
Its hull is protected by a set of ceramic armor modules. The V-shaped floor ensures the protection against landmines. The CM-34 is also protected against NBC weapons. It is equipped with a fire suppression system.
The crew is of 3 : a driver, a gunner and a vehicle commander. It can accommodate 8 soldiers who access the vehicle by a ramp at the rear.
The CM-34 is still under production. The Republic of China army should be issued 234 vehicles in total.
The kit
Released in 2019 as a limited edition, it depicts the standard version of the CM-34. The box comprises 5 beige sprues, 1 clear part sprue, 1 lower hull, 8 vinyl tires, 8 polycaps, 6 resin parts, 3 photoetched parts plates, 1 decals sheet, 1 instructions booklet and 1 color plate for the decorations. The unused parts are marked in the parts diagram. Several extra parts come from the original model released by FMK under the reference 15103.
The molding is average with many large mold lines, some soft details and many ill placed ejection pin marks. A thorough cleaning of the parts is usually necessary. The fit is overall correct even though the positioning of several parts lets to be desire. The photoetched parts fit well to their destination with the exception of the tools straps which are too long.
The model offers few options. All the hatches can be opened however with the exception of a simplified driver compartment there is no interior. The side racks are an option.
The notice has 12 pages and splits the build into 15 large steps and a myriad of sub-steps (15 just for the step 1). Some parts misnumbering will be explained later on.
The decals sheet comprises numerous registration plates as well as individual numbers. Two decoration options are offered : 4 tone large geometrical patches camo and plain sand camo as used during exercise Han Kuang 2019. The color references given by Freedom modl kits are in the range by GSI color with some correspondences in the AK, Mission models and Tamiya ranges. However they don't always look right.
The build
Step 1 comprises 15 sub-steps which are as many sub-assemblies mixing suspension elements and the 3 upper hull plates. To keep coherent I started by the suspension elements and shifted to steps 3,4,5,6 and 8 to finish the suspension.
The cleaning of the
parts is tedious but necessary to allow a good fit. At steps 1-E to 1-J you need
to glue parts C59, C58, C60 and C61 at the end. It is advised to mark the
various sub-assemblies before they are used in the following steps.
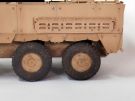
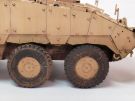
At step 1-K the tires are not installed till the rims are painted.
At step 2 it is possible to assemble the driver station. It is simplified. Part A39 does not fit well to the hull DK-3. You have to shorten the sides.
At step 3 installing the footstep requires some attention.
Steps 4 to 6 do not need any comment. However at the end of the assembly the shock absorbers do not rest on the triangles C46, C47 and C48. It is the same at step 8 for the part C49. But all the wheels are aligned which is the most important.
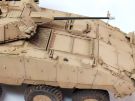
The suspension being done I went back to steps 1-L to 1-O. As I dislike gluing the large hull parts with many fragile details I first glued the hatches to stiffen the plates then I assembled the hull roof which is step 10. The hull sides were warped. To allow a perfect fit, it is better to temporarily install the rear plate with masking tape. Then you need to glue the front part which needs a light sanding of its edges and the center part. Finally you can glue the rear part.
The installation of the details can be done. At step 1-M the left side rear hatch is B46 and not B48 as mentioned on the notice. At step 1-N the rear view mirrors are not glued before the paint is applied. It is better the glue the PE plate PE4 before the left side headlight cluster.
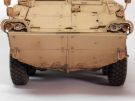
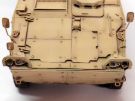
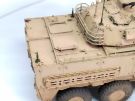
Step 7 deals with the rear wall. The wall itself is part A57 and not C14. The tools straps at step 7-4 are too long.
At step 8 the installation ofthe rear wall must be done according to the sequence given by the instructions. The bins and rack 7-1 and 7-2 do not fit well. You have to thoroughly sand them to have them fit. The ramp can be glued in the lowered position.
At step 9 the wheels can be installed without the tires.
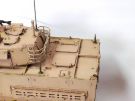
The step 10 being achieved earlier (hull roof installation) the hull assembly is over or close to. You still have to glue the side armor plates which normally is planned at step 14-6. To do so you must be careful as there is no positioning marks.
There is no steps 11 to 13.
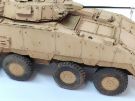
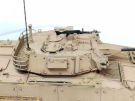
Step 14 deals with the turret assembly. The step comprises 5 sub-steps numbered 14-2, 14-3, 14-4, 14-5 and 14-6
At step 14-2 you have to assemble the cannon and its mantlet. There is no positioning mark for the both parts. The muzzle is hollowed. Part H32 does not fit well.
At step 14-3 the supports C44 for the crew figures are not necessary if the hatches are closed. The photoetched part PE5-10 is very fragile. You have to bend it in the right direction. If you do it wrong it will break.
At step 14-4 you have to ned part PE5-1 which represent the shells ejection port. It is considered as an option. In fact when the turret is completed it is invisible.
At step 14-5 the difficulty is to position the additional armor plates because the marks are way too tiny. It is better to glue parts C1 before the hatches C43.
At step 14-6
assembling the turret basket is another difficulty. At first you have to
assemble the frame and then you must glue the mesh parts. For the frame Freedom
tell to remove the vertical rods. In fact they just need to be shortened. But if
you do so the mesh parts will sit higher than the second horizontal bar which is
wrong. The best is to glue the unaltered parts. The result is a gap between the
central supports. When the frame is set, these supports are removed and replaced
by bits of styrene of the right size.
The bottom mesh parts installation is easy. The mesh parts PE5-4 must be bent to
fit inside the basket sides. To do so Freedom do not give any template but have
engraved tiny marks on the edges of the parts. Then you just need to bend the
mesh parts until you have the right shape.
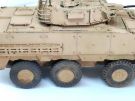
Step 15 and the 8 sub-steps concern the side racks. Bending the parts is tedious but the result is satisfactory. The hinges can be either fixed or workable. To have the workable hinges a photoetched template is provided. The racks can be presented lowered or stowed. However as they are not camouflaged in the 4 tone camo it is better not to glue them before the vehicle is painted.
The decoration
Two options are given: tan or 4 tone geometrical camo. The first one was applied for the exercise Han Kuang 2019, the second is the present standard camo.
Having failed to use the AFV Club masks to paint the present camo, I shifted to the tan camo. To paint it I used the reference XF-93 Light brown DAK 1942. Then I applied highlights with the base color enlightened with flat white.
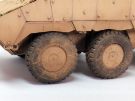
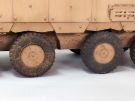
For the weathering I applied a pinwash around the details with US modern vehicles brown wash. The variations of shades and the streaking were done with water pencils in various colors. The dried earth on the drive train the the lower hull were done by sprinkling pigments over diluted flat varnish. Several shades were used. The tires were rubbed with the same pigments and fixed with flat varnish.
Conclusion
Despite some little mistakes and a big part cleaning job, the result is quite satisfactory.
Click on a thumbnail to see the full sized picture
|
|

|
|
|
|
|
|

|
|
|
|
|
|
|

|
|
|

|
|
|
|
|

|
|
|
||||