Ref : Hobby Boss #83897 South African Olifant Mk1B MBT

The replacement of the Olifant Mk1B was officially evaluated in the 1990s. In 1998 the South-African government decided that no funds would be dedicated to a new MBT. Thus the Olifant Manufacturing Company was tasked with improving the Olifant Mk1B and solving the identified shortcomings.
The only external difference between the Mk1B and the Mk2 is the panoramic sight for the commander. The other improvements include an upgraded fire control system associated to a computerized battle system which allow the tank to fire on the move night and day in all weather conditions. The Mk2 has a hunter-killer capacity which currently makes it the best tank in Southern Africa. Its laser rangefinder is efficient up to 10 km.
The tank is armed with the GT3B 105 mm rifled gun produced in South Africa. It is fitted with a thermal sleeve and a bore evacuator. It can fire 4 types of ammo: High Explosive Squash Head, White Phosphorus, High Explosive and Armor-Piercing Fin-Stabilized Discarding Sabot (with a range of 3 km). 64 rounds are stored in the tank. The secondary armament is a 7.62 mm coaxial MG with 6600 rounds of which 2000 are ready to fire.
The protection is ensured by a package of additional armor plates and a double floor against the mine threat. 8 smoke-grenades dischargers are installed at the rear of the turret sides and the tank can create a smoke screen by injecting fuel into the exhausts.
The crew is of 4: the driver is offset to the right of the hull, the commander and the gunner are on the right side of the turret and the loader is on the left side.
Only 26 Olifant Mk2 have been built. The tank is in service with the South African army only. 4 tanks are utilized in the Armour School of Tempe. The 22 remaining are in storage.
The kit
Released in 2018, the kit was originally named Mk2 but Hobby Boss changed the denomination into Mk1B on the notice and covered the mentions Mk2 on the box by stickers. However the kit does represent a Mk2.
It includes 6 beige plastic sprues, 4 non workable individual track links sprues, 2 hull halves, 2 turret halves, 1 clear parts sprue, 24 plastic tires for the roadwheels, 1 photoetched parts plate, 1 decals sheet, 1 instructions booklet and 1 color sheet for the decorations. The total number of parts is 578.
The cast is of high quality with some parts being very fine. The fit is overall good. Hobby Boss made several mistakes some of which being hard to fix (depiction of the additional armor on the turret). The antislip coating is not present. Weirdly Hobby Boss give clear parts for the windows with the exception of the gunner sight one.
Concerning the decoration Hobby Boss give 4 options on the decals sheet plus generic numerals to complete 3 registration plates.
The build
Before starting the build I decided to fix the mistakes of the kit which are mainly on the turret. The only mistake I could spot on the hull concerns the headlights protections which only have 2 rows of bolt heads on the top instead of 3. So the 3rd one needs to be deleted.
On the turret I started by modifying the gun bellow which is to stiff to give it a more realistic look. To do so I milled the top of the bellow. I added some putty under the bellow to create the sag. When the putty was dry I carved the whole bellow.
Then it was time to
tackle the real mistakes. The most difficult one was to fix the depiction of the
add-on armor on the turret front. To make the cast easier Hobby Boss did not
represent the gap between the turret and the armor plates. So I milled the
plastic then I used a sharp blade to thin the inner face of the armor plates.
The second big mistake is that the turret sits too high on the hull. To fix this
I removed the ring inside the turret and sanded down the one on the hull.
On the sides of the turret Hobby Boss made the bins doors handles and the
footsteps as holes. In reality there are recesses so you need to add a back
plate from plastic card.
On the right side Hobby Boss have omitted to carve the panel lines of the bins
doors and the latter do not have the right shape. I did not fix the shape
however I carved the missing panel lines.
Finally on the turret roof left side the door of the bin near the loader hatch
is wrong. The molded one is deleted and replaced by a new one made of 0.25 mm
plastic card.
Once those modifications complete, the build can start with the hull and the suspension from step 1 to 7.
At step 1 you need to properly align the swing arms.
At step 4 you have to glue the rims comprizing the rubber tires to the roadwheels. The latter present (mud release ?) holes which are barely visible because the inner diameter of the rim is too wide. Without a lathe it is very hard to modify the rims precisely and regularly.
At steps 6 and 7 you need to assemble 105 links for each track. As the upper run is invisible behind the skirt I only assembled the necessary links which remain visible. Then I painted the lower hull, the running gear and the tracks before shifting to the upper hull.
At step 8 you have to insert the clear episcopes. The slot for the central one needs to be enlarged. Before gluing the side skirts and the rubber mud flaps, the both hull halves are glued together. On the upper one Hobby Boss have omitted a position light. The recessed location is present but empty. A piece of plastic card fills the back and a bit of 0.66 mm styrene rod represents the light.
At step 10 you have to thin the rods to attach the crowbar D15.
Steps 11 to 16 do not require any comment.
At step 17 the interior of the headlights is painted silver then the clear glasses are glued. The interior of the housing is painted XF-52 then the headlights are installed on the hull.
From step 19 on the turret build begins with the assembly of the gun.
At step 20 once the episcopes are glued to the commander station the both turret shells are glued together. At this time you notice that Hobby Boss have omitted the front of the original Centurion turret armor. There is a void on each side of the gun. So I made a base with plastic card pieces then I created the mantlet canvas with putty. I concluded with the riveted strips made of styrene strips and rod bits.
Steps 21 to 25 do not require any comment.
At step 26 it is possible to represent the panoramic sight shutters open or closed. As I didn't have any reference about the sight glass, I used the closed shutters.
The build is now complete. You just have to make the antislip coating with very thin sand sprinkled onto some matt varnish applied with a brush.
The decoration
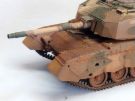
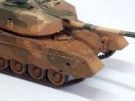
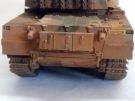
The 3-tone camouflage scheme is the same for the 4 decoration options proposed by Hobby Boss. The colors used are XF-52 for the base and XF-58 for the green and XF-78 for the tan.
The base color is applied with an airbrush then the outlines of the color patches are drawn with a paintbrush and a diluted paint. The interior is then filled with an airbrush. Some touch-ups are done by hand.
For the tracks the base color is XF-84. The surfaces in contact with the roadwheels and the ground are drybrushed with some XF-56.
For the weathering I first applied a dark brown wash all over the model. Before it is dry some streaking is realized with a large brush. Then oil dots are applied and drawn downward with a thinner moistened brush. For the dusty look I used some Vietnam Earth pigments. A first effect is created with a mix of pigments and Tamiya acrylic thinner applied with an airbrush to the lower parts. Then fry pigments are sprinkled over the horizontal surfaces and tapped with a brush.
Conclusion
It really is a pity that Hobby Boss made so many mistakes on the turret. However one can thank the company for having released this ultimate tank avatar of the Centurion which is original and pleasant to assemble despite its flaws.
Click on a thumbnail to see the full sized picture

|

|

|

|

|

|

|

|

|

|
|

|

|

|

|

|

|

|

|

|
|

|

|

|

|

|

|

|
|

|

|

|

|
||
Last updated: 08/2024